|
|
  "Mom"
 
| |
|
| |
|
 Namesless in BHW
Posts: 10368

Location: At the race track with Ah Dee Ohs | How cool is that!!! I am super stoked about this. Now to find some old furniture!  |
|
| |
|
 Roan Wonder
 
Location: SW MO | What a cool idea!!!!
Thank you Gail & Gwen |
|
| |
|
 Big Gun
Posts: 2216
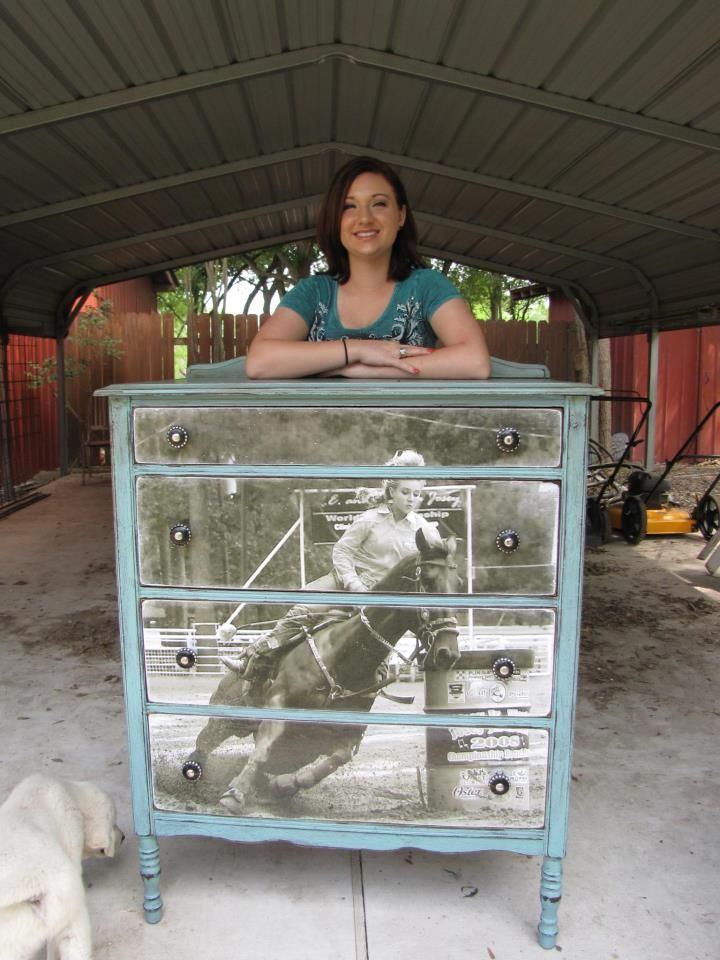
Location: Texas | i like the one with the barrel racer pic on the front of dresser drawers |
|
| |
|
Elite Veteran
Posts: 837
Location: looking forward to retirement!!!!!! Yahoo!!!!! | Thank you Gail I was sad when I read she couldn't post anymore. I love her creativity and talent. |
|
| |
|
 Life Saver
Posts: 10477
Location: MT | I have two old apple crates that I want to restore! I'll have to take pictures of them tonight to post for Gwen. I'd sure love to hear how best to go about it.  |
|
| |
|
 Elite Veteran
Posts: 1131

| I have a cabinet I'd love to have an idea for. Hopefully I can get a pic tonight. It's not necessarily old but it needs a new 'job'. |
|
| |
|
 Living on the edge of common sense
Posts: 24138
Location: Carpenter, WY | Very cool. I have a couple of barstools I want to redo :) Got the fabric and foam for the top but don't have ANY ideas what to do with the legs |
|
| |
|
Roan Wonder
Location: SW MO |  |
|
| |
|
 Ms. Poutability
Posts: 2362
Location: In my own world | 3rdtimesacharm - 2013-04-18 1:57 PM i like the one with the barrel racer pic on the front of dresser drawers
Did u see that on FB? The dresser was teal? That was soo awesome. I want to do that with a black and white wedding photo of ours |
|
| |
|
Ms. Poutability
Posts: 2362
Location: In my own world | qhbreeder58 - 2013-04-18 1:59 PM
Thank you Gail I was sad when I read she couldn't post anymore. I love her creativity and talent.
What? When did this happen? |
|
| |
|
 I Suck and am not Funny
Posts: 6254
| That's a great idea.
I envy her work, but also am honest enough with my self to know I do not have the patience for that type of thing.
Kudos' for her and those of you that do.
|
|
| |
|
Ms. Poutability
Posts: 2362
Location: In my own world | RWR - 2013-04-18 5:28 PM
That's a great idea.
I envy her work, but also am honest enough with my self to know I do not have the patience for that type of thing.
Kudos' for her and those of you that do.
Ok who hacked RWR's account? That is the nicest thing I have ever heard(read) you say. Who are you and where is RWR? |
|
| |
|
I Suck and am not Funny
Posts: 6254
| livinonlove&horses - 2013-04-18 5:35 PM
RWR - 2013-04-18 5:28 PM
That's a great idea.
I envy her work, but also am honest enough with my self to know I do not have the patience for that type of thing.
Kudos' for her and those of you that do.
Ok who hacked RWR's account? That is the nicest thing I have ever heard (read ) you say. Who are you and where is RWR?
Every post is all me, and only me
I am not shy of giving props where props are due. Never have been.
Also am not shy about admitting my shortcomings, although they are VERY few.
|
|
| |
|
 The Original Cyber Bartender
Location: Washington | She is an all around treasure for BHW.
She can also sew, remember the pillows I asked her to make out of my Mom's clothes after she had passed. She made pillows into works of art. |
|
| |
|
Ms. Poutability
Posts: 2362
Location: In my own world | RWR - 2013-04-18 5:38 PM livinonlove&horses - 2013-04-18 5:35 PM RWR - 2013-04-18 5:28 PM That's a great idea. I envy her work, but also am honest enough with my self to know I do not have the patience for that type of thing. Kudos' for her and those of you that do. Ok who hacked RWR's account? That is the nicest thing I have ever heard (read ) you say. Who are you and where is RWR? Every post is all me, and only me I am not shy of giving props where props are due. Never have been. Also am not shy about admitting my shortcomings, although they are VERY few.
It still sounded to nice to be you. I must miss those props you dish out. Not meaning to me personally. But that was very nice of you to say about Gwen. She really is an inspiration!! |
|
| |
|
 Veteran
Posts: 274
Location: Somewhere Over The Rainbow | livinonlove&horses - 2013-04-18 5:24 PM qhbreeder58 - 2013-04-18 1:59 PM Thank you Gail I was sad when I read she couldn't post anymore. I love her creativity and talent. What? When did this happen?
I never heard about this either. I loved the stuff she restored. It was so pretty. |
|
| |
|
 Elite Veteran
Posts: 1092
Location: OK | Oh see!! I wanted to buy an old antique trunk the other day to redo with maybe some conchos and dots and old rubbed looking paint! Wish I woulda got it now :(
|
|
| |
|
 Forever Young at Heart
Posts: 2611
Location: Way down yonder in the indian nation~Oklahoma | Here is one I've started today... all sanded and glued and base coated... not I'm stuck! I would love some inspiration and instruction!!!
(Great... now the pic's wont post from my iPad... :( ) |
|
| |
|
Blessed 
Location: Here | |
|
| |
|
 40Somethings
Posts: 4596
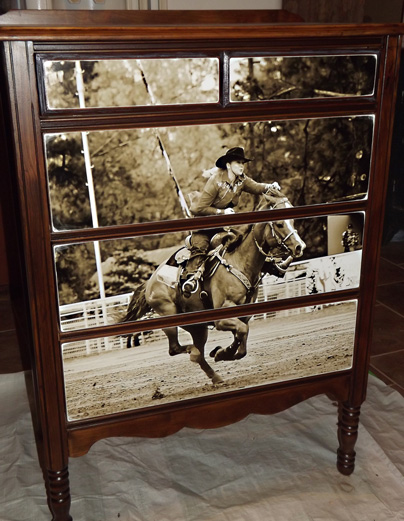
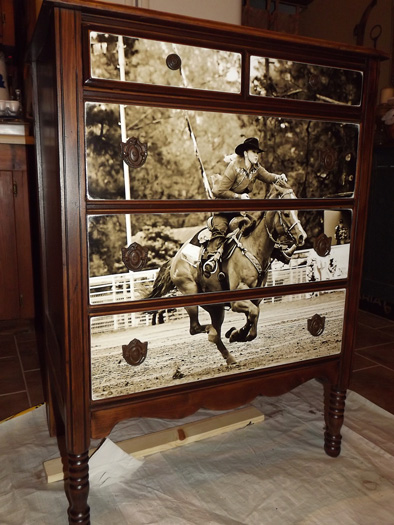
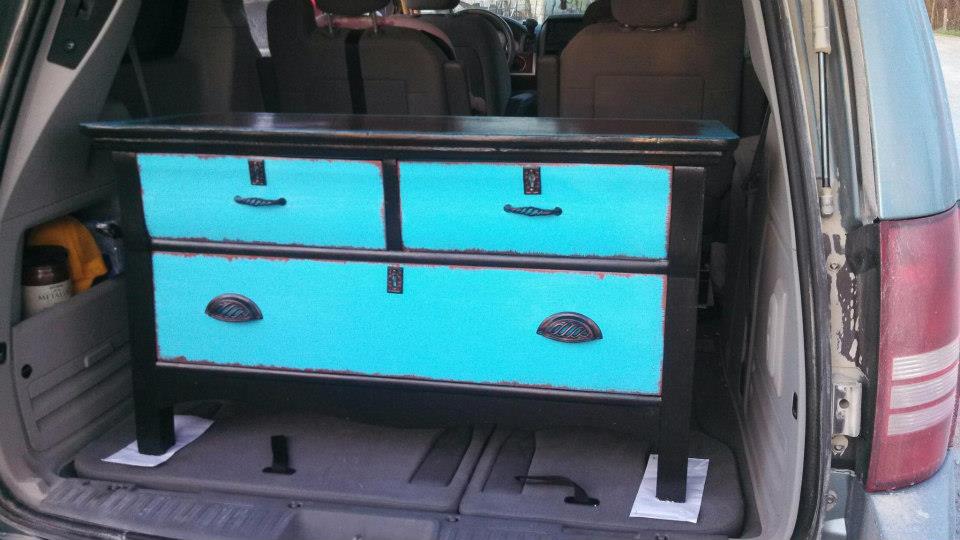
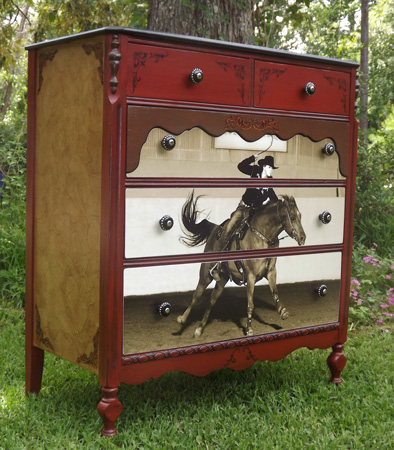
Location: Jacksonville, FL | Heres the dresser you guys are talking about
  |
|
| |
|
Extreme Veteran
Posts: 498
Location: tx |   |
|
| |
|
Extreme Veteran
Posts: 597
| FLDrmRnr - 2013-04-18 7:15 PM
Heres the dresser you guys are talking about
okay THIS is bad to the bone!!!! Flipping awesome!!! |
|
| |
|
I keep my change in my pockets
Posts: 2985
Location: MN | Oh why can't she post anymore??? I loved looking at her work and drooling over it. Please tell me why also. |
|
| |
|
 Lover of Old Things
Posts: 989
Location: South East Texas | Thanks for all the nice words....but this ain't about me :)) this is about what y'all can do....whether you believe it or not. I will post some of my projects here....on this thread....but I'm hoping all of y'all hit a yard sale, flea market, thrift shop....even a dumpster or curb freebie works. Go out n find a chunka wood to redo and make yours.
I'm gonna go ahead and post the rocking chair photos on that thread. Then the latest project will be posted here. |
|
| |
|
Lover of Old Things
Posts: 989
Location: South East Texas | Lol I was gone....but after a few messages with Gail today she reinstated my account. Glad to be back.... |
|
| |
|
I keep my change in my pockets
Posts: 2985
Location: MN |  |
|
| |
|
Living on the edge of common sense
Posts: 24138
Location: Carpenter, WY | thejerseylilly2000 - 2013-04-18 6:47 PM Lol I was gone....but after a few messages with Gail today she reinstated my account. Glad to be back....
I didn't realize you were gone, but am sure glad you're back . You really do inspire alot of us with ideas and things that can be done . You really do inspire alot of us with ideas and things that can be done |
|
| |
|
 Fact Checker
Posts: 16575
Location: Displaced Iowegian | thejerseylilly2000 - 2013-04-18 8:47 PM Lol I was gone....but after a few messages with Gail today she reinstated my account. Glad to be back....
I think your posts are VERY inspirational. They most certainly show just what a person can do with an ugly piece of furniture. Thank you for sharing your ideas and designs.......Most artisans are not as willing to "share"........... |
|
| |
|
 Elite Veteran
Posts: 1163
Location: Foot of the Smoky Mtns, East Tennessee | That dresser is beautiful!!
|
|
| |
|
Lover of Old Things
Posts: 989
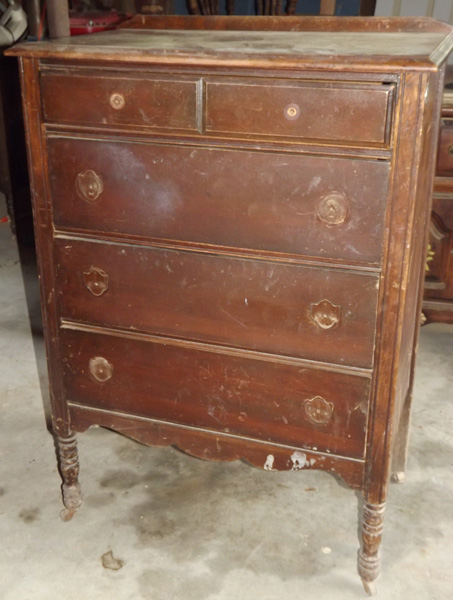
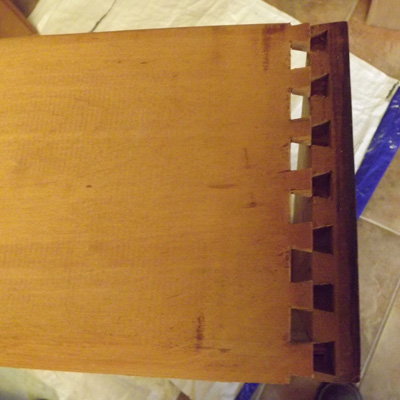
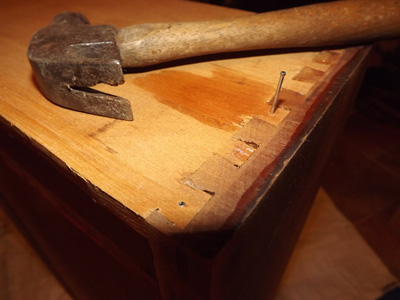
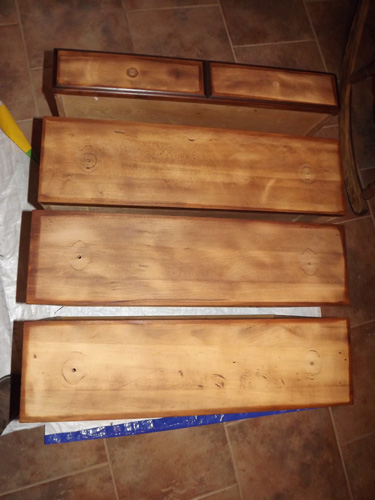
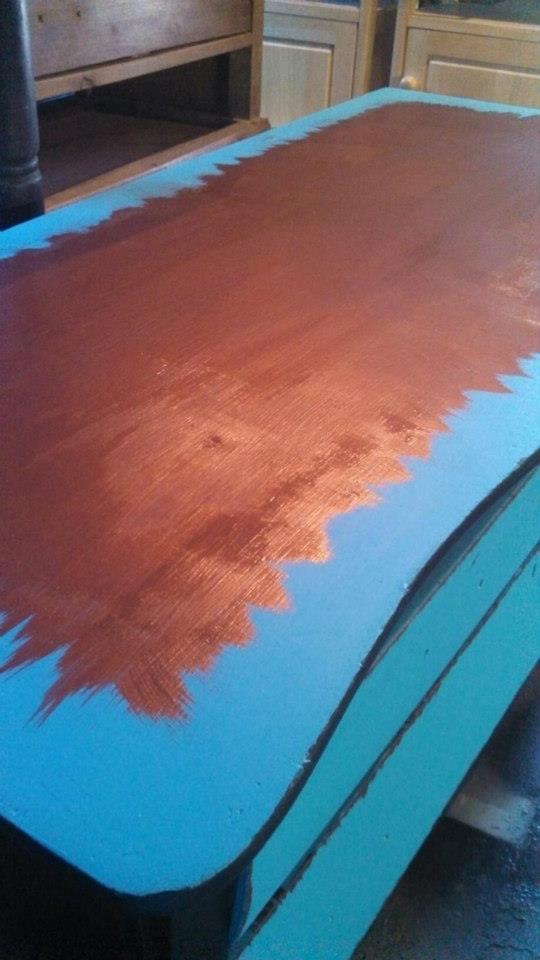
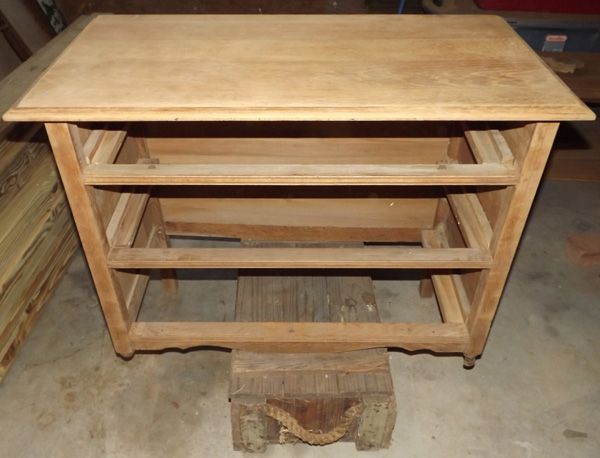
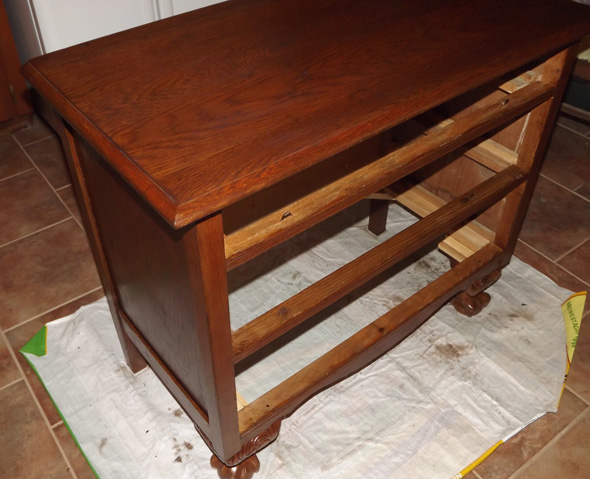
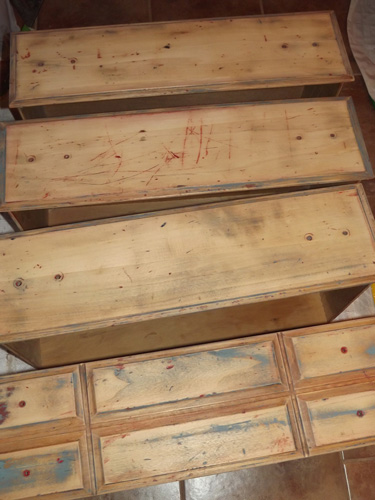
Location: South East Texas | Ok first off the teal chest with picture isn't my work.....but I'm glad someone posted that chest of drawers. Because last week....when the picture started circulating.....a friend contacted me and said..."Can you do this for me?" I'd just purchased a chest of drawers almost identical a few days before at an estate sale and hadnt even given it any thought as to what I would do to it. With all the decoupaging I've done in the past....I said...YES!!!! If I'da seen that picture before she asked me if I could do it...I would have probably done one for my daughter. So....without further ado.....Here she is....I've dubbed her...."Second Chance Cowgirl" but the lady is calling it Micah's Memory Chest.
As it was when I purchased it...minus the hardware.
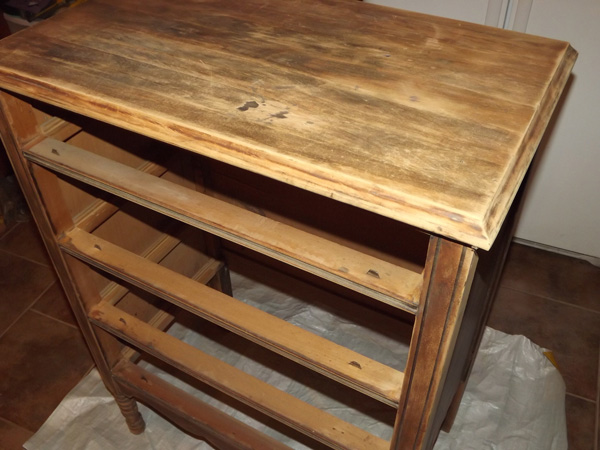
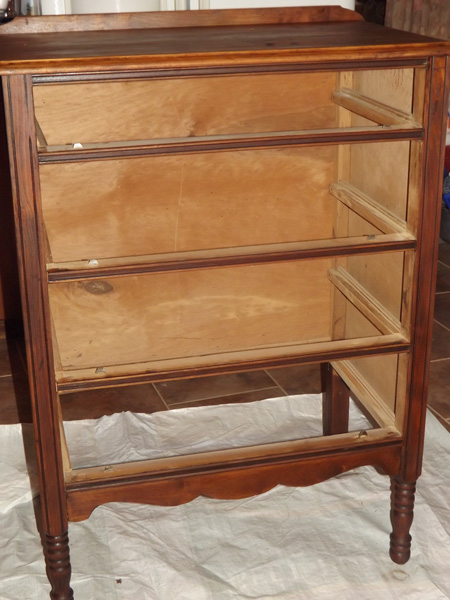
then step by step...sanding....staining....a clear finish.....and the drawers sanded down...repaired with a tad of glue and a few tiny nails. just so the dove tails are sturdy joints again. Then I stained the very edges of the drawers so that what wood shows will be the same color as the rest of the chest.
Edited by thejerseylilly2000 2013-08-15 10:41 AM
 (2013-04-16-001.jpg) (2013-04-16-001.jpg)
 (2013-04-16-003.jpg) (2013-04-16-003.jpg)
 (2013-04-16-006.jpg) (2013-04-16-006.jpg)
 (2013-04-18-002.jpg) (2013-04-18-002.jpg)
 (2013-04-18-003.jpg) (2013-04-18-003.jpg)
 (2013-04-18-005.jpg) (2013-04-18-005.jpg)
 (2013-04-18-006.jpg) (2013-04-18-006.jpg)
Attachments
----------------
 2013-04-16-001.jpg (88KB - 321 downloads) 2013-04-16-001.jpg (88KB - 321 downloads)
2013-04-16-003.jpg (96KB - 312 downloads)
2013-04-16-006.jpg (93KB - 310 downloads)
2013-04-18-002.jpg (51KB - 582 downloads)
2013-04-18-003.jpg (38KB - 288 downloads)
2013-04-18-005.jpg (60KB - 309 downloads)
2013-04-18-006.jpg (54KB - 320 downloads)
|
|
| |
|
Namesless in BHW
Posts: 10368
Location: At the race track with Ah Dee Ohs | teehaha - 2013-04-18 8:53 PM thejerseylilly2000 - 2013-04-18 6:47 PM Lol I was gone....but after a few messages with Gail today she reinstated my account. Glad to be back.... I didn't realize you were gone, but am sure glad you're back. You really do inspire alot of us with ideas and things that can be done
I didn't either! I also am glad your back...cuz I'm going hunting for a piece of furniture! |
|
| |
|
The Original Cyber Bartender
Location: Washington | I think you should open a store or consignee your pieces. |
|
| |
|
Lover of Old Things
Posts: 989
Location: South East Texas | I'd love to have a store...but not in the cards....too much overhead to either buy or rent a building. (altho I do dream lol) I've also thought about consigning....but honestly....I love working out of my home. I keep the grandbaby three days a week...while my daughter works...and I can enjoy him....and playing with furniture at the same time. :)) Maybe later...but he's too precious not to enjoy. |
|
| |
|
The Original Cyber Bartender
Location: Washington | I hear what your saying Gwen. Now please address buying good antiques and bringing them back, without changing what the original maker had in mind. I have bought old pieces (75+ years old) and they had been painted white(hate white paint, worse yet red) and restoring it was my worst nightmare....until I found a place that could dunk them in stripping solution, only to find out later one should not do that? How do you decide, restore or simply change it? |
|
| |
|
Lover of Old Things
Posts: 989
Location: South East Texas | When I'm on the hunt...and I find something. I open and close the doors and drawers...take them out and look inside at the bones. I try to refrain from buying things that have been previously painted. Because I absolutely hate stripping....did I mention I hate stripping furniture??? Hate it!!!!! I don't like the chemicals...I don't like the mess....and I don't like the fact that 99% of the strippers don't really work all that well. Then your left with goo you have to use mineral spirits or alcohol to get off...which doesn't work either most of the time. But it does neutrilize the stripper....kinda. LOL So...I try my best to find pieces that just have the original finish on them. They are so easy to sand down.
Repairs don't bother me...as long as the piece is all there....and relatively sturdy. Loose or peeling vaneer doesn't bother me anymore...since I found out how to get it off fairly easy. a soaking wet towel...and a hot iron...along with a putty knife. After a minute or two of the hot wet iron towel treatment....that stuff peels off. It will leave your iron a mess tho. Get one that you don't plan to use on clothes.
Once a piece is sanded or stripped down....if you like the wood grain....staining and a clear finish is easy. Doesn't take long at all....If there are scars and dents that I don't like...I will fill with wood filler...and paint.
Also....I have a set price in mind...if I can't get it for that...I move on. there is always something else out there.
Edited by thejerseylilly2000 2013-04-18 9:38 PM
|
|
| |
|
Lover of Old Things
Posts: 989
Location: South East Texas | Oh....and one more thing....make sure it's all real wood!!!! that new pressed together stuff doesn't work well for much of anything. If you see pressed wood....keep moving....Unless you just love the piece and plan to just paint over the original finish with Chalk paint. I have been playing with that a little bit...and it seems to be ok stuff.
Also...anyone else out there that has advice or experience doing something...chime in. My way isn't the only way. It's what works for me. And anothers ideas or techniques may work better for someone. :))
Edited by thejerseylilly2000 2013-04-18 9:44 PM
|
|
| |
|
Lover of Old Things
Posts: 989
Location: South East Texas |
LOL @ ugly pieces of furniture. I seem to gravitate to those things. ;-O its like they scream...pick me...pick me!!!! |
|
| |
|
"Mom"
| |
|
| |
|
 Baby Blue's
Posts: 7306
Location: Texas | FLDrmRnr - 2013-04-18 8:15 PM Heres the dresser you guys are talking about
Dang. Now that is amazing.
I'd love for this type of thing (furniture makeover) to catch on like other crafy-type things have caught on...I mean, *I'm* not crafty AT.ALL (I toss clothes if a button comes off) but I have a great admiration for those with the talent and patience to do it -- and I'll support them with my $$ :). |
|
| |
|
 The Bird Lady
Posts: 6440
Location: The end of the Earth, SE AR | What type of sandpaper do you use if there is alot of paint on a piece vs. just a think coat or a finish over a stain?
For large areas on a dresser or large piece do you hand sand or use an electric sander - what kind?
How do you get into the nook and crannies to sand? |
|
| |
|
Lover of Old Things
Posts: 989
Location: South East Texas | Gail I use Minwax Stains and Minwax finishes. I like to stay with the same brand so there isn't a chemical reaction between the two. |
|
| |
|
Lover of Old Things
Posts: 989
Location: South East Texas | I have a stash of sandpaper from 80 grit down to 200 grit. 80 being rougher ,200 being fine. I have an electric palm sander as well as an orbital sander. Sand all the surfaces I can with those then sand the rest by hand. Usually the 80 grit first to get all the finish off. It's not so rough that I have to go to smaller grit. After a good coat of Sealer I will lightly sand by hand before a go on ith sealing. Just takes any small roughness out.
Edited by thejerseylilly2000 2013-04-19 9:02 AM
|
|
| |
|
Lover of Old Things
Posts: 989
Location: South East Texas | Sometimes sanding paint can be tricky. If it gets gummy when your sanding it's most likely latex based and you'll have to use stripper. |
|
| |
|
Lover of Old Things
Posts: 989
Location: South East Texas | And always always wear a mask to avoid breathing the dust. And if possible do your sanding outside. Preferably on a breezy day so you can stay downwind.
Edited by thejerseylilly2000 2013-04-19 8:59 AM
|
|
| |
|
| FLDrmRnr - 2013-04-18 8:15 PM
Heres the dresser you guys are talking about
Anyone know how to get the picture on the drawers like that?! I have a dresser very similar to this one!! I may have to try it!! |
|
| |
|
 Looking for Lady Jockey
Posts: 3747
Location: Rodeos or Baseball games | bocephus's mama - 2013-04-19 6:56 AM
FLDrmRnr - 2013-04-18 8:15 PM Heres the dresser you guys are talking about
I'd love for this type of thing (furniture makeover) to catch on like other crafy-type things have caught on...I mean, *I'm* not crafty AT.ALL (I toss clothes if a button comes off) but I have a great admiration for those with the talent and patience to do it -- and I'll support them with my $$ :).
This is amazing!!! |
|
| |
|
Lover of Old Things
Posts: 989
Location: South East Texas | This is what I am doing to the chest of drawers I have posted in this thread. |
|
| |
|
| Oooo Awesome! Sorry I miss understood! I thought you were just refinishing that one with that beautiful wood! Can't wait to see!!! |
|
| |
|
 Uh....never mind
Posts: 2696
Location: Midwest Farmer's Daughter: Central Illinois | My mom has a pretty awesome wood shop & she is always going to classes to learn how to do things she's not sure of. She's always so excited to come home & tell us about what she's learned. Last week she went to a class to learn about finishes & was so stoked because one of the techniques she learned will undo (or at least minimize) the damage my roommate did to my vintage Ethan Allen coffee table & milk stool by sitting on them (& moving around...) with blingy jeans. Took huge gouges out. We thought we were going to have to strip everything down & refinish them but nope! So awesome.
I would highly recommend looking up wood shops in your area if you are looking to do this kind of thing for fun - you will get expert advice for cheap or even free & they will be able to tell you about classes as well. |
|
| |
|
Lover of Old Things
Posts: 989
Location: South East Texas | The lady I'm doing it for preferred the natural wood vs. paint. So I just refinished it instead of painting. Waiting on the picture now so that I can put it on the drawers. |
|
| |
|
| Where did you order the picture from in order to get a large enough one? |
|
| |
|
Lover of Old Things
Posts: 989
Location: South East Texas | I haven't gotten the picture done yet. I have it ready to take to Office Depot or Walgreens. The do posters. I'm going both places in person to check quality and prices. But one of those two places for sure. |
|
| |
|
Lover of Old Things
Posts: 989
Location: South East Texas | And so y'all don't think I'm ignoring a question.....when I get to working on something...sometimes it's the end of the day or wee hours of the morning when I get online. I hope there are others that chime in with advice too. |
|
| |
|
| I've got a question... What made u decide to decoupage instead of using an adhesive sticker? |
|
| |
|
Lover of Old Things
Posts: 989
Location: South East Texas | I've never worked with adhesive stickers on wood. I've done alot of decoupaging. Plus I think having an adhesive sticker made would be alot more expensive? |
|
| |
|
The Bird Lady
Posts: 6440
Location: The end of the Earth, SE AR | Thankyou so much for the information on sanding. |
|
| |
|
 Undercover Amish Mafia Member
Posts: 9992
Location: Kansas | There was definitely one project I wanted to do and it was take an older dresser and put a picture on the drawers. Gwen, do you know how to do this?! I can try to find an example, but I loved the one I saw!
ETA: saw the one from above, thats the one!!!!
Edited by hoofs_in_motion 2013-04-19 2:39 PM
|
|
| |
|
Lover of Old Things
Posts: 989
Location: South East Texas | hoofs_in_motion - 2013-04-19 2:37 PM
There was definitely one project I wanted to do and it was take an older dresser and put a picture on the drawers. Gwen, do you know how to do this?! I can try to find an example, but I loved the one I saw!
ETA: saw the one from above, thats the one!!!!
Yes go back thru the posts. The chest that I've posted, I am doing this to. Only difference is I refinished instead of painting the chest. |
|
| |
|
Life Saver
Posts: 10477
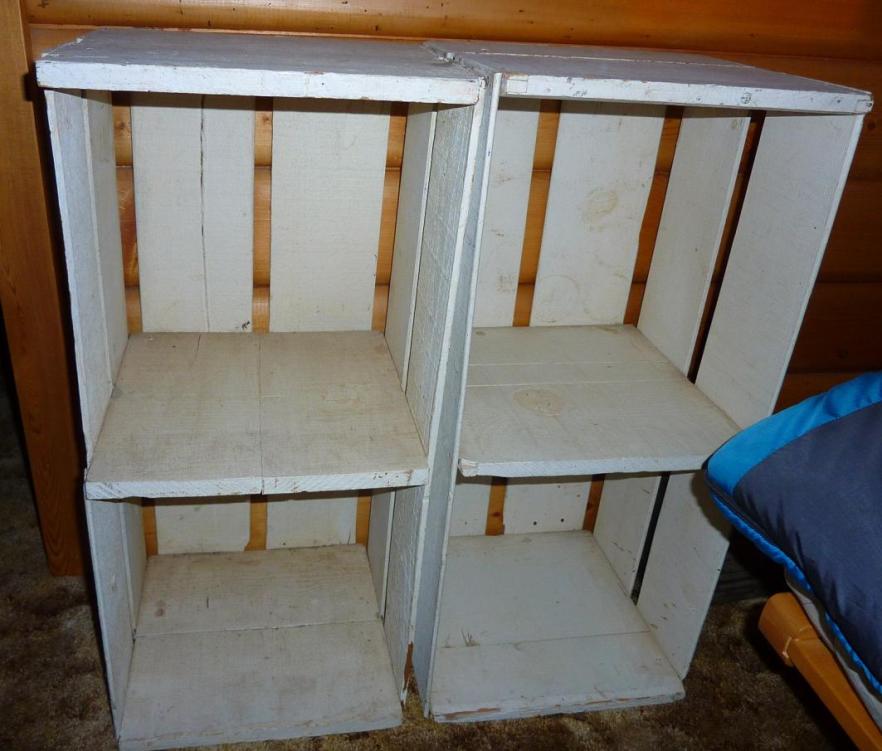
Location: MT | Here are the old apple crates I'd love to do something with. I am unsure what color to do and really like the look of a little bit of white showing through the color on the edges, like they are worn. I've also printed out a couple old labels that I was planning on mod-podging on them once they were painted. We use them for bookcases in our office.
Would sure like to hear your ideas and suggestions!
 (1.JPG) (1.JPG)
 (2.JPG) (2.JPG)
Attachments
----------------
1.JPG (72KB - 308 downloads)
2.JPG (86KB - 319 downloads)
|
|
| |
|
Lover of Old Things
Posts: 989
Location: South East Texas | RuggedChica,
you could go any direction on those. I would give the pieces a good cleaning with a wet rag first. Let that dry...then come back and just lightly sand by hand, before painting. Paint them whatever color you like....and instead of "sanding down" to the white...just leave some of it showing...instead of painting completely over the white. Or...you could antique the white with a little brown paint and a wet sea sponge. A little paint goes a long ways like that. you could even do that after you mod podged the pictures on them..and antique those as well with the brown. Almost like a tea dye affect. And when I say tiny amount...I mean....a dot the size of a pencil eraser on the wet sponge...then act like your wiping it down. you can adjust the amount by using a clean area of your sponge to take some off....or put a little more paint on if it's not what you want. You can do that too after you paint with a color if you so choose. Acrylic craft paints work well for that. |
|
| |
|
Lover of Old Things
Posts: 989
Location: South East Texas | Ok Office Depot and Walgreens were both a flop on getting a poster made. Walmart however is a go. :) and cheaper. |
|
| |
|
Lover of Old Things
Posts: 989
Location: South East Texas | Anyone hit any thrift stores, yard sales or flea markets this weekend and make any finds? |
|
| |
|
 I Prefer to Live in Fantasy Land
Posts: 64864
Location: In the Hills of Texas | thejerseylilly2000 - 2013-04-21 10:44 AM Anyone hit any thrift stores, yard sales or flea markets this weekend and make any finds?
I love looking at all of your pictures as it makes me want to start doing something crafty again.
|
|
| |
|
Lover of Old Things
Posts: 989
Location: South East Texas | Go for it then. Don't wait...I find if I wait I will never do it. Even if you don't have alot of time to work on something....an hour here or there and soon it will be finished. I literally have to MAKE myself do the prep work....after that's done it's all fun stuff :) |
|
| |
|
| What size of poster did you end up ordering? |
|
| |
|
 Help is on the Way
Posts: 2717
Location: Belvidere,SD | I want to redo my old bedroom set and it is handmade. I would like to do it in a light blue or turq. finish. How does chalk paint work? |
|
| |
|
Life Saver
Posts: 10477
Location: MT | Thanks jerseylily!!!!!!!!!!!!!!!!!!!!!!!!!!! I will post pics once I get around to doing it. I also have a church pew on my front porch that I will be doing once I figure out what the heck color I want on it!. |
|
| |
|
Lover of Old Things
Posts: 989
Location: South East Texas | Poster size is 24x36. |
|
| |
|
Lover of Old Things
Posts: 989
Location: South East Texas | Speedy Dr Pepper - 2013-04-22 9:13 AM I want to redo my old bedroom set and it is handmade. I would like to do it in a light blue or turq. finish. How does chalk paint work?
You go get whatever color of flat latex paint you want (paint dept home depot, lowes walmart etc) ....a quart goes a long long ways. buy a box of plaster of paris (comes in like a milk carton at Home depot) I take out a cup of paint instead of mixing all of the whole quart. for every cup of paint you take 2 tblsp of plaster of paris...and mix just enough water in it to mix it up...then add that to the paint and mix well. Then paint your piece. Supposedly your not supposed to have to sand it at all. But I would lightly sand it by hand with 150 grit paper. Wipe the dust off with a damp towel and then paint. Finish with either a wax (which I haven't tried yet but alot do it that way) or you can finish with minwax water based sealer...either gloss or satin finish.
Edited by thejerseylilly2000 2013-04-22 12:17 PM
|
|
| |
|
 "Special"
Posts: 2364
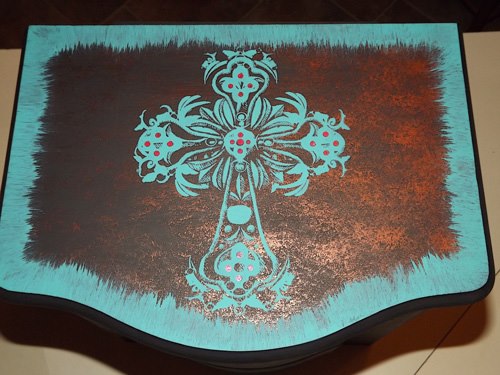
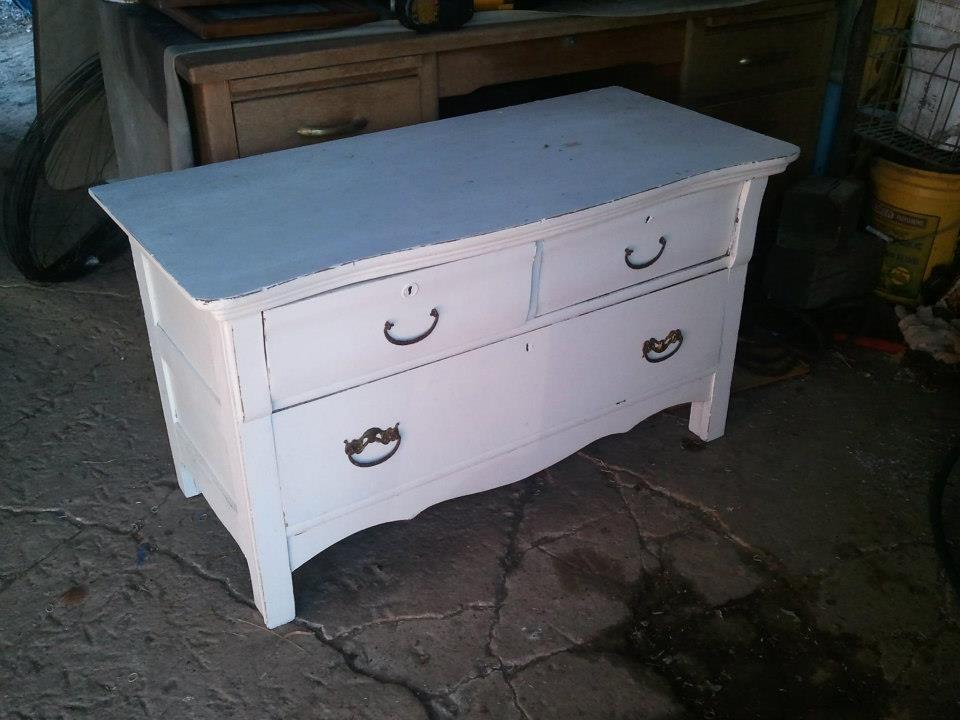
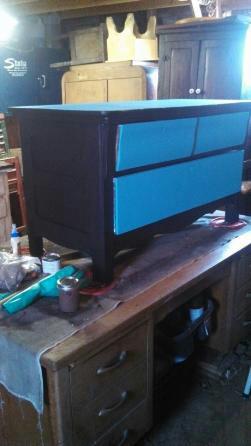
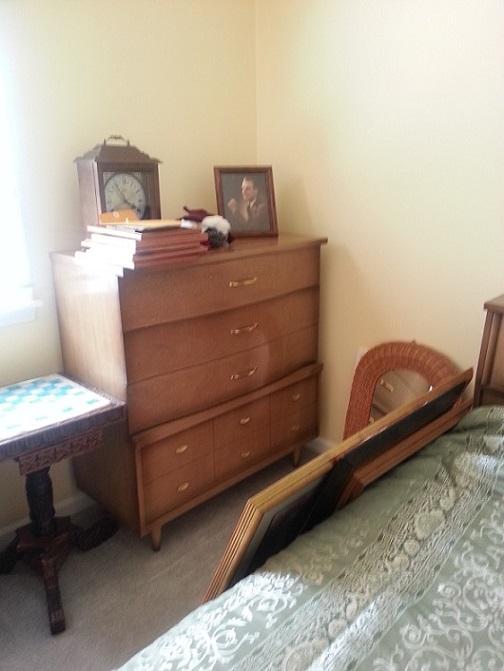
Location: in the middle of backwoods iowa | Seeing this dresser you did inspired my ideas for one my cousin is working on for me.
The first pic is inspiration, then my before and a during. still trying to find the cross I want to finish it.
 (77063_522646674414936_368282216_n.jpg) (77063_522646674414936_368282216_n.jpg)
 (196283_4964385639152_894569693_n.jpg) (196283_4964385639152_894569693_n.jpg)
 (408582_10200802793049914_1968144955_n.jpg) (408582_10200802793049914_1968144955_n.jpg)
Attachments
----------------
77063_522646674414936_368282216_n.jpg (50KB - 303 downloads)
196283_4964385639152_894569693_n.jpg (73KB - 307 downloads)
408582_10200802793049914_1968144955_n.jpg (16KB - 299 downloads)
|
|
| |
|
Lover of Old Things
Posts: 989
Location: South East Texas | Looking good!!! If your after that particular cross....I got it at Walmart. It's a screen printing stencil. Worked great. And you just stick it on and paint...peel off and wash with warm water and it remains sticky for use after use.
Also looks like you have a pretty neat little stash of furniture there ;)
Edited by thejerseylilly2000 2013-04-23 1:02 PM
|
|
| |
|
 Elite Veteran
Posts: 707
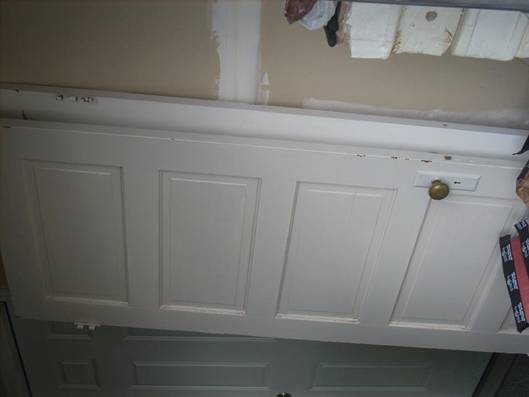
Location: The stix of Utah | I bought a couple of antique doors that I am going to turn in to wall decorations. However, I was told by the lady that they were taken from a 100+ year old home and that she couldn't guaranty that it wasn't lead based paint on the doors. Have you ever removed lead based paint? What precautions do I need to take? How hard is it to do? Here are my old doors and what I am going to make...
Edited by Jaders Mom 2013-04-23 2:00 PM
 (old doors.jpg) (old doors.jpg)
 (Old Door above stairs 3.jpg) (Old Door above stairs 3.jpg)
Attachments
----------------
old doors.jpg (14KB - 293 downloads)
Old Door above stairs 3.jpg (48KB - 286 downloads)
|
|
| |
|
Lover of Old Things
Posts: 989
Location: South East Texas | I did do one door. And I was fairly sure there was lead based paint on it as well. The paint on it however was curled up and peeling off. So I scraped as much as I could off. Sanded it as little as possibly needed by hand wearing a mask and vacuuming up any dust afterwards. Then prime with KILZ. Then paint.
Do some research on your own about painting over lead paint. I surely wouldn't want you to do anything harmful based soley on my advice. I think Home Depot carries a small kit you can test to see if paint is lead based. That might be your first step. Then go from there.
|
|
| |
|
Help is on the Way
Posts: 2717
Location: Belvidere,SD | thejerseylilly2000 - 2013-04-22 12:13 PM Speedy Dr Pepper - 2013-04-22 9:13 AM I want to redo my old bedroom set and it is handmade. I would like to do it in a light blue or turq. finish. How does chalk paint work? You go get whatever color of flat latex paint you want (paint dept home depot, lowes walmart etc) ....a quart goes a long long ways. buy a box of plaster of paris (comes in like a milk carton at Home depot) I take out a cup of paint instead of mixing all of the whole quart. for every cup of paint you take 2 tblsp of plaster of paris...and mix just enough water in it to mix it up...then add that to the paint and mix well. Then paint your piece. Supposedly your not supposed to have to sand it at all. But I would lightly sand it by hand with 150 grit paper. Wipe the dust off with a damp towel and then paint. Finish with either a wax (which I haven't tried yet but alot do it that way) or you can finish with minwax water based sealer...either gloss or satin finish.
so I should sand it before painting? I will try the small nightstand first, maybe this weekend I will get to it. thanks!!! love all your posts! |
|
| |
|
Mrs. Txdad
Posts: 14084
Location: the fantasy txdad married | What an awesome thread |
|
| |
|
Add Poop. It Works!
Posts: 1360
| Did you stain, paint and stencil a door into a sign a while ago?? That has inspired me to stain, paint and stencil some kitchen cabinets...someday... |
|
| |
|
Mrs. Txdad
Posts: 14084
Location: the fantasy txdad married | Hope she doesn't mind...this is the dresser jerseyfilly is doing with the picture on it...LOVE IT!!!!! OMG!

|
|
| |
|
Lover of Old Things
Posts: 989
Location: South East Texas | Ok ya'll....the moment of truth has arrived. I think it was totally worth it. It's not finished....I have to do all the coats of mod podge over the picture....and then coats of sealer.....but this was just a blast to do. If you haven't seen the rest of this thread folks....go back to the beginning and you'll see all the other posts leading up to these photos. Thanks ya'll.....this thread is fun for me to being able to share.
First I measured and measured and remeasured before cutting the poster.
Then I lightly sanded the edges of the poster before putting it on the drawers.
I put a good coat of mod podge on....then laid the piece in place on each drawer...one at a time. Making sure there were no air bubbles under neath....just rub them out. quickly.
 (2013-04-23-009.jpg-small.jpg) (2013-04-23-009.jpg-small.jpg)
Attachments
----------------
2013-04-23-009.jpg-small.jpg (99KB - 299 downloads)
|
|
| |
|
Mrs. Txdad
Posts: 14084
Location: the fantasy txdad married | ha ha, I got excited and posted before you. Sorry!
wish you were closer, would love this done to my antique dresser :) |
|
| |
|
Lover of Old Things
Posts: 989
Location: South East Texas | Haha you are quick!!!! Thanks :)) |
|
| |
|
Elite Veteran
Posts: 707
Location: The stix of Utah | thejerseylilly2000 - 2013-04-23 7:58 PM
I did do one door. And I was fairly sure there was lead based paint on it as well. The paint on it however was curled up and peeling off. So I scraped as much as I could off. Sanded it as little as possibly needed by hand wearing a mask and vacuuming up any dust afterwards. Then prime with KILZ. Then paint.
Do some research on your own about painting over lead paint. I surely wouldn't want you to do anything harmful based soley on my advice. I think Home Depot carries a small kit you can test to see if paint is lead based. That might be your first step. Then go from there.
Thank you! I have been looking online and only found info for refinishing walls in a home with lead based paint. I never even thought about going to Home Depot. I will look for those kits and try to find out more information. Hopefully there isn't any lead paint and I am good to go. I can't wait to get started!
P.s. your dresser turned out gorgeous! |
|
| |
|
Lover of Old Things
Posts: 989
Location: South East Texas | Thank you ... The dresser .... is sitting here in my kitchen and I just can't stoop coming up with other pictures I'd like to do on pieces....endless possibilities with this technique.
Please keep us posted on the lead kit as it may be useful to others on the board as well in their refinishing projects :) and your progress as well on the door. |
|
| |
|
 Elite Veteran
Posts: 1119
| I am sooooo in love with that dresser! It is truly amazing! |
|
| |
|
Elite Veteran
Posts: 1074
| LOVE, LOVE, LOVE it!!!!!!!! |
|
| |
|
Lover of Old Things
Posts: 989
Location: South East Texas | Hey everyone, I've noticed in my area that the first weekend in may seems to be filled with antique shows, trade days, etc that are going on...y'all might check around in your area to see what's happening....might find that special piece :)) |
|
| |
|
"Mom"
| |
|
| |
|
Looking for Lady Jockey
Posts: 3747
Location: Rodeos or Baseball games | I LOVE THIS!!!!!!!! Wish I was crafty and had time. Again when your ready for a holiday your more than welcome to come and paint........I mean stay. |
|
| |
|
Regular
Posts: 51
Location: The land of mosquitos | That dresser is amazing! GREAT JOB! I think you may be near me in the S TX area. (I think I saw this posted on FB.) :) Do you do this for a living or just as a hobby? (Sorry if I missed it earlier.) I have a piece that came from my grandparents house that I would love to have worked on but can find no one to restore it in my area. Again - GREAT JOB! I love this thread. Please keep it going! |
|
| |
|
Extreme Veteran
Posts: 482
Location: Texas, and loving it | My daughter and I do alot of furniture makeovers. We made our own chalk paint at first but now we use Anne Sloan Chalk Paint. Yes it is more expensive but the finish you get is amazing and it goes a long ways. Whether you make your own chalk paint or use Anne Sloan you do not need to sand your pieces first. Just paint it. It sticks really well, even to metal. Will try and post some pics later.
|
|
| |
|
Lover of Old Things
Posts: 989
Location: South East Texas | ArenaRat....I've only used it on a couple pieces. So...from experience would you say it would stand up to use for years? I just don't know that much about it. I have read and read.....but just can't make myself wanna think it will really stand the test of time.
Coming from a car restoration as well as furniture restoration back ground...everything must be sanded for paint to adhere. Please don't think I'm bashing chalk paint. Im not...I just don't have that much experience with it....willing to learn something new lol
I do love how alot of the furniture looks that is done with chalk paint. |
|
| |
|
Lover of Old Things
Posts: 989
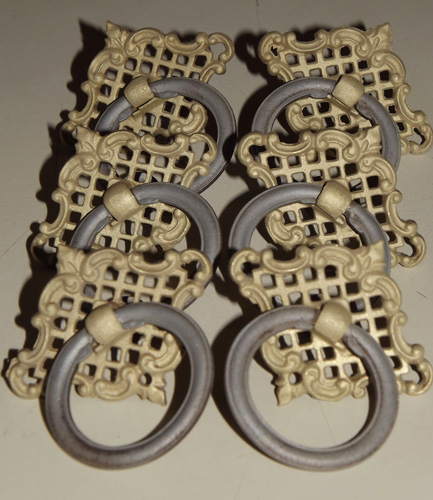
Location: South East Texas | All finished, and she gets to go to her new home tomorrow. The hardware was rusty. Instead of sandblasthing and painting them as I normally would....since the rust color went well with the sepia tone of the picture....I just used a wire brush on them....and then coated them with sealer.
 (2013-04-24-004.jpg) (2013-04-24-004.jpg)
Attachments
----------------
2013-04-24-004.jpg (96KB - 308 downloads)
|
|
| |
|
 Off the Wall Wacky
Posts: 2981
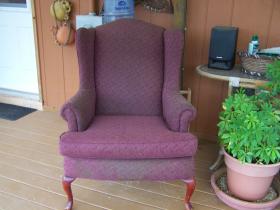
Location: Louisiana | Okay quick question!!
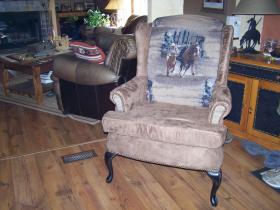
I found a set of old high back chairs. They are in good shape just an ugly, dirty pink. Do you have experience reupholstering?? Or is it fairly easy? If I get them they will sit until I actually have a place to put them and know what color to do. |
|
| |
|
Lover of Old Things
Posts: 989
Location: South East Texas | I haven't ever reupholstered anything like that. There are YouTube videos showing how to...I've just not tried it. Now they have paint you can paint the fabric with but I haven't tried that either...it's a spray. Think it's dr by Tulip. |
|
| |
|
Off the Wall Wacky
Posts: 2981
Location: Louisiana | thejerseylilly2000 - 2013-04-27 10:50 PM I haven't ever reupholstered anything like that. There are YouTube videos showing how to...I've just not tried it. Now they have paint you can paint the fabric with but I haven't tried that either...it's a spray. Think it's dr by Tulip.
Thank you! I don't know what's been on them and even in the pics you can see they are very dingy. So I will most definitely redo them if I buy. I'm still trying to convince myself! I always seem to find good deals when I really don't have extra cash to spare LOL. And I want both, not just one! She is only asking $80 for both, which I think is a fair price after looking online, considering they are in good structural shape. And I wouldn't be putting any $$ in them for a while. See, I'm almost convinced! |
|
| |
|
Extreme Veteran
Posts: 498
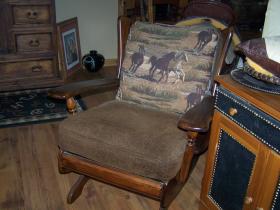
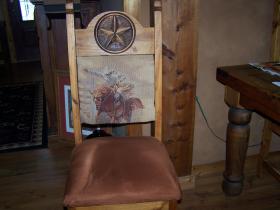
Location: tx | Here's a high back chair I redid-got it at a yard sale for $5.00
 (bth_100_0848_zps081d8913.jpg) (bth_100_0848_zps081d8913.jpg)
 (bth_000_0029_zps2b0e6063.jpg) (bth_000_0029_zps2b0e6063.jpg)
Attachments
----------------
bth_100_0848_zps081d8913.jpg (10KB - 295 downloads)
bth_000_0029_zps2b0e6063.jpg (12KB - 295 downloads)
|
|
| |
|
Extreme Veteran
Posts: 498
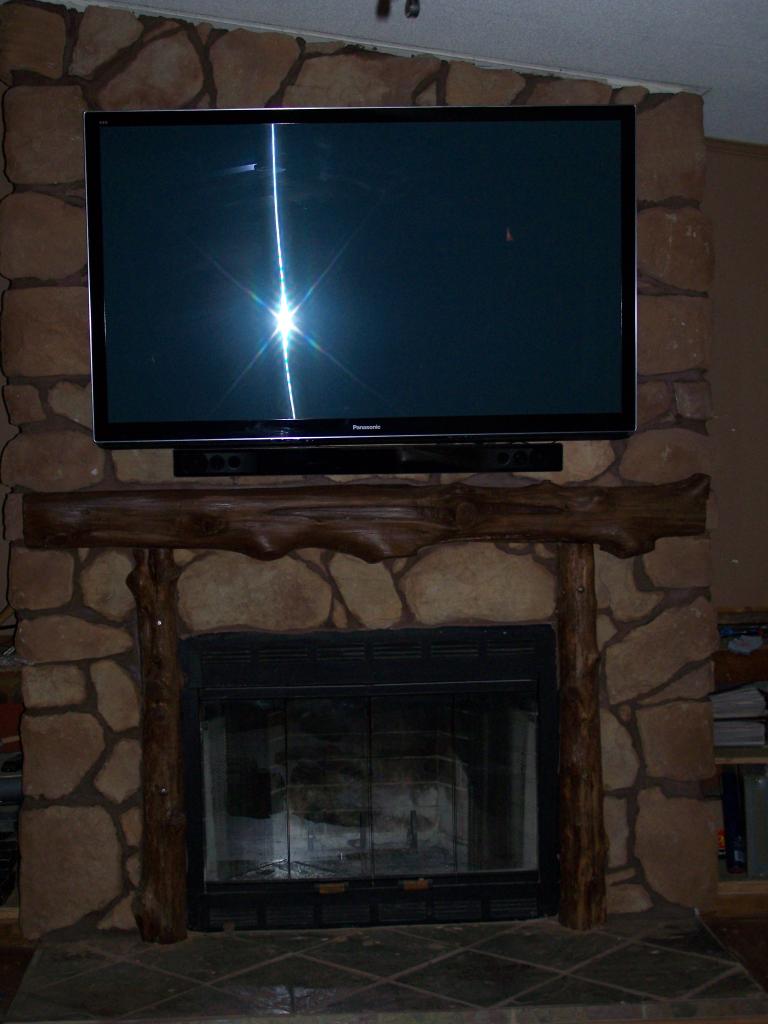
Location: tx | Also, here's a couple more projects I did, plus I rocked my fireplace-the mantel is part of a cedar tree we cut down on our property.
 (bth_100_2072_zps23073b2e.jpg) (bth_100_2072_zps23073b2e.jpg)
 (bth_100_2069_zps3449e710.jpg) (bth_100_2069_zps3449e710.jpg)
 (100_2030_zps4c506bf0.jpg) (100_2030_zps4c506bf0.jpg)
Attachments
----------------
bth_100_2072_zps23073b2e.jpg (11KB - 307 downloads)
bth_100_2069_zps3449e710.jpg (9KB - 274 downloads)
100_2030_zps4c506bf0.jpg (68KB - 286 downloads)
|
|
| |
|
Lover of Old Things
Posts: 989
Location: South East Texas | Very nicely done...on all of your projects Tee!!! I have a few pieces that need redone...just haven't ever made my mind up to tackle them lol |
|
| |
|
Extreme Veteran
Posts: 498
Location: tx | thejerseylilly2000 - 2013-04-28 1:02 PM
Very nicely done...on all of your projects Tee!!! I have a few pieces that need redone...just haven't ever made my mind up to tackle them lol
Thanks-I'm no pro by a long shot but what the hay-I enjoy doing it:) Your stuff is just too cool-haven't seen anything you've done that I didn't like! |
|
| |
|
Lover of Old Things
Posts: 989
Location: South East Texas | Visited with another forum member this weekend at a barrel race and she had such nice things to say about this thread....thanks BeanCounter :)) |
|
| |
|
"Special"
Posts: 2364
Location: in the middle of backwoods iowa | Here is my finished dresser
 (944553_576444909055923_1565853023_n.jpg) (944553_576444909055923_1565853023_n.jpg)
 (309940_576444609055953_1712494279_n.jpg) (309940_576444609055953_1712494279_n.jpg)
Attachments
----------------
944553_576444909055923_1565853023_n.jpg (70KB - 291 downloads)
309940_576444609055953_1712494279_n.jpg (56KB - 285 downloads)
|
|
| |
|
Lover of Old Things
Posts: 989
Location: South East Texas | Awesome!!! Black and turquoise....love those two together!!! You done a great job :)) |
|
| |
|
Lover of Old Things
Posts: 989
Location: South East Texas | Later today I will be posting my latest project here. So y'all can see that repairs aren't that scary. :)) |
|
| |
|
| I love your work!! but unfortunately I haven't been on here long enough to see it all!! Could you (Whenever you get some free time!) perhaps post your top few favorite projects? I would love to see more!! |
|
| |
|
Lover of Old Things
Posts: 989
Location: South East Texas | Kgirl - 2013-05-01 10:28 AM
I love your work!! but unfortunately I haven't been on here long enough to see it all!! Could you (Whenever you get some free time!) perhaps post your top few favorite projects? I would love to see more!!
We are trying to keep this a DIY thread....with step by step pictures. I sent you a pm as to where you can view past projects. :)) |
|
| |
|
Lover of Old Things
Posts: 989
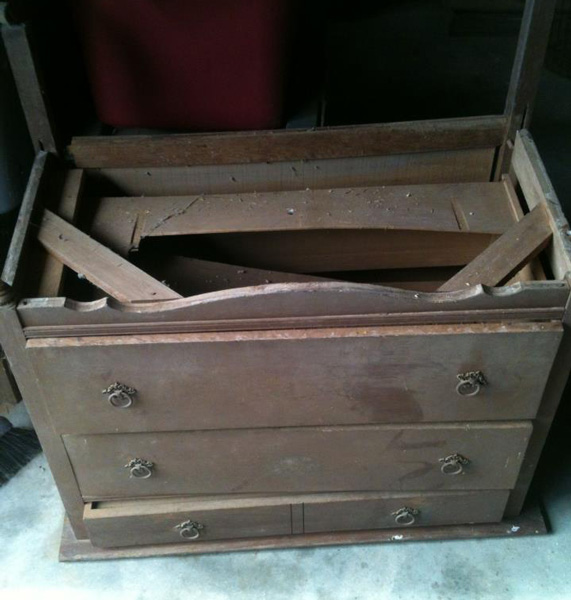
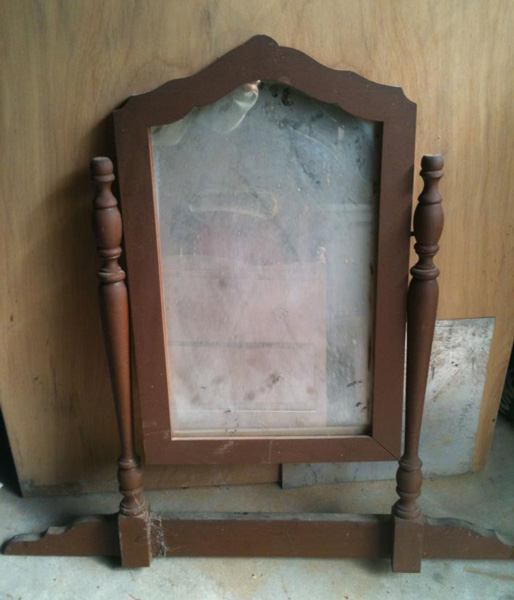
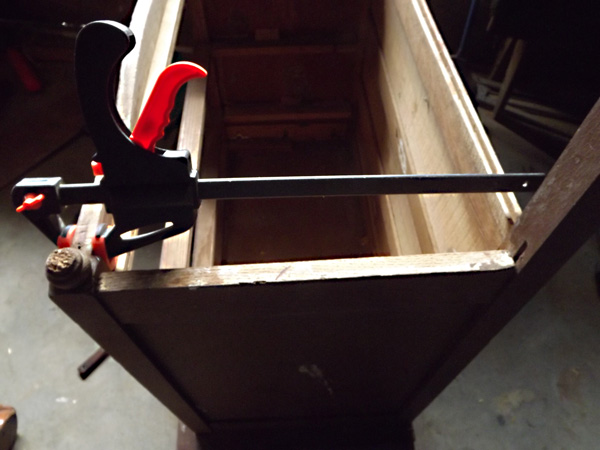
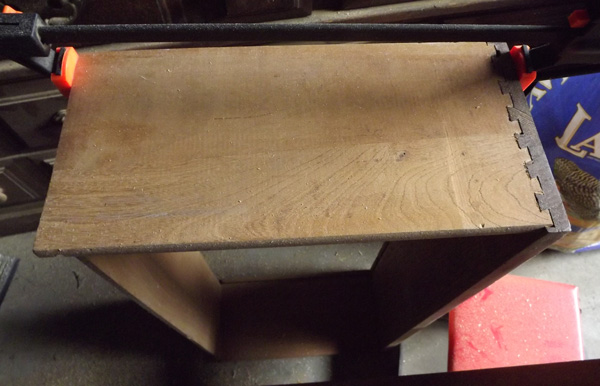
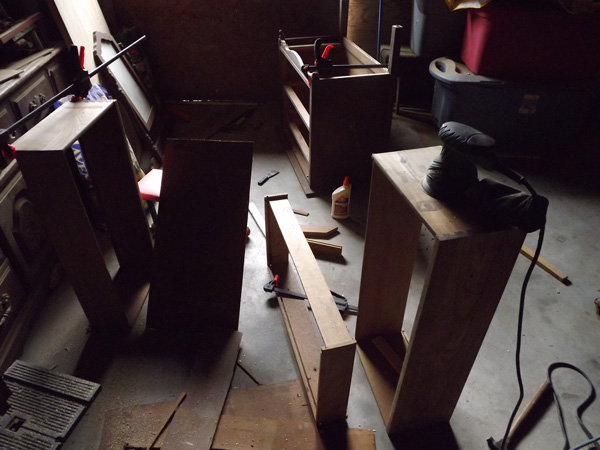
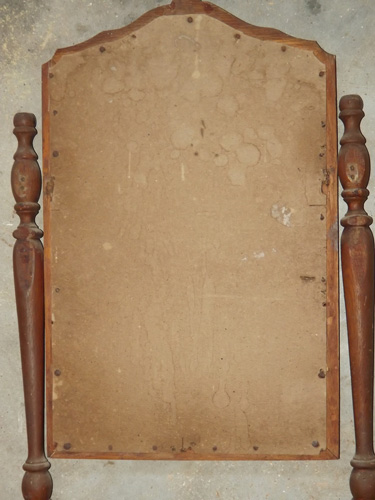
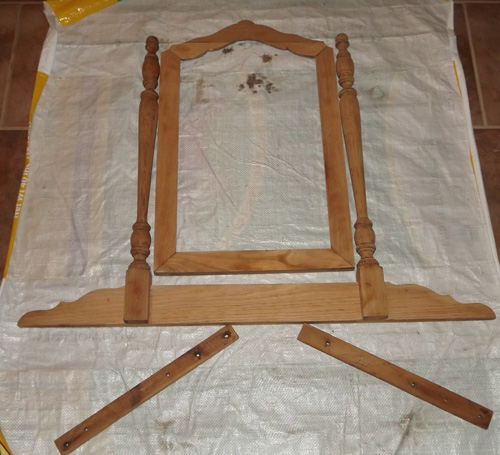
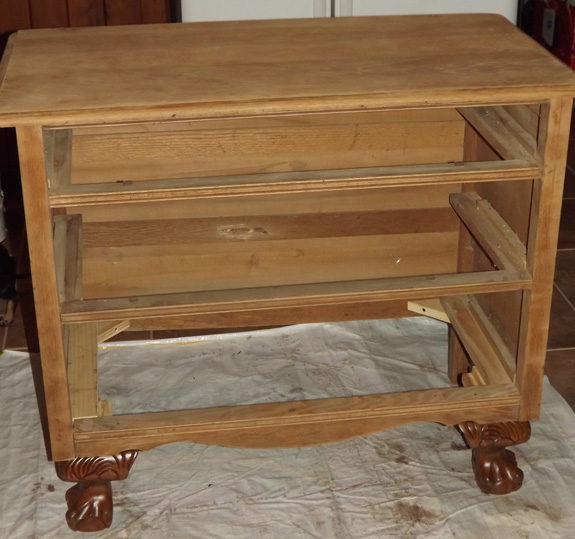
Location: South East Texas | This little gal (bless her heart) is upside down because her two front legs are broken off. When I found her at an estate sale she was sitting in a corner, with old milk bottles propping her up in the front. She's kinda coming apart at the seams....she has a hole in her drawers....but her face (mirror) spoke volumes to me. Even in her disheveled state she's beautiful. Just needs a little love to once again shine. There's a series of pictures following...I've removed the bottoms of all the drawers to be replaced with new. I've glued all the joints that needed put back together. LIttle glue and clamps do miracles for pieces that have come apart. AT the moment my work shop looks like she exploded in there. lol
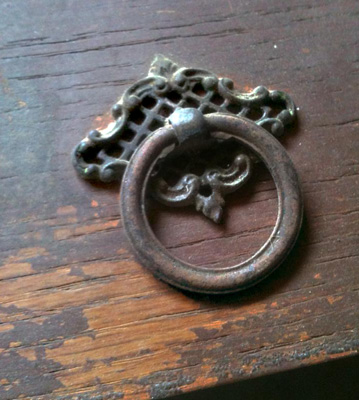
There's a picture of the hardware before I removed it...and after I sandblasted it. She's Oak.....so I've dubbed her....."Annie Oakley"
Edited by thejerseylilly2000 2013-05-01 6:06 PM
 (2013-05-01-A.jpg) (2013-05-01-A.jpg)
 (2013-05-01-B.jpg) (2013-05-01-B.jpg)
 (2013-05-01-C.jpg) (2013-05-01-C.jpg)
 (2013-05-01-007.jpg) (2013-05-01-007.jpg)
 (2013-05-01-008.jpg) (2013-05-01-008.jpg)
 (2013-05-01-009.jpg) (2013-05-01-009.jpg)
 (2013-05-01-011.jpg) (2013-05-01-011.jpg)
Attachments
----------------
2013-05-01-A.jpg (86KB - 302 downloads)
2013-05-01-B.jpg (78KB - 282 downloads)
2013-05-01-C.jpg (60KB - 283 downloads)
2013-05-01-007.jpg (70KB - 274 downloads)
2013-05-01-008.jpg (75KB - 305 downloads)
2013-05-01-009.jpg (84KB - 283 downloads)
2013-05-01-011.jpg (87KB - 290 downloads)
|
|
| |
|
Elite Veteran
Posts: 794
| I can see why you had to take her home with you she is awesome. Can't wait to see her new outfit. |
|
| |
|
Extreme Veteran
Posts: 498
Location: tx | So you've not finished her yet! LOL Can't wait to her all done up... |
|
| |
|
Lover of Old Things
Posts: 989
Location: South East Texas | Haha I'm working as fast as I can while having my 14 mo old grandson along with me. Man I don't remember my kids wearin me out like he does :)) wouldn't trade it for nothin tho. Love love him.
Tee
I was just wondering if you thought this dresser was the same one as I recently done. If so go back a couple pages. ??? :))
Edited by thejerseylilly2000 2013-05-01 9:00 PM
|
|
| |
|
I keep my change in my pockets
Posts: 2985
Location: MN | I asked this question before but I believe that the thread was deleted because I couldn't find the thread later. But how do you seal the wood of an old dresser that smells really bad? It will make clothes smell sour and it take multiple washing to get the smell out. I think it is the wood that smells.
|
|
| |
|
 Quarter Horse HIstorian
Posts: 2878
Location: Aubrey, Texas | What a fine old relic Annie Oakey is! I've never seen any hardware like that- can't wait to see her transformation. |
|
| |
|
Lover of Old Things
Posts: 989
Location: South East Texas | Dawnb,
I answered your question on that post but all my previous posts have gotten deleted. I can't find them either. I have a couple end tables that are hex shape and have doors that close the bottom storage section up...and they stink horribly. I googled but didn't find much of anything as far as a solution to get rid of the smell. I think it's caused from a type of glue that was used when they were made. ??? |
|
| |
|
Veteran
Posts: 129
Location: So. MN, to close to IA | Thanks, right now the dresser got move out to shed for now. |
|
| |
|
Lover of Old Things
Posts: 989
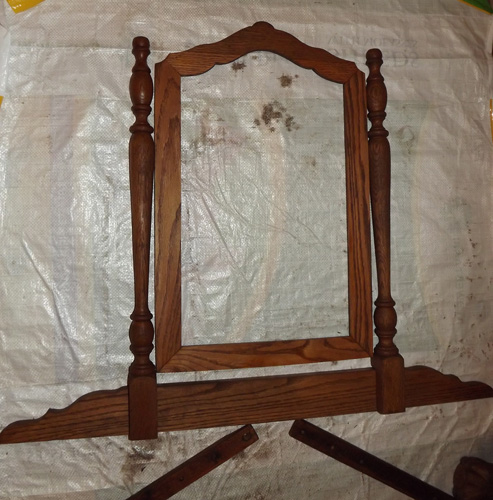
Location: South East Texas | "Annie Oakley" stripped nekid ;)
No chemical stripper used....only sanding.
 (2013-05-02-001.jpg) (2013-05-02-001.jpg)
Attachments
----------------
2013-05-02-001.jpg (83KB - 289 downloads)
|
|
| |
|
Extreme Veteran
Posts: 482
Location: Texas, and loving it | thejerseylilly2000 - 2013-04-24 8:58 AM ArenaRat....I've only used it on a couple pieces. So...from experience would you say it would stand up to use for years? I just don't know that much about it. I have read and read.....but just can't make myself wanna think it will really stand the test of time.
Coming from a car restoration as well as furniture restoration back ground...everything must be sanded for paint to adhere. Please don't think I'm bashing chalk paint. Im not...I just don't have that much experience with it....willing to learn something new lol
I do love how alot of the furniture looks that is done with chalk paint.
Jersey, sorry been off the computer for a couple of days. So far I have been really pleased with the chalk paint. We wax the furniture to finish it. I have seen some that has had some hard use and it is holding up really well. I was skeptical at first about not having to sand but it sticks and stays on. This is such a great thread. Love it. |
|
| |
|
Lover of Old Things
Posts: 989
Location: South East Texas | Arena Rat - 2013-05-02 11:55 PM
thejerseylilly2000 - 2013-04-24 8:58 AM ArenaRat....I've only used it on a couple pieces. So...from experience would you say it would stand up to use for years? I just don't know that much about it. I have read and read.....but just can't make myself wanna think it will really stand the test of time.
Coming from a car restoration as well as furniture restoration back ground...everything must be sanded for paint to adhere. Please don't think I'm bashing chalk paint. Im not...I just don't have that much experience with it....willing to learn something new lol
I do love how alot of the furniture looks that is done with chalk paint.
Jersey, sorry been off the computer for a couple of days. So far I have been really pleased with the chalk paint. We wax the furniture to finish it. I have seen some that has had some hard use and it is holding up really well. I was skeptical at first about not having to sand but it sticks and stays on. This is such a great thread. Love it.
How does the chalk paint with wax finish do if you set a glass that sweats on it? Still reading on Annie Sloan paint and so far on table tops etc that my be used for drinks she recommends putting a poly over it.
I bought a can of wax recently and really want to give this a try. Just gotta find the right piece to do it with. Because in this day and age any piece of furniture is subject to having a glass set on it. So I will contemplate this....and find a piece to play with :)) |
|
| |
|
 Elite Veteran
Posts: 746
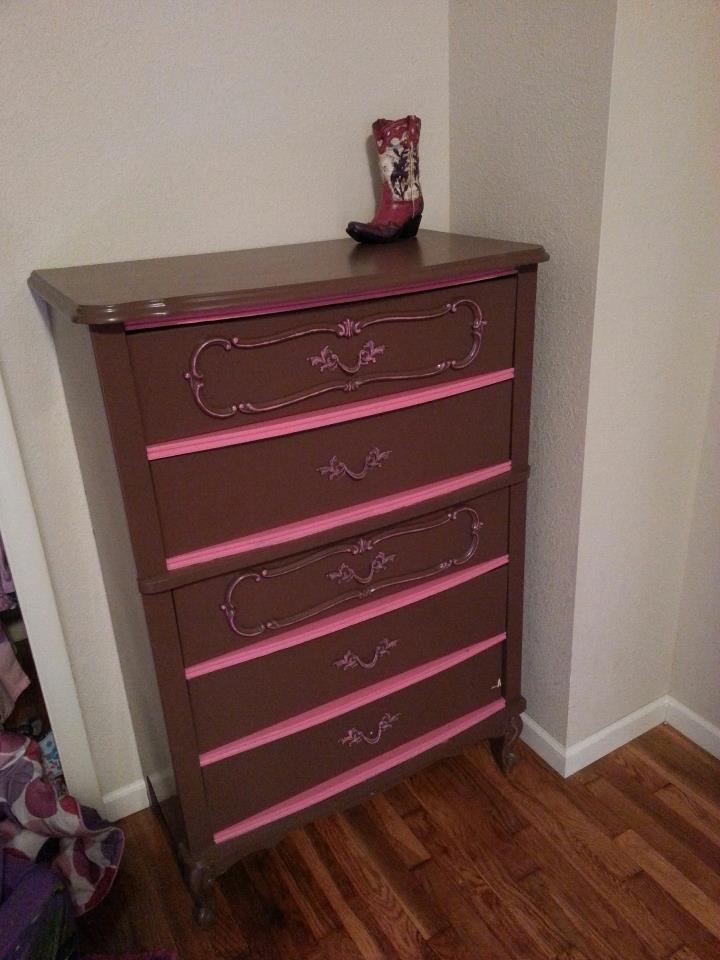
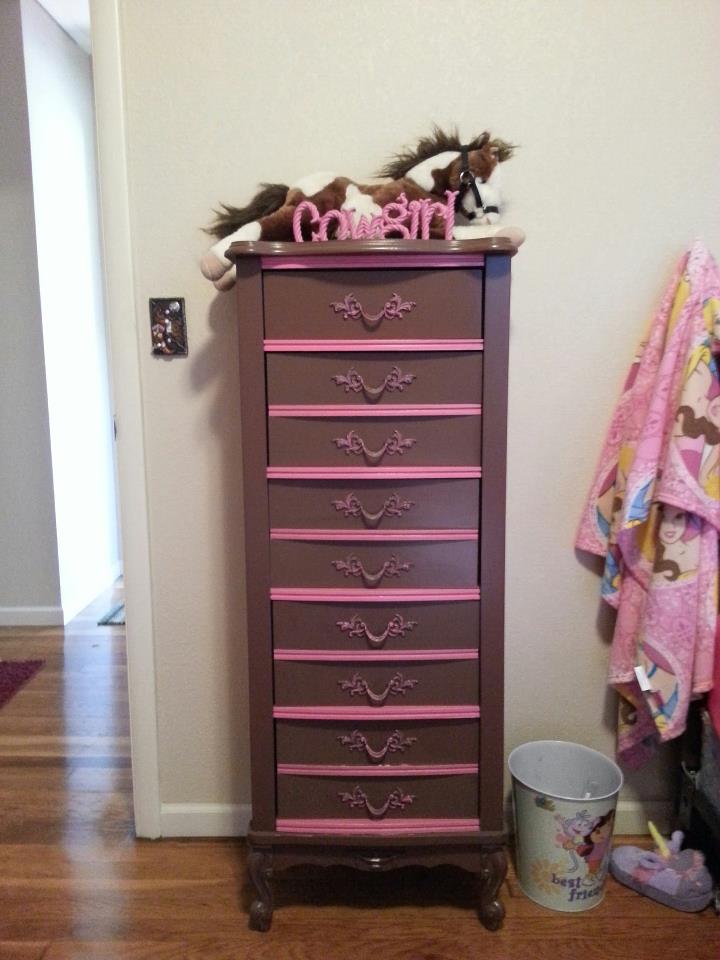
Location: Missouri | I don't have any before pictures, but here is a couple of the pieces we did for my SO's daughter's room. We did the long dresser and headboard too. It was the old cream color with the gold edge style though. We sanded it all down by hand and then they SO sprayed it with a latex paint and then we added pink accents.
 (dresser 2.jpg) (dresser 2.jpg)
 (dresser.jpg) (dresser.jpg)
Attachments
----------------
dresser 2.jpg (69KB - 295 downloads)
dresser.jpg (68KB - 283 downloads)
|
|
| |
|
Lover of Old Things
Posts: 989
Location: South East Texas | Dixie,
Very cute!!! I have a friend who has that same furniture. She's wanting to paint it but she can't make up her mind what color. Love the brown and pink for a little girl :)) and I am on the hunt for a tall chest like that!!! |
|
| |
|
Elite Veteran
Posts: 746
Location: Missouri | thejerseylilly2000 - 2013-05-03 10:23 AM Dixie, Very cute!!! I have a friend who has that same furniture. She's wanting to paint it but she can't make up her mind what color. Love the brown and pink for a little girl :)) and I am on the hunt for a tall chest like that!!!
Thank you! It isn't perfect, but it was the first piece we tried and the his daughter LOVED it.
Well the tall lingerie ones sell quite often at an auction up here (I have seen 3-4 in the past year), but I am in MO :) |
|
| |
|
Lover of Old Things
Posts: 989
Location: South East Texas | Ok finally back at it....after a full weekend of barrel racing...and me being sick....finally got meds from Doc and feel up to par again. YAY!!! I"m never sick.....but on the rare occasion that I do get sick...it's gonna be full blown...can't do a daggum thing sick!!! LOL
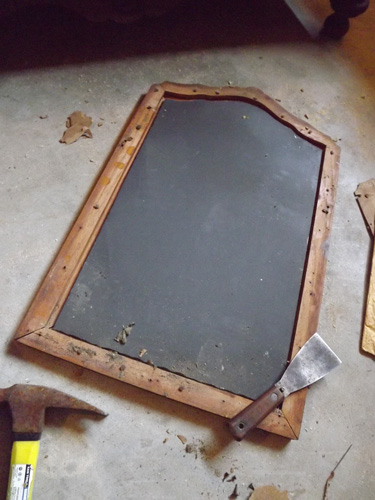
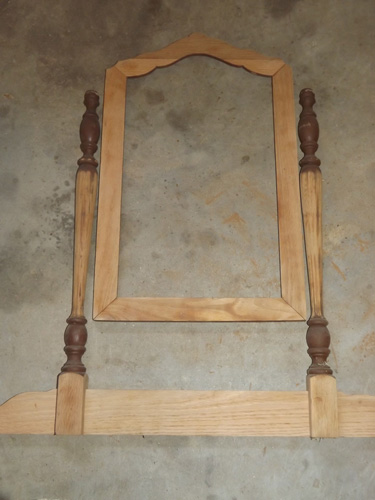
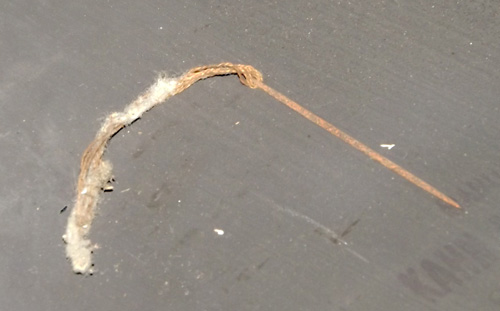
Ok...to "Annie Oakley" I've taken pictures of the dismantling of the mirror assembly. Just a few screws here and there and it all came apart. Much easier to sand apart than together. I have sanded everything I possibly can with my electric sander....and in the last picture what you see that's not sanded will be sanded by hand.
Oh...and an old needle and embrodery thread that was somehow between the cardboard and the mirror in the back when I took it apart. Haha. these kinda things makes me wish they could talk to tell their story.
 (2013-05-07-001.jpg) (2013-05-07-001.jpg)
 (2013-05-07-002.jpg) (2013-05-07-002.jpg)
 (2013-05-07-004.jpg) (2013-05-07-004.jpg)
 (2013-05-07-003.jpg) (2013-05-07-003.jpg)
Attachments
----------------
2013-05-07-001.jpg (60KB - 283 downloads)
2013-05-07-002.jpg (66KB - 284 downloads)
2013-05-07-004.jpg (53KB - 290 downloads)
2013-05-07-003.jpg (37KB - 289 downloads)
|
|
| |
|
 Elite Veteran
Posts: 975
Location: Iowa/Missouri | Okay I have a question. While I was gone this weekend my fiance brought in another curio cabinet. It's more of a small and narrow one. Well one of the mirrors from the back of it is missing. Where is the best place to purchase a mirror for the back of it? I'm not sure where to start looking. |
|
| |
|
Lover of Old Things
Posts: 989
Location: South East Texas | Go to the Yellow Pages....anywhere that does mirrors for homes....or auto glass...shower doors etc will be able to cut a mirror for it. As long as it's strait cuts...it won't cost all that much. |
|
| |
|
Lover of Old Things
Posts: 989
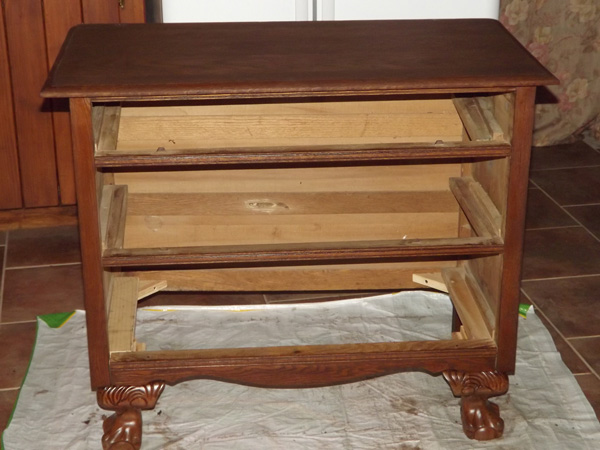
Location: South East Texas | All sanded....
And stained....gettin her pretty on. :))
 (2013-05-06-001.jpg) (2013-05-06-001.jpg)
 (2013-05-06-002.jpg) (2013-05-06-002.jpg)
Attachments
----------------
2013-05-06-001.jpg (85KB - 279 downloads)
2013-05-06-002.jpg (99KB - 280 downloads)
|
|
| |
|
Extreme Veteran
Posts: 498
Location: tx | Jersey Lil-Did you ever get the rocking chair done? I never did see the pics of it. |
|
| |
|
Lover of Old Things
Posts: 989
Location: South East Texas | Yes I did... Turned out really pretty. |
|
| |
|
Lover of Old Things
Posts: 989
Location: South East Texas | Her new legs are on....took a little bit in finigglin....and some help from hubby to get the old legs sawed off....and the new legs on....but I think they look perfect :)) (I sanded stained and put finish on the legs before mounting them)
Then a coat of stain over the entire body of the chest.
 (2013-05-09-018.jpg) (2013-05-09-018.jpg)
 (2013-05-09-019.jpg) (2013-05-09-019.jpg)
Attachments
----------------
2013-05-09-018.jpg (97KB - 298 downloads)
2013-05-09-019.jpg (88KB - 284 downloads)
|
|
| |
|
Lover of Old Things
Posts: 989
Location: South East Texas | "Annie" with a couple coats of Minwax satin....I love this sealer...it's water based...dries quickly and durable. And sure makes the wood grain show up pretty.
 (2013-05-10-003.jpg) (2013-05-10-003.jpg)
Attachments
----------------
2013-05-10-003.jpg (99KB - 272 downloads)
|
|
| |
|
 Good Grief!
Posts: 6343
Location: Cap'n Joan Rotgut.....alberta | well you have finally convinced me to tackle my piece of furniture....i will post pics of it when i get a chance.......its fairly tall and old.......i think my mom about crapped her pants when isaid i was gonna redo it....the words antique dresser and sander spell disaster inher world..........
m |
|
| |
|
Lover of Old Things
Posts: 989
Location: South East Texas | Oh cool....I look forward to seeing pictures. |
|
| |
|
| I have a question...
This is a stupid question but how can you tell if piece of furniture can be sanded down and stained and finished? My aunt has some of my grandparents old retro furniture that is blonde curved. I already know I don't like the color and would like a darker richer color but how can I tell if that is do able?
ETA I forgot how ugly this dresser was till I got the picture from my relative... yikes!
Edited by Kgirl 2013-05-17 9:33 AM
 (ugly dressersmall1.jpg) (ugly dressersmall1.jpg)
Attachments
----------------
ugly dressersmall1.jpg (92KB - 267 downloads)
|
|
| |
|
Lover of Old Things
Posts: 989
Location: South East Texas | That piece most likely has vaneer on it. You can sand it but be careful to just sand until you don't see anything but wood. You don't want to sand through the vaneer. If you look at the drawer open...looking downward at the edge you will be able to tell how thick or thin the vaneer is. Usually about 1/8th inch. But it looks well taken care of and should sand just fine. You can dress it up with different hardware and make it look totally different. |
|
| |
|
 Elite Veteran
Posts: 850
Location: Bluffdale UT | thejerseylilly2000 - 2013-04-26 8:04 PM All finished, and she gets to go to her new home tomorrow. The hardware was rusty. Instead of sandblasthing and painting them as I normally would....since the rust color went well with the sepia tone of the picture....I just used a wire brush on them....and then coated them with sealer.
This is in reference to the dresser with the picture on front:
I have some questions, I'm sorry if the answers have been posted already somewhere in this thread, if so please tell me what page :-)
You use regular Modge Podge to adhere the picture to the drawers and then over the picture to seal it onto the drawer?
What kind of picture works best - I guess my question is what kind of finish on the picture? Does it have to be on certain type of photo paper?
What kind of sealer do finish with?
Thanks, you are amazing!
Edited by syoung 2013-05-22 5:19 PM
|
|
| |
|
Lover of Old Things
Posts: 989
Location: South East Texas | Poster from Walmart. It's on what looks to me to be photo paper. Honestly I don't know exactly what it's called. But if you have it printed as a poster...I"m sure all Walmarts use the same paper.
Yes regular mod podge. Then a couple coats over it after it's dried. Then a few more coats of polycrylic sealer.
Sorry I've been away .... my Grandbaby Thumper is in Oklahoma this week...with his other Granny.....and we've been worried sick. Monday during the Moore Tornado....they all had to go to the school basement and take cover. Thank God they are all OK....now today...my daughter went to pick him up and spend the weekend...as well as hauling a horse to run at a Rodeo up there tomorrow night. This week has been a nail biter for sure. Will be so glad when they are both back home sleeping in their own house...where I know they are safe. Uhggg....I haven't worked on anything this week...except praying. For their safety as well as all those poor people that have lost love ones and homes, businesses etc. May God keep them under his watchfull eye and protective hand. |
|
| |
|
Elite Veteran
Posts: 850
Location: Bluffdale UT | Thank you!! And thank God they are safe and sound! |
|
| |
|
Lover of Old Things
Posts: 989
Location: South East Texas | Grandbaby is home!!!! Finally!!! Week and a half without him was way too long! Now time to get back to being busy and not worrying lol. The "Annie Oakley" dresser has been put on hold, the lady it's for has some things going on and it will have to wait. So on to the next piece/s
Edited by thejerseylilly2000 2013-05-28 10:43 AM
|
|
| |
|
Lover of Old Things
Posts: 989
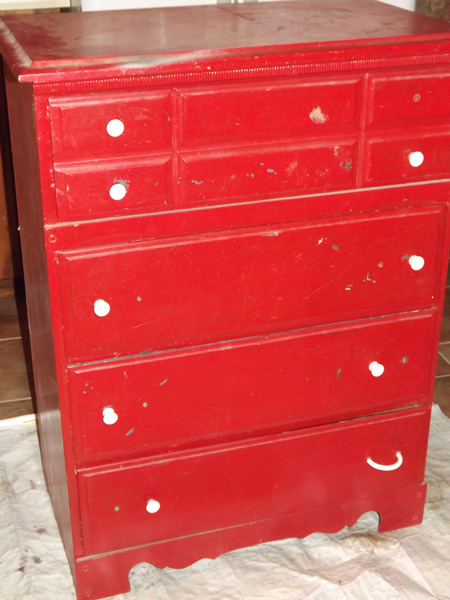
Location: South East Texas | My next victom.....as I got started sanding...I discover that under the red....is a coat of blue :-/ And this one...I've named "Rooster" a little surprise at the end...:))
Edited by thejerseylilly2000 2013-05-29 9:55 PM
 (2013-05-29-001.jpg) (2013-05-29-001.jpg)
Attachments
----------------
2013-05-29-001.jpg (95KB - 279 downloads)
|
|
| |
|
Lover of Old Things
Posts: 989
Location: South East Texas | "Rooster" has a Formica top. Didn't expect that but not a problem. Will have to use special bonding primer on it before painting. |
|
| |
|
Lover of Old Things
Posts: 989
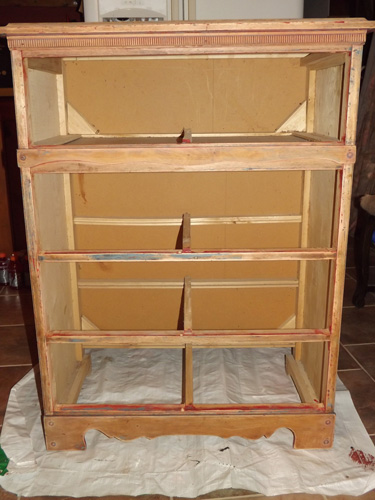
Location: South East Texas | Pic 1 - This is the stripping of the paint on the top that under neath is formica.....
Pic 2 - Alllll the red paint as gone as I can get it...ready for paint.
Pic 3 - Drawers didn't come off so good. But it's ok....
Pic 4 - One coat of new black paint....get another coat on and then let the fun begin :))
 (2013-05-30-002.jpg) (2013-05-30-002.jpg)
 (2013-05-30-003.jpg) (2013-05-30-003.jpg)
 (2013-05-30-004.jpg) (2013-05-30-004.jpg)
 (2013-05-30-005.jpg) (2013-05-30-005.jpg)
Attachments
----------------
2013-05-30-002.jpg (73KB - 288 downloads)
2013-05-30-003.jpg (67KB - 286 downloads)
2013-05-30-004.jpg (66KB - 290 downloads)
2013-05-30-005.jpg (58KB - 264 downloads)
|
|
| |
|
Lover of Old Things
Posts: 989
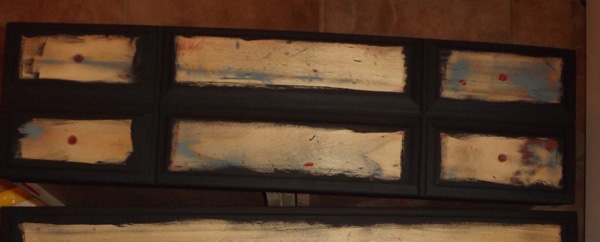
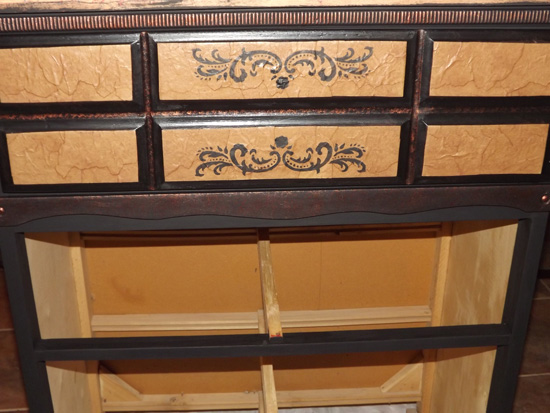
Location: South East Texas | Pic 1- as you can see not all the paint would come off the top drawer...but that's ok it wasn't an issue. painted black around the edges.
Pic 2- top drawer all dressed up.....
Edited by thejerseylilly2000 2013-05-31 12:44 PM
 (2013-05-31-001.jpg) (2013-05-31-001.jpg)
 (2013-05-31-002.jpg) (2013-05-31-002.jpg)
Attachments
----------------
2013-05-31-001.jpg (41KB - 281 downloads)
2013-05-31-002.jpg (86KB - 279 downloads)
|
|
| |
|
Veteran
Posts: 174
Location: Wisconsin | That looks beautiful! |
|
| |
|
 Expert
Posts: 1392
Location: Central Texas | Looking great!! |
|
| |
|
Lover of Old Things
Posts: 989
Location: South East Texas | Another weekend out of town....killin me cuz I can't stay home and work on projects. Think we've finally got most of our weekend running around done for a while. Now to get home a back to work :)) |
|
| |
|
Lover of Old Things
Posts: 989
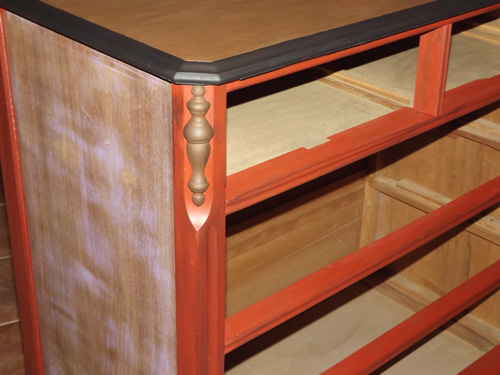
Location: South East Texas | Giving the sides of this chest of drawers the faux leather treatment. Because the sides weren't in that great of shape. They are solid...but really banged up and unsmooth. Sanding didn't do the trick.
 (2013-06-03-001.jpg) (2013-06-03-001.jpg)
 (2013-06-03-002.jpg) (2013-06-03-002.jpg)
Attachments
----------------
2013-06-03-001.jpg (92KB - 288 downloads)
2013-06-03-002.jpg (80KB - 303 downloads)
|
|
| |
|
Lover of Old Things
Posts: 989
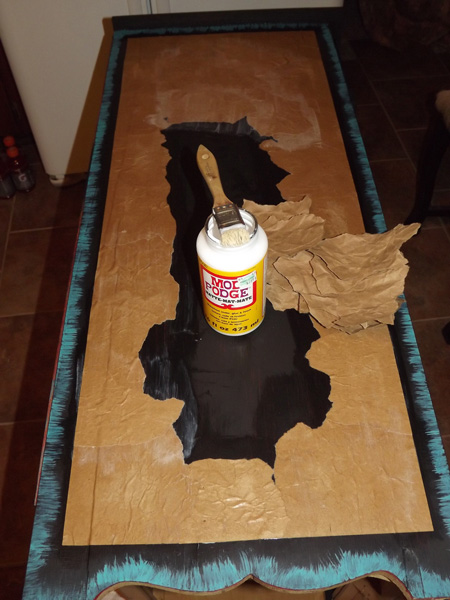
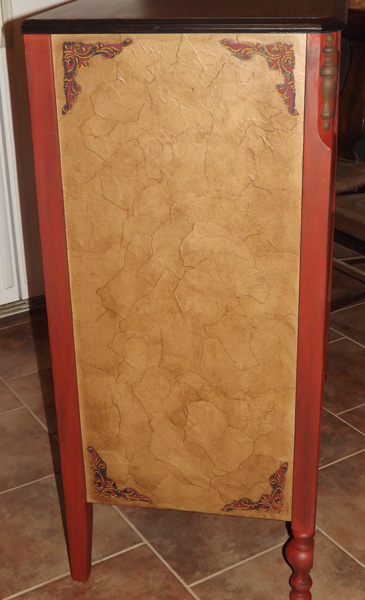
Location: South East Texas | Ok, body of the chest of drawers is finished. After putting the paper faux leather on the sides....I did a wash with black paint to kinda give it more definition and an antique affect. Then I've put 3 coats of polycrylic sealer on the whole thing.
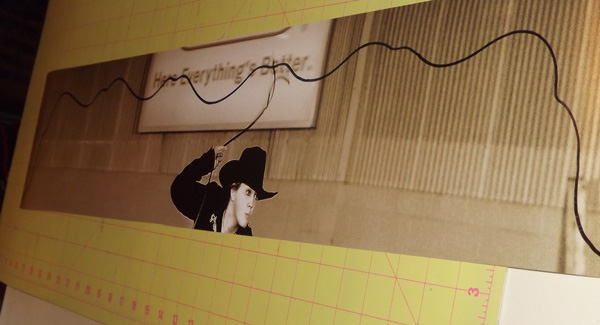
Picture on the drawer....There's really no way that I can take pictures of the whole process. Lots of measuring before cutting the picture. And then a coat of mod podge...and quickly place the photo on the drawer front and get all the bubbles out. Then a coat of mod podge over it. The picture here is with the first coat of mod podge on it. It's kinda scary looking but it dries clear.
 (2013-06-04-001.jpg) (2013-06-04-001.jpg)
 (2013-06-03-003.jpg) (2013-06-03-003.jpg)
Attachments
----------------
2013-06-04-001.jpg (98KB - 279 downloads)
2013-06-03-003.jpg (80KB - 306 downloads)
|
|
| |
|
Lover of Old Things
Posts: 989
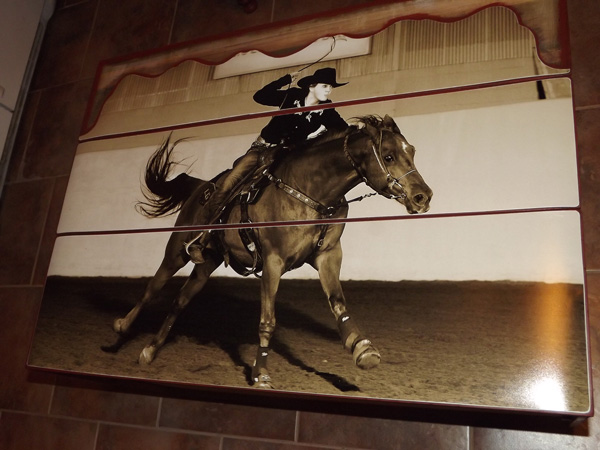
Location: South East Texas | All done...fixing to deliver it :) New hardware turned out awesome on it.
 (2013-06-04-002.jpg-small.jpg) (2013-06-04-002.jpg-small.jpg)
 (2013-06-04-003.jpg-small.jpg) (2013-06-04-003.jpg-small.jpg)
Attachments
----------------
2013-06-04-002.jpg-small.jpg (99KB - 278 downloads)
2013-06-04-003.jpg-small.jpg (97KB - 284 downloads)
|
|
| |
|
Lover of Old Things
Posts: 989
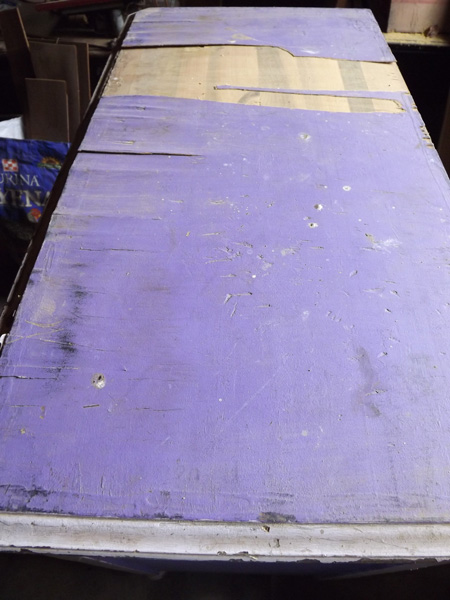
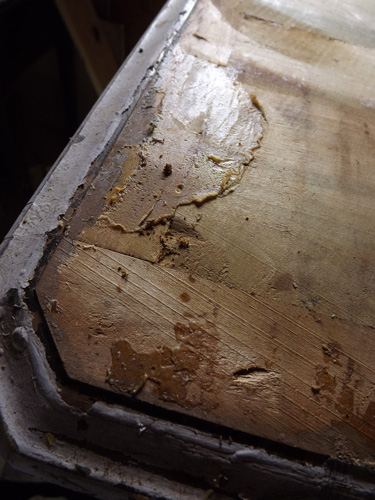
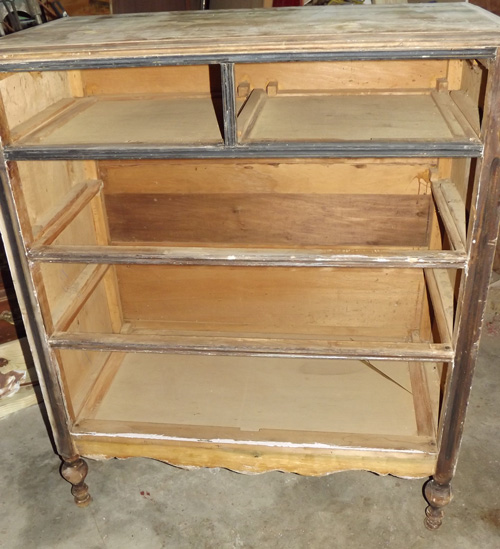
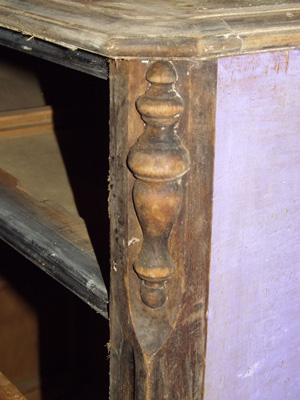
Location: South East Texas | I don't have a name for this one...other that YUCK....(with some great details that someone somewhere covered up with hidious purple and white paint) I've taken a few shots of it. The details are what made me actually pay money for this piece LOL She once was a Grand Old Lady....now lets see if we can spruce her up and make her shine once again. :))
 (2013-06-04-004.jpg) (2013-06-04-004.jpg)
 (2013-06-05-001.jpg) (2013-06-05-001.jpg)
 (2013-06-05-008.jpg) (2013-06-05-008.jpg)
 (2013-06-05-010.jpg) (2013-06-05-010.jpg)
Attachments
----------------
2013-06-04-004.jpg (90KB - 293 downloads)
2013-06-05-001.jpg (86KB - 288 downloads)
2013-06-05-008.jpg (69KB - 296 downloads)
2013-06-05-010.jpg (73KB - 292 downloads)
|
|
| |
|
Lover of Old Things
Posts: 989
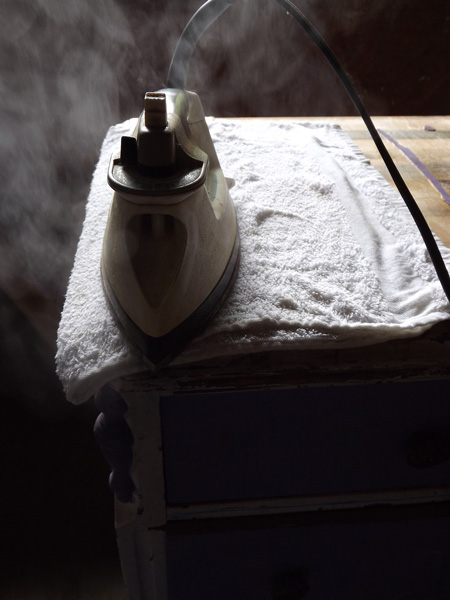
Location: South East Texas | A hot iron...a wet towel...and a putty knife took care of the vaneer that was coming off on top...
Then...I don't have a clue what type of glue was used to try and reglue the vaneer down...but oh man is it some rubbery stuff!!! Hoping stripper removes it. But we shall see.
 (2013-06-05-002.jpg) (2013-06-05-002.jpg)
 (2013-06-05-006.jpg) (2013-06-05-006.jpg)
 (2013-06-05-003.jpg) (2013-06-05-003.jpg)
Attachments
----------------
2013-06-05-002.jpg (66KB - 290 downloads)
2013-06-05-006.jpg (98KB - 289 downloads)
2013-06-05-003.jpg (79KB - 306 downloads)
|
|
| |
|
Lover of Old Things
Posts: 989
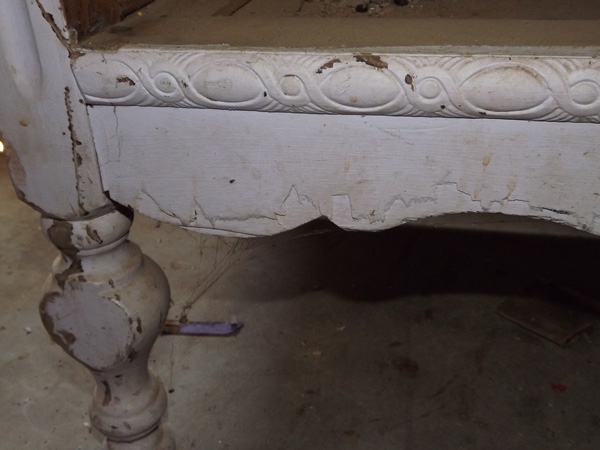
Location: South East Texas | Also...any of you out there that are wanting to redo a piece. A word of advice. You see the edges of this piece? How clumped on the paint is? That's from using too big of a brush and way too much paint at one time. I use really small brushes. And very little paint. I'd much rather paint 2 or three thin smooth coats than one gloppy coat. When I say small brushes...I mean small. I would use a half inch wide brush to paint those edges. Bigger areas such as the sides I use a 2 inch wide brush...but again...very little paint on the brush.
Edited by thejerseylilly2000 2013-06-05 11:39 AM
|
|
| |
|
Expert
Posts: 1392
Location: Central Texas | Thank you for posting all your work. It keeps me inspired. I'm going to be tackleing a very old piece that I will need to get the veneer off of the top. I've been putting it off because I'm afraid it's going to be hard lol. |
|
| |
|
Lover of Old Things
Posts: 989
Location: South East Texas | It's really not hard using the wet towel and iron. And a spray bottle of water to keep the towel and piece wet as you move from one section to another. Just make sure it's an old iron you don't plan to use on clothes. It gets goo'd up, but comes fairly clean scraping it with the putty knife afterwards. |
|
| |
|
Lover of Old Things
Posts: 989
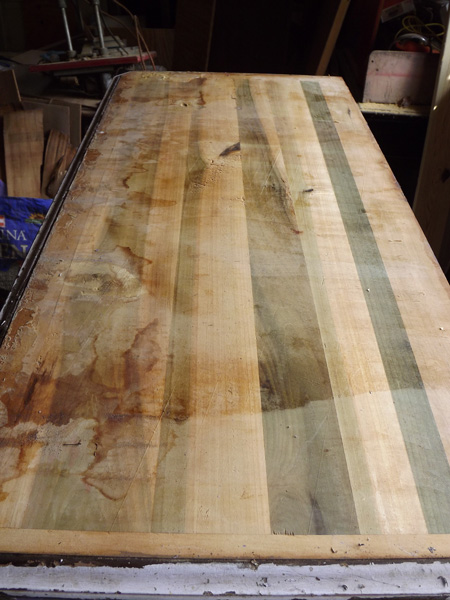
Location: South East Texas | Wheww...long day stripping. But it's looking good. Now comes the sanding, some with the electric sander and some by hand. As you can see, and as I suspected...all of the purple paint didn't come off using stripper. It will be painted...and after sanding there shouldn't be much left.
 (2013-06-05-011.jpg) (2013-06-05-011.jpg)
 (2013-06-05-013.jpg) (2013-06-05-013.jpg)
Attachments
----------------
2013-06-05-011.jpg (99KB - 281 downloads)
2013-06-05-013.jpg (46KB - 288 downloads)
|
|
| |
|
Nut Case Expert
Posts: 9305
Location: Tulsa, Ok | Question. I am getting ready to convert an old buffet to a western theme. I want to adhere cowhide to the raised panel doors. Any clue what kind of adhesive would work? Once it is on I will use upholstery tack strips around the edges of the hide. |
|
| |
|
Looking for Lady Jockey
Posts: 3747
Location: Rodeos or Baseball games | thejerseylilly2000 - 2013-06-04 2:29 PM
All done...fixing to deliver it :) New hardware turned out awesome on it.
THIS IS AMAZING!!!!! |
|
| |
|
| thejerseylilly2000 - 2013-06-04 3:29 PM All done...fixing to deliver it :) New hardware turned out awesome on it.
where did you get the hardware for this piece? I have an old desk missing 1 drawer pull.
thanks |
|
| |
|
Lover of Old Things
Posts: 989
Location: South East Texas | Hobby Lobby :) |
|
| |
|
Lover of Old Things
Posts: 989
Location: South East Texas | SC Wrangler - 2013-06-07 11:23 AM
Question. I am getting ready to convert an old buffet to a western theme. I want to adhere cowhide to the raised panel doors. Any clue what kind of adhesive would work? Once it is on I will use upholstery tack strips around the edges of the hide.
3M spray adhesive. But....you will have to tape off and cover anywhere that you don't want the spray it doesn't come off easily. |
|
| |
|
 Mature beyond Years
Posts: 10780
Location: North of the 49th Parallel | Where do you get your stensils? Wal Mart? |
|
| |
|
Lover of Old Things
Posts: 989
Location: South East Texas | bccanchaser16 - 2013-06-09 2:11 PM
Where do you get your stensils? Wal Mart?
Walmart, Hobby Lobby, JoAnn's Fabrics, Anywhere that I find them. |
|
| |
|
Lover of Old Things
Posts: 989
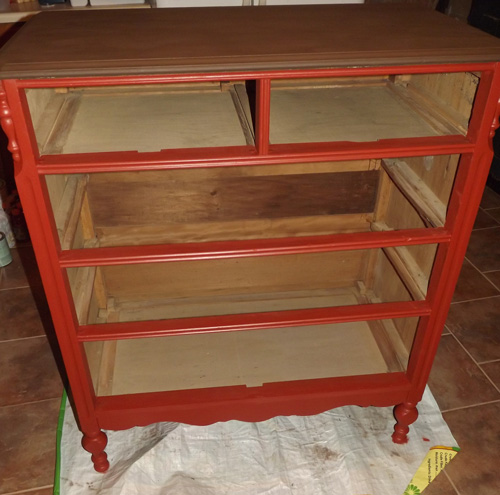
Location: South East Texas | Inside (last night) and ready for paint. I painted until after midnight :))
Brown on the top and red on the body. It will also have the faux leather on the sides like the last one did.
Smooth paint....that's what small brushes and small amounts of paint will turn out like...
 (2013-06-10-093.jpg) (2013-06-10-093.jpg)
 (2013-06-10-094.jpg) (2013-06-10-094.jpg)
 (2013-06-10-095.jpg) (2013-06-10-095.jpg)
Attachments
----------------
2013-06-10-093.jpg (85KB - 300 downloads)
2013-06-10-094.jpg (78KB - 294 downloads)
2013-06-10-095.jpg (66KB - 287 downloads)
|
|
| |
|
| looks awesome!! how are you doing the faux leather treatment? Sorry if you already explained this and I missed it somewhere. |
|
| |
|
Lover of Old Things
Posts: 989
Location: South East Texas | It's the same treatment as on the sides of the last dresser ... I didn't take during pictures of this one but will post pictures later today of the sides. I'm in the hay field now trying to help hubby get equipment ready to bale hay. Lol |
|
| |
|
Lover of Old Things
Posts: 989
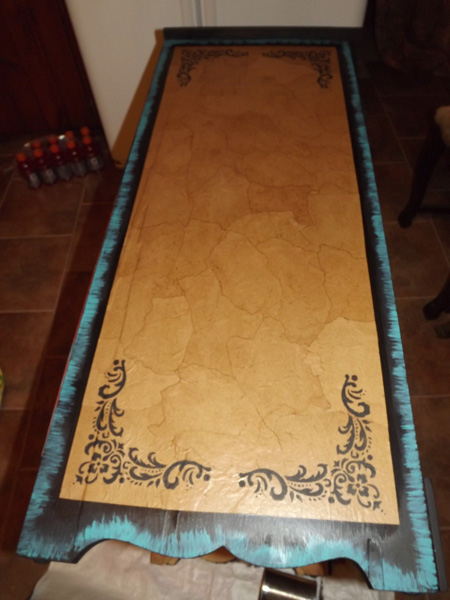
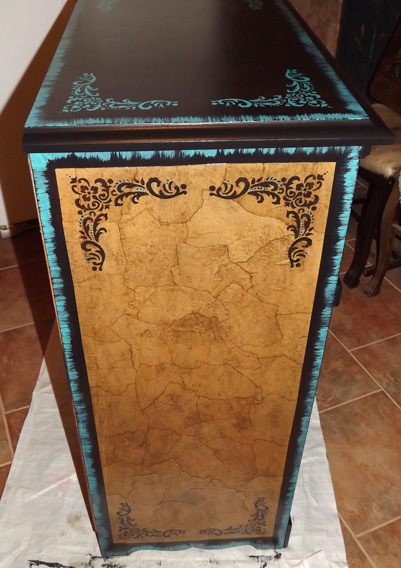
Location: South East Texas | The sides...covered with paper to look like leather. Then corner stencils. :))
 (2013-06-11-002.jpg) (2013-06-11-002.jpg)
Attachments
----------------
2013-06-11-002.jpg (74KB - 302 downloads)
|
|
| |
|
 Expert
Posts: 1584
Location: Central Texas | Fascinating thread, thanks! Amazing work. |
|
| |
|
Lover of Old Things
Posts: 989
Location: South East Texas | Thanks Marfan :)) |
|
| |
|
Lover of Old Things
Posts: 989
Location: South East Texas | In case any of you are wondering why this piece seems to be taking longer...it's because we've been cutting and baling hay. (Interrupting my painting lol) but a must do none the less. Gotta make hay while the sun shines. Also have been doing some minor drawer repairs getting them ready to finish. |
|
| |
|
I keep my change in my pockets
Posts: 2985
Location: MN | Be thankful you can bale hay. We can't go for more then 2 days without rain. We have 4 beautiful acres of grass hay that needs to be cut but we are to wet. Around use the farms are already thinking that they will not be able to finish planting their crops. Our pastures are so wet that the farrier says the horse hoofs are just wet sponges. Hope thrush doesn't hit us next.
Your work is beautiful and can't wait to see it done. |
|
| |
|
Lover of Old Things
Posts: 989
Location: South East Texas | Oh I'm extremely thankful that we have hay to cut. The drought just nearly did us in as far as cattle go. We had to cut our herd so hard that we have only 30 cows left. For too many yers to count it was almost pointless to cut it because there was hardly anything there. Two years ago our pastures were dirt...blowing sand. We have had wonderful rain to bring the pastures back to lush grass and abundant hay. It did however get rained on after cutting. But one field is rolled. And got a neighbors cut for them yesterday with hopes of baling it tomorrow or Tuesday. |
|
| |
|
Lover of Old Things
Posts: 989
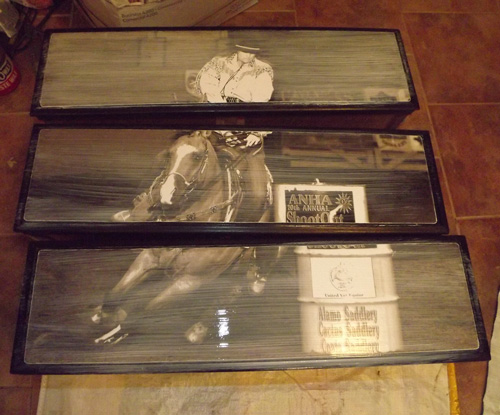
Location: South East Texas | Ok...here's the latest pictures of the dresser.
Cutting the picture to fit....
Picture layed out on the drawers final placement before glueing them on.
One small trim piece I almost forgot to strip the paint off of and add. Had to dig paint out of the creases wth a kitchen knife.
FINISHED!!!! :))
Edited by thejerseylilly2000 2013-06-17 3:24 PM
 (2013-06-15-021.jpg) (2013-06-15-021.jpg)
 (2013-06-15-022.jpg) (2013-06-15-022.jpg)
 (2013-06-17-002.jpg) (2013-06-17-002.jpg)
 (2013-06-17-006.jpg) (2013-06-17-006.jpg)
Attachments
----------------
2013-06-15-021.jpg (57KB - 311 downloads)
2013-06-15-022.jpg (86KB - 289 downloads)
2013-06-17-002.jpg (46KB - 305 downloads)
2013-06-17-006.jpg (95KB - 298 downloads)
|
|
| |
|
Elite Veteran
Posts: 794
| thejerseylilly2000 - 2013-06-11 9:20 PM
The sides...covered with paper to look like leather. Then corner stencils. :))
I know you said you use paper sacks for the sides but how do you get it to stick o you use mogpodg or wall paper glue and once it is on do you go back and stain it with any thing or do you just poly. One more question do you like to use poly or do you prefer varnish. I have started to use varnish and I love the finish I get with it. But only use it on outside stuff. Thanks for all your information you will give me. |
|
| |
|
Elite Veteran
Posts: 794
| thejerseylilly2000 - 2013-06-17 3:20 PM
Ok...here's the latest pictures of the dresser.
Cutting the picture to fit....
Picture layed out on the drawers final placement before glueing them on.
One small trim piece I almost forgot to strip the paint off of and add. Had to dig paint out of the creases wth a kitchen knife.
FINISHED!!!! :))
This piece is soooooo pretty I can't stop looking at it. You are the most talented person. I wish I could send you pix of my stuff and you could tell me what to do with them. |
|
| |
|
Lover of Old Things
Posts: 989
Location: South East Texas | cavlier - 2013-06-17 3:26 PM
thejerseylilly2000 - 2013-06-11 9:20 PM
The sides...covered with paper to look like leather. Then corner stencils. :))
I know you said you use paper sacks for the sides but how do you get it to stick o you use mogpodg or wall paper glue and once it is on do you go back and stain it with any thing or do you just poly. One more question do you like to use poly or do you prefer varnish. I have started to use varnish and I love the finish I get with it. But only use it on outside stuff. Thanks for all your information you will give me.
Yes I use modpodge. And I use polycrylic because I like the finish I get...plus it's soap and water clean up and dries much faster than varnish. It's really just a matter of preference. I do usually do a antiquing stain over the paper. It just gives it more depth. |
|
| |
|
Lover of Old Things
Posts: 989
Location: South East Texas | cavlier - 2013-06-17 3:28 PM
thejerseylilly2000 - 2013-06-17 3:20 PM
Ok...here's the latest pictures of the dresser.
Cutting the picture to fit....
Picture layed out on the drawers final placement before glueing them on.
One small trim piece I almost forgot to strip the paint off of and add. Had to dig paint out of the creases wth a kitchen knife.
FINISHED!!!! :))
This piece is soooooo pretty I can't stop looking at it. You are the most talented person. I wish I could send you pix of my stuff and you could tell me what to do with them.
That's what this whole thread was intended for...to get more people interested and doing pieces of their own. Post pictures of what you have and what you want to do with it and I will help any way I can. |
|
| |
|
 Elite Veteran
Posts: 685
Location: Arkansas | So I've been wanting to redo my dresser and night stands that have been passed down 3 generations to me... they are an old, creamy color with gold trim and very ornate! I would like to do a distressed/crackle red look with hints of black on top... any suggestions as to how I can accomplish this?? I don't have time to start it too soon, but would like to start planning... I am also almost afraid to do anything to them out of fear of making them look worse |
|
| |
|
Elite Veteran
Posts: 794
| thejerseylilly2000 - 2013-06-17 3:45 PM
cavlier - 2013-06-17 3:28 PM
thejerseylilly2000 - 2013-06-17 3:20 PM
Ok...here's the latest pictures of the dresser.
Cutting the picture to fit....
Picture layed out on the drawers final placement before glueing them on.
One small trim piece I almost forgot to strip the paint off of and add. Had to dig paint out of the creases wth a kitchen knife.
FINISHED!!!! :))
This piece is soooooo pretty I can't stop looking at it. You are the most talented person. I wish I could send you pix of my stuff and you could tell me what to do with them.
That's what this whole thread was intended for...to get more people interested and doing pieces of their own. Post pictures of what you have and what you want to do with it and I will help any way I can.
Thanks so much I will get pix and we will go from there. Thanks |
|
| |
|
Lover of Old Things
Posts: 989
Location: South East Texas | Brrlracengirl - 2013-06-17 9:23 PM
So I've been wanting to redo my dresser and night stands that have been passed down 3 generations to me... they are an old, creamy color with gold trim and very ornate! I would like to do a distressed/crackle red look with hints of black on top... any suggestions as to how I can accomplish this?? I don't have time to start it too soon, but would like to start planning... I am also almost afraid to do anything to them out of fear of making them look worse
My suggestion is go buy a small bottle of the crackle medium and small bottles of whatever paint color you want and play with it on something that doesn't matter. I have tried crackle and wasn't happy at all with the results. But...play with it anyway...seems like everyone has a different hand when it comes to that and it may work great for you. |
|
| |
|
Elite Veteran
Posts: 685
Location: Arkansas | thejerseylilly2000 - 2013-06-17 11:53 PM
Brrlracengirl - 2013-06-17 9:23 PM
So I've been wanting to redo my dresser and night stands that have been passed down 3 generations to me... they are an old, creamy color with gold trim and very ornate! I would like to do a distressed/crackle red look with hints of black on top... any suggestions as to how I can accomplish this?? I don't have time to start it too soon, but would like to start planning... I am also almost afraid to do anything to them out of fear of making them look worse
My suggestion is go buy a small bottle of the crackle medium and small bottles of whatever paint color you want and play with it on something that doesn't matter. I have tried crackle and wasn't happy at all with the results. But...play with it anyway...seems like everyone has a different hand when it comes to that and it may work great for you.
sounds like a good idea! would it also work to paint the item black, then put a coat or two of deep red on top and just lightly sand to allow the black to show through?? |
|
| |
|
 Extreme Veteran
Posts: 480
Location: Oklahoma | I recently began working on an old dresser. I originally planned to stain the drawers and paint the sides and top, but when I got the old paint off, I found there was too much filler on the drawers for them to stain nicely, so I decided to do the paper bag finish. The two larger drawers turned out great, but the small ones have some places where it looks as though the stain I used bled through the Modpodge. What would cause that to happen? Maybe put on more coats of Modpodge? I think I will scrape it all off and try again. Any tips for better luck? |
|
| |
|
Lover of Old Things
Posts: 989
Location: South East Texas | Brrlracengirl - 2013-06-18 8:24 PM
thejerseylilly2000 - 2013-06-17 11:53 PM
Brrlracengirl - 2013-06-17 9:23 PM
So I've been wanting to redo my dresser and night stands that have been passed down 3 generations to me... they are an old, creamy color with gold trim and very ornate! I would like to do a distressed/crackle red look with hints of black on top... any suggestions as to how I can accomplish this?? I don't have time to start it too soon, but would like to start planning... I am also almost afraid to do anything to them out of fear of making them look worse
My suggestion is go buy a small bottle of the crackle medium and small bottles of whatever paint color you want and play with it on something that doesn't matter. I have tried crackle and wasn't happy at all with the results. But...play with it anyway...seems like everyone has a different hand when it comes to that and it may work great for you.
sounds like a good idea! would it also work to paint the item black, then put a coat or two of deep red on top and just lightly sand to allow the black to show through??
Yes you can sure do that. |
|
| |
|
Lover of Old Things
Posts: 989
Location: South East Texas | ibracin - 2013-06-19 10:20 AM
I recently began working on an old dresser. I originally planned to stain the drawers and paint the sides and top, but when I got the old paint off, I found there was too much filler on the drawers for them to stain nicely, so I decided to do the paper bag finish. The two larger drawers turned out great, but the small ones have some places where it looks as though the stain I used bled through the Modpodge. What would cause that to happen? Maybe put on more coats of Modpodge? I think I will scrape it all off and try again. Any tips for better luck?
I've had that happen a couple times too. And have started putting a really good layer of mod podge on after the first initial "gluing it on" is dry. Seems to help keep that from happening. |
|
| |
|
 A Somebody to Everybody
Posts: 41354
Location: Under The Big Sky Of Texas | thejerseylilly2000 - 2013-06-17 3:20 PM Ok...here's the latest pictures of the dresser. Cutting the picture to fit.... Picture layed out on the drawers final placement before glueing them on. One small trim piece I almost forgot to strip the paint off of and add. Had to dig paint out of the creases wth a kitchen knife. FINISHED!!!! :))
That is AWWWSOME, I love it |
|
| |
|
Lover of Old Things
Posts: 989
Location: South East Texas | I have been busy busy busy....will get back to posting pictures soon :)) |
|
| |
|
 Heeler Hater
Posts: 3014
Location: Texas | wow these are awesome!!!!
I really want to redo an old couch table (you know the long ones people put behind their couches)
But i have no idea what to do with it, especially the legs. |
|
| |
|
Elite Veteran
Posts: 794
| What do you use to strip the paint off? |
|
| |
|
Lover of Old Things
Posts: 989
Location: South East Texas | I've been using Citra-Strip .... Works really well. Got it at Walmart. Be sure to wear protective gloves and read the label for all steps, for clean up etc you will need Ty have some other stuff on hand....putty knife, gloves. Alcohol, and lots of paper towels.
Edited by thejerseylilly2000 2013-07-09 12:24 PM
|
|
| |
|
 Expert
Posts: 1567
| So I saw this thread and thought about refinishing a used baby crib. My concern is with the chewing that infants do on the rails. Would you be concerned about the possible toxicity of any of the finishes? I'm thinking paint would almost certainly come off, and I know that on some used cribs you can see the raw wood where the child has scraped off the finish. |
|
| |
|
 Heart of Orange
Posts: 13226
Location: At The End of The Red Dirt Road | I have totally missed this post until today! Good timing! My DIL is doing our granddaughter's room (she's due to arrive Sept.9). I bought an antique twin bed for her to eventually put in there & we were going to have someone else refinish it - you have about enlightened me enough that I'm thinking I can do it myself! LOL! I also have several smaller pieces - tables, an old wooden ash tray stand & a couple of etched mirror wardrobe doors I saved off of an old wardrobe that was my grandmothers - after moving it thru 5 states it had pretty much fallen apart. Think I will practice on some smaller pieces and see what I can do - thank you! |
|
| |
|
Lover of Old Things
Posts: 989
Location: South East Texas | As for baby beds and toxicity of finishes. I've really no experience with something that might get chewed on. My best advice there would be to go talk to someone in a paint store and see what's available. I will say this tho...if you don't sand it down, nothing is going to adhere good, be it paint or finish. |
|
| |
|
Elite Veteran
Posts: 1074
| Love it! |
|
| |
|
 Little Miss can't be wrong
Posts: 1478
Location: SW Missouri | Wow!
|
|
| |
|
 Grandma's little Beauty Queen
Posts: 12653
Location: Somewhere playing in the mud....Oklahoma | Love! |
|
| |
|
Sock Snob
Posts: 3021
| I have a question i had put some finish with stain and put a coat of clear poly and i made sure i stired the poly well left some white haze, i sanded it off and bought a new can and it did the same thing, i know some of yall where using the water base kind. what did i do wrong. |
|
| |
|
Elite Veteran
Posts: 794
| daisycake123 - 2013-08-04 6:35 AM
I have a question i had put some finish with stain and put a coat of clear poly and i made sure i stired the poly well left some white haze, i sanded it off and bought a new can and it did the same thing, i know some of yall where using the water base kind. what did i do wrong.
How's long did you let the stain dry before you put poly on and hoe long did you let the poly dry before you decided to sand. Some of those finishes need a couple days to dry before they turn clear. |
|
| |
|
Lover of Old Things
Posts: 989
Location: South East Texas | Daisycake, from the wording of your post, it sounds like you mixed the stain with the finish? or am I not reading that right? if that's the case...it would probably cause major issues with the finish. |
|
| |
|
Lover of Old Things
Posts: 989
Location: South East Texas | Ok...finally getting to sit down and post some pictures. I've had major computer issues...ended up just going and buying a new one. Sometimes I hate technology lol
I've been super super busy with furniture these days. So....I will just post before and after photos of each piece I've done. If you have any questions, I will try to answer them. Thanks for being patient with me.
Also you'll notice I started putting my name on the final photo....because of Pinterest and other sharing sights it's a necessity. The last dresser is the one I'm working on right now.
Edited by thejerseylilly2000 2013-08-04 11:52 PM
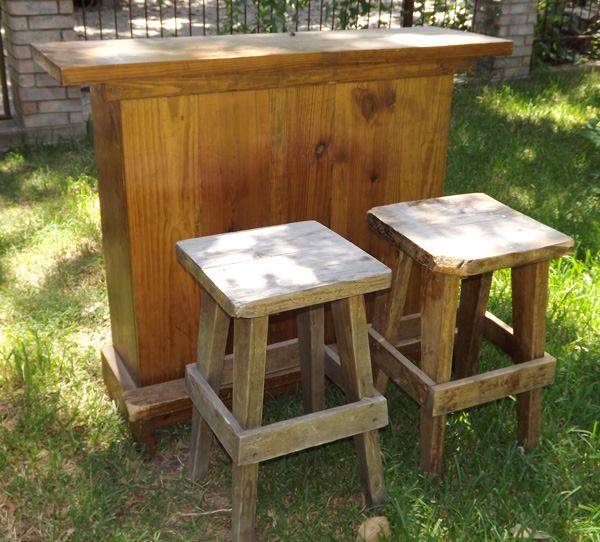 (KimSteve's bar before.jpg) (KimSteve's bar before.jpg)
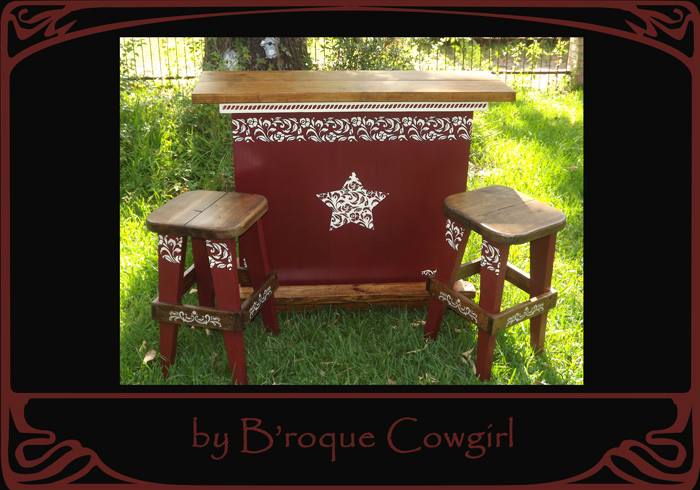 (KimSteve's bar after.jpg) (KimSteve's bar after.jpg)
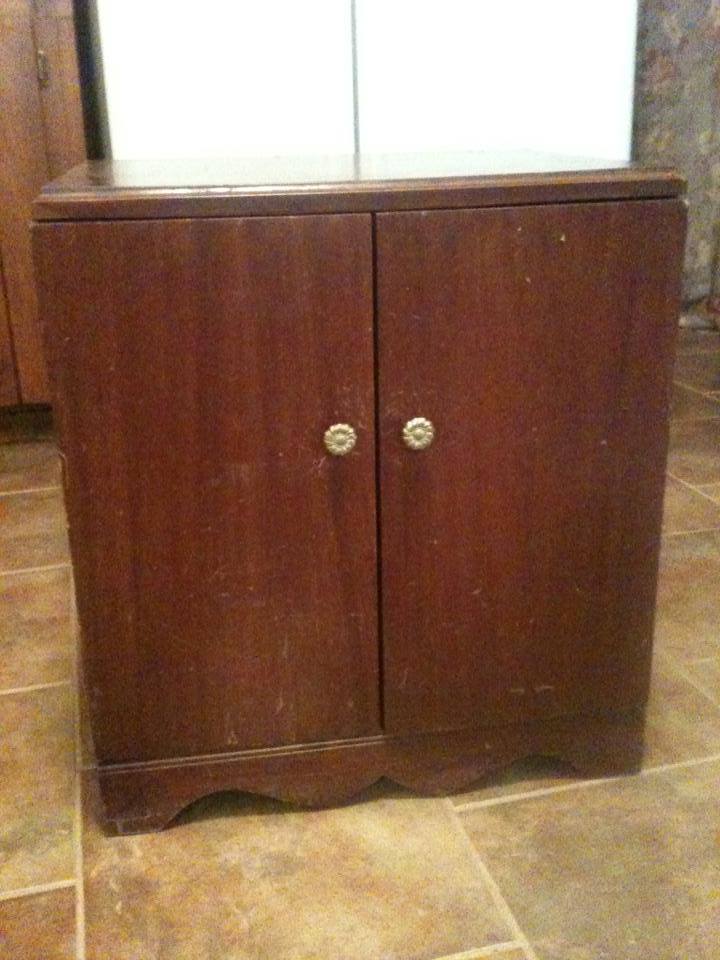 (Julie's cabinet before.jpg) (Julie's cabinet before.jpg)
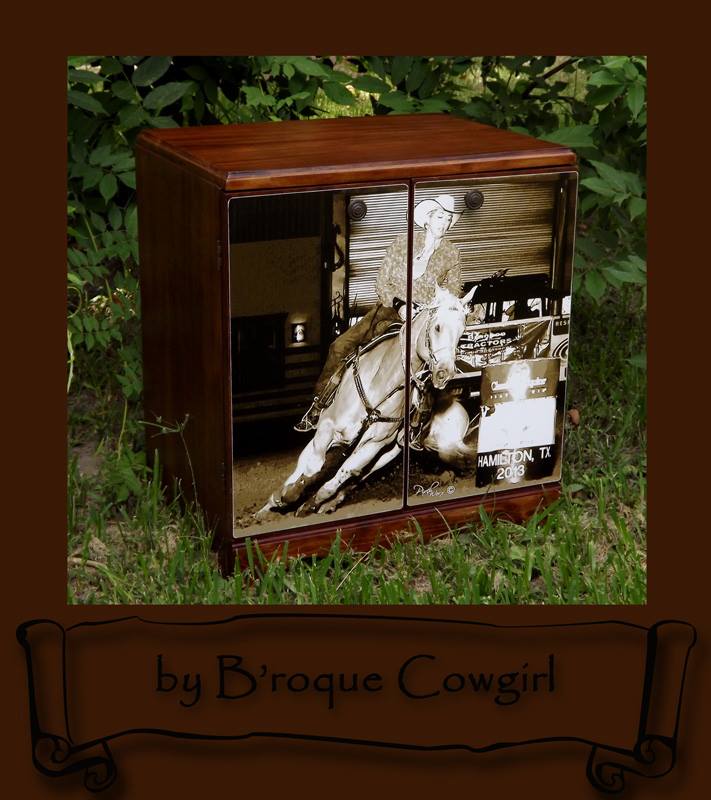 (Julie's cabinet after.jpg) (Julie's cabinet after.jpg)
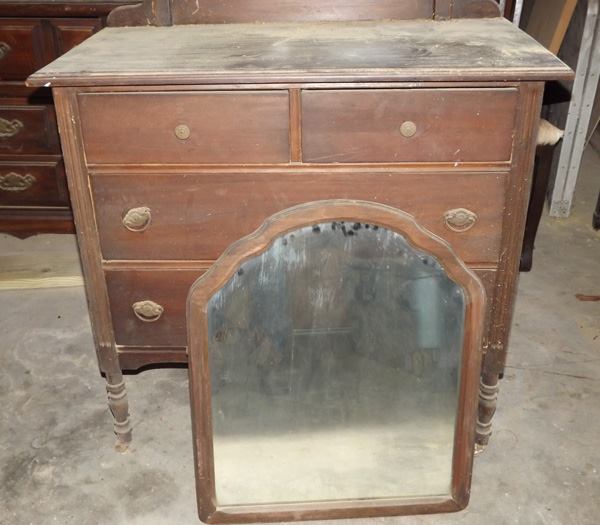 (Granny's Dresser before.jpg) (Granny's Dresser before.jpg)
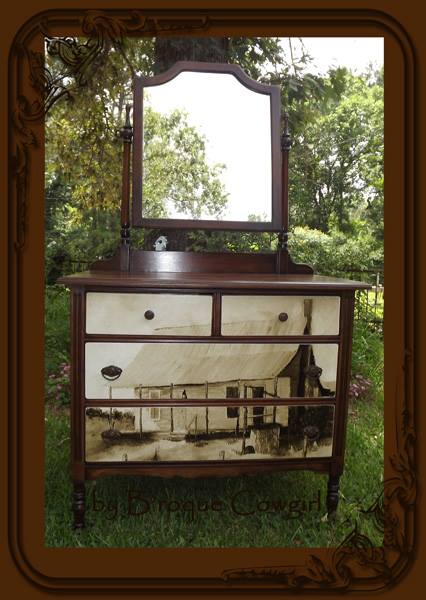 (Granny's Dresser after.jpg) (Granny's Dresser after.jpg)
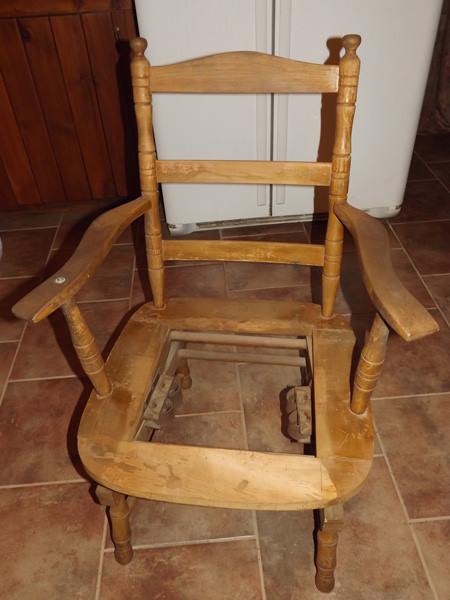 (Dawn's Rocker before.jpg) (Dawn's Rocker before.jpg)
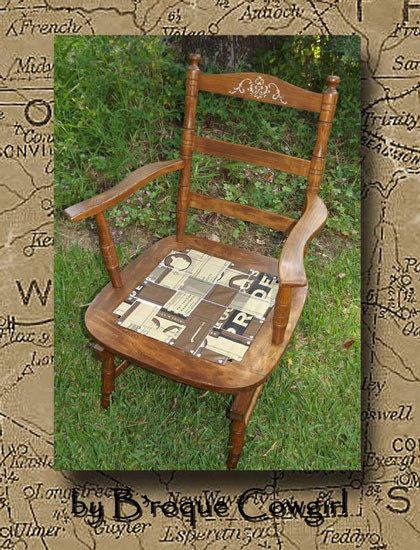 (Dawn's-Rocker-after.jpg) (Dawn's-Rocker-after.jpg)
 (Emily before.jpg) (Emily before.jpg)
 (Emily after.jpg) (Emily after.jpg)
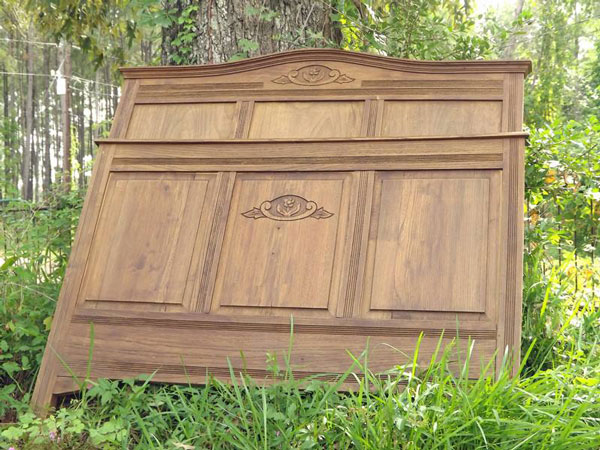 (Tristen's-bed-before.jpg) (Tristen's-bed-before.jpg)
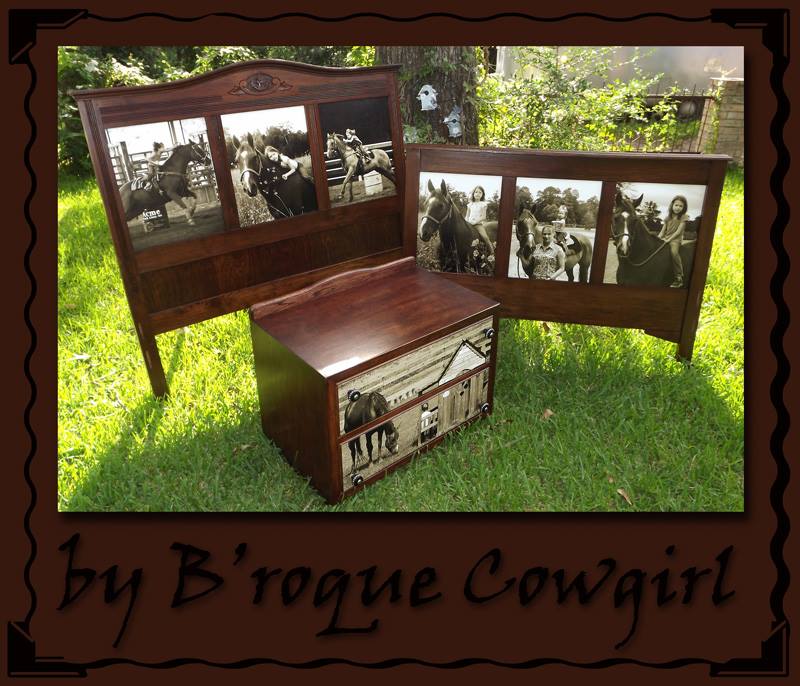 (Tristen's bed after.jpg) (Tristen's bed after.jpg)
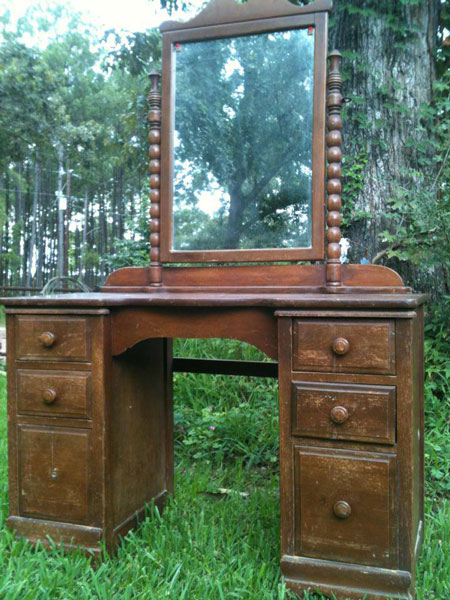 (RosaLea-before.jpg) (RosaLea-before.jpg)
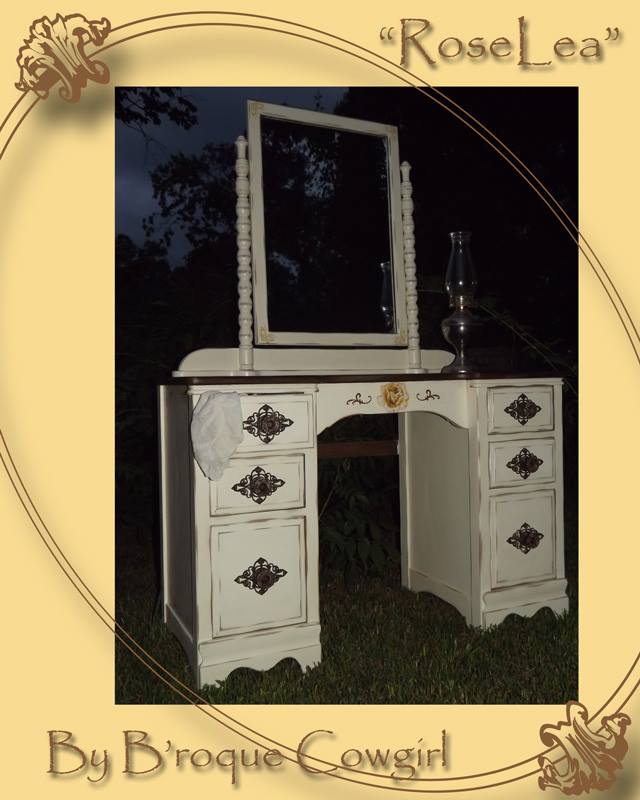 (RosaLea after.jpg) (RosaLea after.jpg)
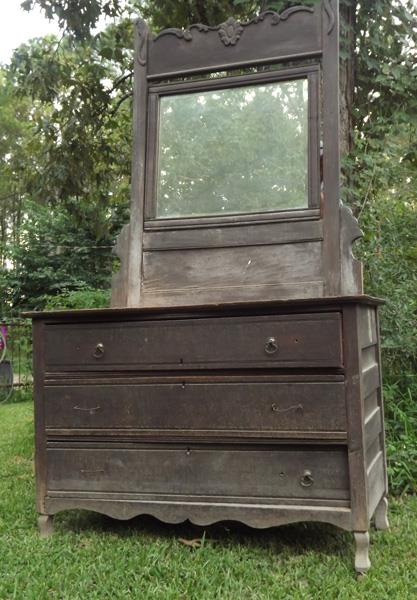 (Kenna's Chance dresser before.jpg) (Kenna's Chance dresser before.jpg)
Attachments
----------------
KimSteve's bar before.jpg (63KB - 304 downloads)
KimSteve's bar after.jpg (50KB - 295 downloads)
Julie's cabinet before.jpg (73KB - 299 downloads)
Julie's cabinet after.jpg (71KB - 303 downloads)
Granny's Dresser before.jpg (42KB - 289 downloads)
Granny's Dresser after.jpg (43KB - 292 downloads)
Dawn's Rocker before.jpg (32KB - 301 downloads)
Dawn's-Rocker-after.jpg (94KB - 308 downloads)
Emily before.jpg (56KB - 288 downloads)
Emily after.jpg (62KB - 273 downloads)
Tristen's-bed-before.jpg (95KB - 280 downloads)
Tristen's bed after.jpg (87KB - 279 downloads)
RosaLea-before.jpg (89KB - 277 downloads)
RosaLea after.jpg (55KB - 277 downloads)
Kenna's Chance dresser before.jpg (49KB - 285 downloads)
|
|
| |
|
 boon
Posts: 2
| |
|
| |
|
| Love it all!!! where do you find all of your great furniture? |
|
| |
|
Looking for Lady Jockey
Posts: 3747
Location: Rodeos or Baseball games | Once again...................AMAZING work!!! |
|
| |
|
Lover of Old Things
Posts: 989
Location: South East Texas | Kgirl, some of these pieces were done for the people that owned them, the bar, small cabinet with barrel horse, tall cabinet yellow rose. As for the other stuff...I find them at yard sales, estate sales, flea markets, thrift stores.....and sometimes just have people contact me and say I have this do you want it. Lol |
|
| |
|
Lover of Old Things
Posts: 989
Location: South East Texas | Thanks GOIN' FAST :) |
|
| |
|
 Shipwrecked and Flat Out Zapped
Posts: 16390
Location: DUMPING CATS AND PIGS IN TEXAS :) | WOW! You do amazing work! You have so much talent! |
|
| |
|
Shipwrecked and Flat Out Zapped
Posts: 16390
Location: DUMPING CATS AND PIGS IN TEXAS :) | thejerseylilly2000 - 2013-06-03 2:48 PM Giving the sides of this chest of drawers the faux leather treatment. Because the sides weren't in that great of shape. They are solid...but really banged up and unsmooth. Sanding didn't do the trick. I have a question for you about this faux leather look. Am I understanding correctly that I should put a coat of Mod Podge after sanding, then the pieces of brown paper bag, and then a layer of Modge Podge on top of that? And, then let it dry like that?
Thanks :) I really want to try this.
Edited by LRQHS 2013-08-08 12:32 PM
|
|
| |
|
Lover of Old Things
Posts: 989
Location: South East Texas | When I'm putting the brown paper on I work with each individual piece. Paint on a spot of modpodge put paper on and do it again over lapping them. It dries relatively fast so you can't work in large sections. Each piece I put on I put a layer of it on then. Then after its all dry I paint on another layer all over the brown paper. |
|
| |
|
Shipwrecked and Flat Out Zapped
Posts: 16390
Location: DUMPING CATS AND PIGS IN TEXAS :) | thejerseylilly2000 - 2013-08-08 6:18 PM When I'm putting the brown paper on I work with each individual piece. Paint on a spot of modpodge put paper on and do it again over lapping them. It dries relatively fast so you can't work in large sections. Each piece I put on I put a layer of it on then. Then after its all dry I paint on another layer all over the brown paper.
O.k....thank you, very much :) I really appreciate it. I am so going to try this :)
After your final coat of Mod Podge, do you spray something else on it to seal it or apply anything else? |
|
| |
|
Lover of Old Things
Posts: 989
Location: South East Texas | I put 2 or 3 coats of min wax polycrylic over the modpodge. It's a water based clear sealer. I use satin because I just don't care for the high gloss. (Personal preference) cheapest place I have found it is Walmart. Home Depot and Lowes both have it but its a couple dollars more a can. Also cleans up with soap and water. |
|
| |
|
Shipwrecked and Flat Out Zapped
Posts: 16390
Location: DUMPING CATS AND PIGS IN TEXAS :) | thejerseylilly2000 - 2013-08-09 11:59 AM I put 2 or 3 coats of min wax polycrylic over the modpodge. It's a water based clear sealer. I use satin because I just don't care for the high gloss. (Personal preference) cheapest place I have found it is Walmart. Home Depot and Lowes both have it but its a couple dollars more a can. Also cleans up with soap and water.
You are awesome! Thank you so much! |
|
| |
|
 John Deere Green
Posts: 12272
Location: ~Kansas~ | so awesome I have a really old kitchen table that i would love to use outside for a picnic table |
|
| |
|
Lover of Old Things
Posts: 989
Location: South East Texas | Answered your pm about old table outside. :) |
|
| |
|
Lover of Old Things
Posts: 989
Location: South East Texas | Ok here's a picture of the last dresser that I've completed. It has a little bit of several things on it. A little faux leather....some stencils...and some refinished wood...as well as the picture on the drawer fronts. I really love how this piece has came back to life. The before picture is the last picture in the last picture post I made. Almost looked like a piece out of a ghost house or something lol But no more....:)
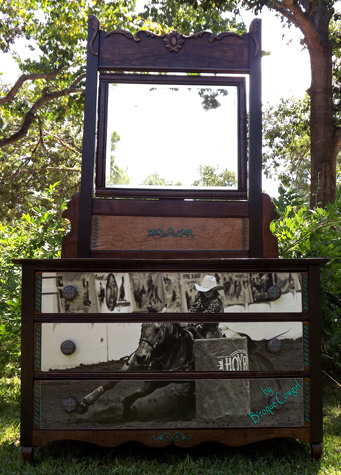 (2013-08-18-009small.jpg) (2013-08-18-009small.jpg)
Attachments
----------------
2013-08-18-009small.jpg (95KB - 292 downloads)
|
|
| |
|
 Extreme Veteran
Posts: 310
Location: Ohio | thejerseylilly2000 - 2013-08-18 1:25 PM
Ok here's a picture of the last dresser that I've completed. It has a little bit of several things on it. A little faux leather....some stencils...and some refinished wood...as well as the picture on the drawer fronts. I really love how this piece has came back to life. The before picture is the last picture in the last picture post I made. Almost looked like a piece out of a ghost house or something lol But no more....:)
THIS is beautiful! |
|
| |
|
Lover of Old Things
Posts: 989
Location: South East Texas | Thank you :) |
|
| |
|
| Anymore Projects Gwen? I love looking at your creations and havent seen any new ones for awhile!! |
|
| |
|
Expert
Posts: 1409
Location: Oklahoma | I couldn't afford a new ceiling in my house so to cover up the discoloration we did the technique you are talking about using the brown paper to make look like leather and it was super cheap! I get compliments all the time. You can also do walls, I did it in my bathroom and then stained it. I heard that you can also paint it too. |
|
| |
|
Lover of Old Things
Posts: 989
Location: South East Texas | Yes I need to sit down and resize all the photos for here.
I would love to see pics of the ceiling :)) |
|
| |
|
Lover of Old Things
Posts: 989
Location: South East Texas | Ok here are a few of the latest pieces.
The first one...I named "Buffalo Bill" because it came in on a horse trailer from Cheyenne Wyoming....hoping to get it a ride back in the next couple weeks....I am waiting on hardware for it that I ordered. It came all wrapped nicely in a blanket and tarp with ratchet straps all around it. If it hadn't been for all that I don't think it would have made it in one piece. LOL Cool piece...but had alot of repairs to do before making him pretty.
The piece with the Windmill on it....I'm donating to a silent auction fundraiser. I didn't take before pictures of it....I kinda hurried on this one.
This last piece...the veneer was in horrible shape...so had to steam it off with a wet towel and an iron.
But it came off rather easily.....all except one drawer....but I got it. Currently sitting in my kitchen...working on it.
Edited by thejerseylilly2000 2013-09-17 10:46 PM
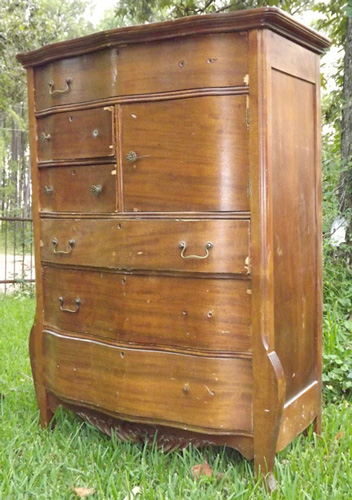 (2013-08-27-001small.jpg) (2013-08-27-001small.jpg)
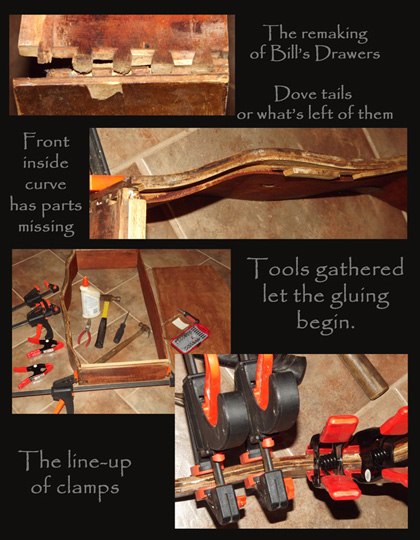 (2013-09-04small.jpg) (2013-09-04small.jpg)
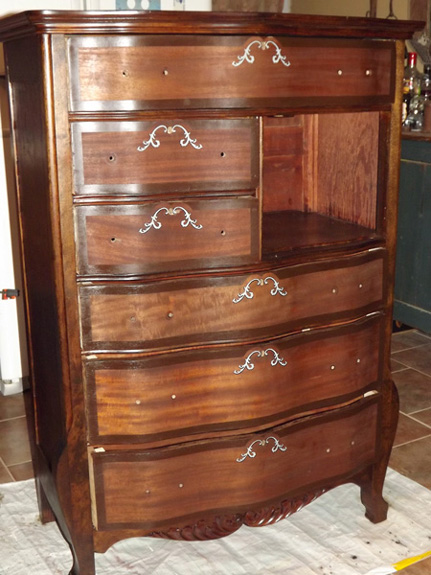 (2013-09-09-001small.jpg) (2013-09-09-001small.jpg)
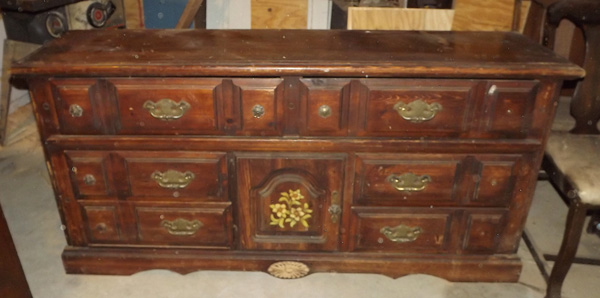 (2013-08-28-002.jpg) (2013-08-28-002.jpg)
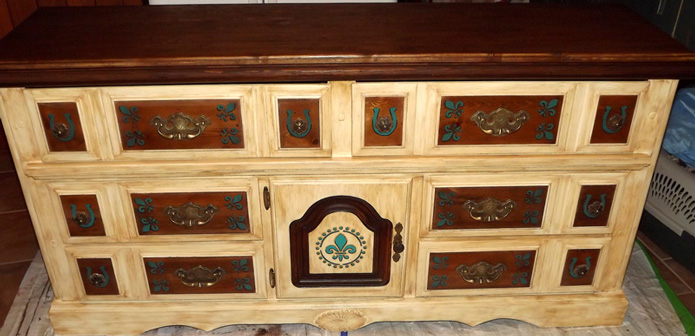 (2013-09-01-003small.jpg) (2013-09-01-003small.jpg)
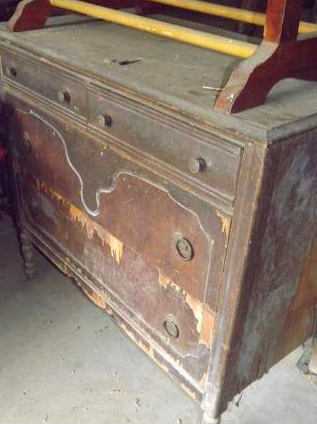 (2013-09-17-dresser.jpg) (2013-09-17-dresser.jpg)
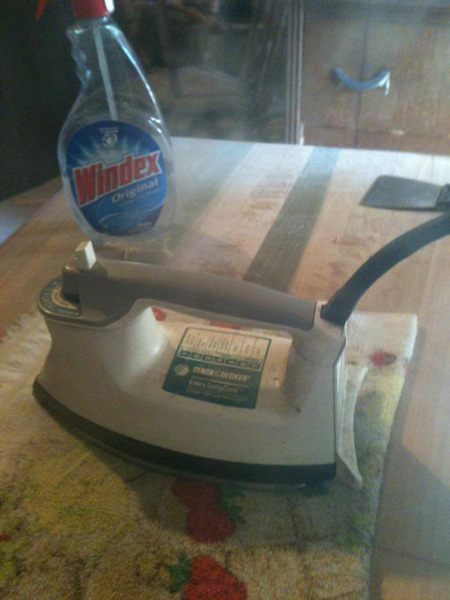 (2013-09-17-stripping-veneer.jpg) (2013-09-17-stripping-veneer.jpg)
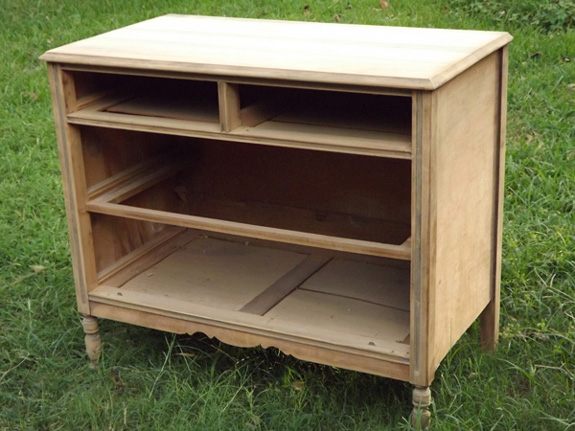 (2013-09-17-006small.jpg) (2013-09-17-006small.jpg)
Attachments
----------------
2013-08-27-001small.jpg (88KB - 287 downloads)
2013-09-04small.jpg (98KB - 293 downloads)
2013-09-09-001small.jpg (98KB - 304 downloads)
2013-08-28-002.jpg (61KB - 295 downloads)
2013-09-01-003small.jpg (98KB - 288 downloads)
2013-09-17-dresser.jpg (54KB - 303 downloads)
2013-09-17-stripping-veneer.jpg (83KB - 290 downloads)
2013-09-17-006small.jpg (98KB - 301 downloads)
|
|
| |
|
 Desert Diva
Posts: 4946
Location: The birthplace of Honest Abe | I may have and probably did miss it but how do you remove the Veneer and all the glue?
|
|
| |
|
Lover of Old Things
Posts: 989
Location: South East Texas | The picture with the wet towel and an iron. The windex bottle has water in it that I spray directly on the veneer. Then spray my towel to keep it wet. Set the iron on it for 30 seconds to a minute then peel it up with the putty knife. After that sanding takes care of any glue remaining. |
|
| |
|
Fact Checker
Posts: 16575
Location: Displaced Iowegian | Gorgeous....I love the light dresser with the inserts......you are very talented! |
|
| |
|
Expert
Posts: 1409
Location: Oklahoma | I keep forgetting to take pic of ceiling but I will try to remember tonight and post tomorrow.
|
|
| |
|
Expert
Posts: 1409
Location: Oklahoma | I am trying to learn how to attach some pics finally got pics of my ceiling and also in my bathroom I have this piece for my sink I want to redo finish on it but not sure I should everyone tells me I should leave alone and for my border in the bathroom I order bandana red look and then I am gonna stud it with silver studs. My ceiling is not stained or painted but my bathroom wall was textured under the paper and then I stained it. though about poly but not sure if I want a shiny look so here are some pics let me know what you think good or bad I can take it. Lol
 (bathroom.JPG) (bathroom.JPG)
Attachments
----------------
bathroom.JPG (38KB - 283 downloads)
|
|
| |
|
Expert
Posts: 1409
Location: Oklahoma | here is the bathroom wall. stained. also on the cabinet above that is shadow on the front of it it is not discolored.
 (bathroom wall.JPG) (bathroom wall.JPG)
Attachments
----------------
bathroom wall.JPG (32KB - 285 downloads)
|
|
| |
|
Expert
Posts: 1409
Location: Oklahoma | here is the ceiling and another pic of cabinet
 (ceiling.JPG) (ceiling.JPG)
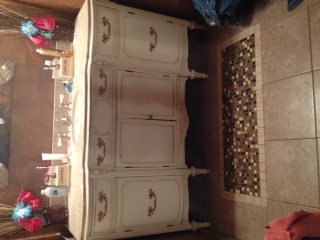 (bathroom (2).JPG) (bathroom (2).JPG)
Attachments
----------------
ceiling.JPG (30KB - 282 downloads)
bathroom (2).JPG (36KB - 309 downloads)
|
|
| |
|
Expert
Posts: 1409
Location: Oklahoma | sorry the pics are sidwways this is first time and don't know how to rotate the are the right way on my computer. |
|
| |
|
Lover of Old Things
Posts: 989
Location: South East Texas | That looks awesome!!! Love the piece that is used for the bathroom vanity! As for refinishing it....that would be entirely up to you. If you do....an easier option might be to just take doors and drawers off...refinish them...and paint the base where it sits. Then put it back together. |
|
| |
|
 Elite Veteran
Posts: 1066
| Any suggestions on the easiest (and cheapest) way to remove wallpaper? |
|
| |
|
Expert
Posts: 1392
Location: Central Texas | Tys-ol-lady - 2013-10-02 10:20 AM Any suggestions on the easiest (and cheapest) way to remove wallpaper?
I filled a spray bottle about a 1/4 with fabric softener and the rest with HOT water. Peel whatever wall paper will come off first and then soak the rest with this mixture. Walk away for about 15 minutes and then come back and scrap off with a putty knife. This worked well for me, most of it just rolled off, I had a few stubborn areas that I had to soak a second time. Unfortunatley I don't think there is an easy method. This still required work but it has been the easiest method I have found.....and it smells good... |
|
| |
|
Elite Veteran
Posts: 1066
| GraciousLegacy - 2013-10-02 11:28 AM Tys-ol-lady - 2013-10-02 10:20 AM Any suggestions on the easiest (and cheapest) way to remove wallpaper? I filled a spray bottle about a 1/4 with fabric softener and the rest with HOT water. Peel whatever wall paper will come off first and then soak the rest with this mixture. Walk away for about 15 minutes and then come back and scrap off with a putty knife. This worked well for me, most of it just rolled off, I had a few stubborn areas that I had to soak a second time. Unfortunatley I don't think there is an easy method. This still required work but it has been the easiest method I have found.....and it smells good...
Cool, thanks! You sound like a pro, wanna come help?? haha  |
|
| |
|
Lover of Old Things
Posts: 989
Location: South East Texas | I've never tried to remove wall paper....ive only papered a room one time in my whole life...my bath at my parents house when I was in high school...swore I would never put wall paper on anything ever again. Lol |
|
| |
|
Elite Veteran
Posts: 850
Location: Bluffdale UT | What kind of Poly do you use over white paint - that won't turn it yellow?.... ugh! |
|
| |
|
Lover of Old Things
Posts: 989
Location: South East Texas | I use Minwax Polycrylic. It doesn't yellow like polyurethane does. |
|
| |
|
I Eat Like a Normal Person
Posts: 3400
Location: Kansas | thejerseylilly2000 - 2013-06-07 3:49 PM SC Wrangler - 2013-06-07 11:23 AM Question. I am getting ready to convert an old buffet to a western theme. I want to adhere cowhide to the raised panel doors. Any clue what kind of adhesive would work? Once it is on I will use upholstery tack strips around the edges of the hide. 3M spray adhesive. But....you will have to tape off and cover anywhere that you don't want the spray it doesn't come off easily.
Edited by lonestarace 2013-10-26 11:54 AM
|
|
| |
|
Lover of Old Things
Posts: 989
Location: South East Texas | If you are using the spray adhesive you shouldn't have to do anything to the finish. Only reason you would need to is if it has veneer on it that is loose. |
|
| |
|
| lonestarace - 2013-10-26 11:53 AM thejerseylilly2000 - 2013-06-07 3:49 PM SC Wrangler - 2013-06-07 11:23 AM Question. I am getting ready to convert an old buffet to a western theme. I want to adhere cowhide to the raised panel doors. Any clue what kind of adhesive would work? Once it is on I will use upholstery tack strips around the edges of the hide. 3M spray adhesive. But....you will have to tape off and cover anywhere that you don't want the spray it doesn't come off easily.
Lets see pictures!! |
|
| |
|
 The Rose of Rodeo...
Posts: 2560
Location: Where we still run to look when the siren goes by. | I am refinishing a coffee table and doing the faux leather look on top, I have a lot of butcher paper – will that work or do I need the paperbag style paper? The butcher paper is pretty light but I think it would work to stain it?
|
|
| |
|
Expert
Posts: 1392
Location: Central Texas | Rodeo Rose - 2013-10-31 10:47 AM I am refinishing a coffee table and doing the faux leather look on top, I have a lot of butcher paper – will that work or do I need the paperbag style paper? The butcher paper is pretty light but I think it would work to stain it?
I used the brown butcher type paper on my wall and it worked fine. As long as it doesn't have that waxy texture to it you should be ok.
Edited by GraciousLegacy 2013-10-31 12:44 PM
|
|
| |
|
The Rose of Rodeo...
Posts: 2560
Location: Where we still run to look when the siren goes by. | GraciousLegacy - 2013-10-31 11:42 AM Rodeo Rose - 2013-10-31 10:47 AM I am refinishing a coffee table and doing the faux leather look on top, I have a lot of butcher paper – will that work or do I need the paperbag style paper? The butcher paper is pretty light but I think it would work to stain it?
I used the brown butcher type paper on my wall and it worked fine. As long as it doesn't have that waxy texture to it you should be ok.
Great thanks! |
|
| |
|
Lover of Old Things
Posts: 989
Location: South East Texas | I've no experience with using butcher paper, I've just always used brown paper bags...feed sacks or the roll of brown paper that they sell for shipping paper. But like was mentioned, as long as it doesn't have the waxy side it should work fine. |
|
| |
|
 Veteran
Posts: 137
Location: ILLINOIS | Sure wish you could record you doing the faux leather look step by step! I am a "watch and learn" person! :)
Beautiful pieces though! |
|
| |
|
Lover of Old Things
Posts: 989
Location: South East Texas | I'm sure there are some tutorials on you tube and Pinterest. |
|
| |
|
Veteran
Posts: 137
Location: ILLINOIS | I'll have to look! :)
If I did the faux leather look on a table, how many coats of clearcoat would you suggest?
|
|
| |
|
Lover of Old Things
Posts: 989
Location: South East Texas | When I do it on the top surface of anything I put one good coat of modpodge over it after I've glued it on and it's dried....then I put 3 or 4 coats of polycrylic over that. Usually wait overnight to let that coat of modpodge dry good before the poly goes on |
|
| |
|
Lover of Old Things
Posts: 989
Location: South East Texas | This is my latest piece. I'm loving it....almost want to keep it instead of letting it go. LOL The drawers weren't all the same wood. Why I have no idea. So....even tho they weren't, I couldn't help playing with that wood grain. And I love how it turned out. Probably won't ever be able to repeat this affect. I started out calling this piece "The Ugly Duckling"......now that it's finished it's named, "Let 'er Buck"
 (2013-11-16-before.jpg) (2013-11-16-before.jpg)
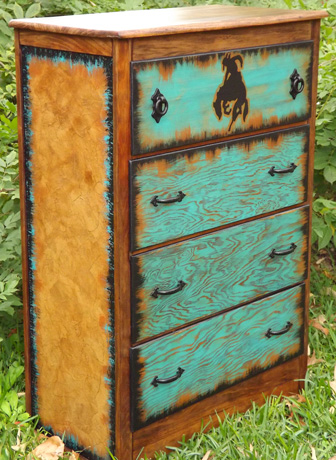 (2013-11-16-002.jpg) (2013-11-16-002.jpg)
Attachments
----------------
2013-11-16-before.jpg (98KB - 313 downloads)
2013-11-16-002.jpg (98KB - 305 downloads)
|
|
| |
|
 Angel in a Sorrel Coat
Posts: 16030
Location: In a happy place | Aaaawwwwwww! I love it! |
|
| |
|
Veteran
Posts: 116
| I love it!!! What did you do on the drawers? Awesome!!!! |
|
| |
|
Lover of Old Things
Posts: 989
Location: South East Texas | I painted them then went over them lightly with the sander. The wood grain that you see is a tad higher than where the paint stayed. Very slight difference but enough so that sanding took it off on the rippled grain. The top drawer was totally different wood.
Edited by thejerseylilly2000 2013-11-18 10:05 PM
|
|
| |
|
The Rose of Rodeo...
Posts: 2560
Location: Where we still run to look when the siren goes by. | What or how do you fill in the holes made by the previous drawer pulls?
|
|
| |
|
Looking for Lady Jockey
Posts: 3747
Location: Rodeos or Baseball games | Love it!!!! |
|
| |
|
 Bye-Bye Jiggle
Posts: 1691
Location: Where ever there's sunshine! | I'm starting on my first project this weekend. It's nothing fancy, but fter seeing all of your work I'm extremely excited! Thanks for sharing you talent and knowledge. |
|
| |
|
Lover of Old Things
Posts: 989
Location: South East Texas | Rodeo Rose...sometimes I'm able to use existing holes...sometimes not. If I fill the holes I use Elmer's wood filler then sand smooth. |
|
| |
|
Lover of Old Things
Posts: 989
Location: South East Texas | BleuIdGrl please share before and after pictures here on this thread, would love to see more of other people's projects. |
|
| |
|
Bye-Bye Jiggle
Posts: 1691
Location: Where ever there's sunshine! | thejerseylilly2000 - 2013-11-16 10:48 AM
This is my latest piece. I'm loving it....almost want to keep it instead of letting it go. LOL The drawers weren't all the same wood. Why I have no idea. So....even tho they weren't, I couldn't help playing with that wood grain. And I love how it turned out. Probably won't ever be able to repeat this affect. I started out calling this piece "The Ugly Duckling"......now that it's finished it's named, "Let 'er Buck"
How did you sand this piece and not lose the depth in the grooves? I would have thought sanding it wouls have made it a smooth surface? |
|
| |
|
Lover of Old Things
Posts: 989
Location: South East Texas | Just very different grain than you normally come across. I sanded the piece down before I painted...then a light sanding afterward. Weird deal...that's why I said I won't ever be able to repeat this technique. |
|
| |
|
Bye-Bye Jiggle
Posts: 1691
Location: Where ever there's sunshine! | thejerseylilly2000 - 2013-11-23 11:16 PM
Just very different grain than you normally come across. I sanded the piece down before I painted...then a light sanding afterward. Weird deal...that's why I said I won't ever be able to repeat this technique.
Just wanted to check. It looks amazing! I love your work! |
|
| |
|
Bye-Bye Jiggle
Posts: 1691
Location: Where ever there's sunshine! | ok, I want to be able to see the wood, but I want to put a red colored finish(?) on it and do some stenciling. How would I go about this? Do i finish it first, add the stencil and then go over with a polyurethane? |
|
| |
|
The Rose of Rodeo...
Posts: 2560
Location: Where we still run to look when the siren goes by. | thejerseylilly2000 - 2013-11-23 3:41 PM Rodeo Rose...sometimes I'm able to use existing holes...sometimes not. If I fill the holes I use Elmer's wood filler then sand smooth.
Thank you I will try that! |
|
| |
|
Lover of Old Things
Posts: 989
Location: South East Texas | BleuIdGrl - 2013-11-24 1:08 PM
ok, I want to be able to see the wood, but I want to put a red colored finish(?) on it and do some stenciling. How would I go about this? Do i finish it first, add the stencil and then go over with a polyurethane?
Do your stenciling first...then stain then finish. If you try to put stenciling on over the finish it most likely will smear around with the brush strokes when you try to put finish over it. (Speaking from experience ;) |
|
| |
|
Expert
Posts: 1409
Location: Oklahoma | Where do u get your stencils from i cant seem to find any. Thanks |
|
| |
|
Lover of Old Things
Posts: 989
Location: South East Texas | I get new ones at Hobby Lobby, Michaels, JoAnn's, the a big majority I've picked up at thrift stores and yard sales. |
|
| |
|
Lover of Old Things
Posts: 989
Location: South East Texas | I have been super super busy with some pieces for Christmas....I will get pictures up as soon as the holiday is over. Don't want to ruin any surprises ;) |
|
| |
|
Elite Veteran
Posts: 602
Location: out in Oklahoma | I have ran in to a spot on my furniture remake where I need some advice. I have a few small cut out images that I have placed on the surface of my table thing but they do not take up the entire surface, they are just accent images. I have used mod podge to put the images on and seal them but where I run in to my confusion is; Do I need to use a layer of modpodge over the entire surface of the table or just over the images? There are small shiny spots left around the edges of the images and im curious if the poly sealer will even that out when I put it on or if I just need to do a layer of modpodge over the surface to make it look even? |
|
| |
|
I Eat Like a Normal Person
Posts: 3400
Location: Kansas | I have a wooden sled that I used as a litle girl. It's 50+ years old, and is still in good shape, however it's been out in the barn for years. What is the best thing to clean the wood with that won't ruin what finish and decals are left? I'm sure the mice have been around it, but it's not stained, chewed, or damaged....just dusty/dirty. Thanks! |
|
| |
|
I Eat Like a Normal Person
Posts: 3400
Location: Kansas | I have a wooden sled that I used as a litle girl. It's 50+ years old, and is still in good shape, however it's been out in the barn for years. What is the best thing to clean the wood with that won't ruin what finish and decals are left? I'm sure the mice have been around it, but it's not stained, chewed, or damaged....just dusty/dirty. I didn't know if rubbing alcohol would damage it? Thanks!
Edited by lonestarace 2013-12-27 11:33 AM
|
|
| |
|
The Rose of Rodeo...
Posts: 2560
Location: Where we still run to look when the siren goes by. | lonestarace - 2013-12-27 10:27 AM I have a wooden sled that I used as a litle girl. It's 50+ years old, and is still in good shape, however it's been out in the barn for years. What is the best thing to clean the wood with that won't ruin what finish and decals are left? I'm sure the mice have been around it, but it's not stained, chewed, or damaged....just dusty/dirty. I didn't know if rubbing alcohol would damage it? Thanks!
I would blow it off with an air hose then take a damp rag to it. Not sure but rubbing alcohol might dry it out? I have gone through my basement and brought up a lot of old metal/wooden cooking utensils and this works great for them
|
|
| |
|
Bye-Bye Jiggle
Posts: 1691
Location: Where ever there's sunshine! | UPDATE! I had to head to florida for a month so I didnt't get my night stand finnished as soon as I thought I would, but it's done! It's nothing fancy, but I'm pretty happy with it. I couldn't load the before pics ( took them with my iPad). This is the back.
Edited by BleuIdGrl 2014-01-08 4:07 PM
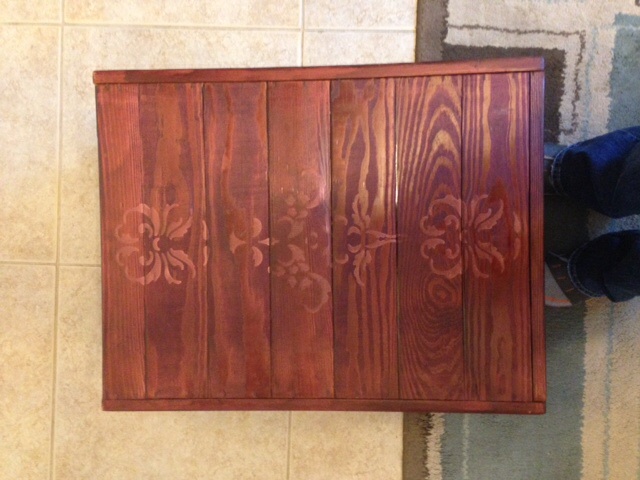 (image.jpg) (image.jpg)
Attachments
----------------
image.jpg (98KB - 294 downloads)
|
|
| |
|
| anymore beautiful pieces? I love looking at this thread!! |
|
| |
|
Lover of Old Things
Posts: 989
Location: South East Texas | BleuIdGrl - 2014-01-08 4:00 PM
UPDATE! I had to head to florida for a month so I didnt't get my night stand finnished as soon as I thought I would, but it's done! It's nothing fancy, but I'm pretty happy with it. I couldn't load the before pics ( took them with my iPad). This is the back.
That's really pretty!!! Nice work :)) |
|
| |
|
Lover of Old Things
Posts: 989
Location: South East Texas | Yes I have numerous pieces that I have finished. I've been swamped :)) Will try to get some uploaded ASAP.
Edited by thejerseylilly2000 2014-03-18 12:21 AM
|
|
| |
|
Lover of Old Things
Posts: 989
Location: South East Texas | Ok....here's a few of the projects I've done since my last posting. I've been so busy....it's amazing. I'm incredibly blessed. And having so much fun. :))
Edited by thejerseylilly2000 2014-03-25 1:20 PM
 (2013-09-17-dresser.jpg) (2013-09-17-dresser.jpg)
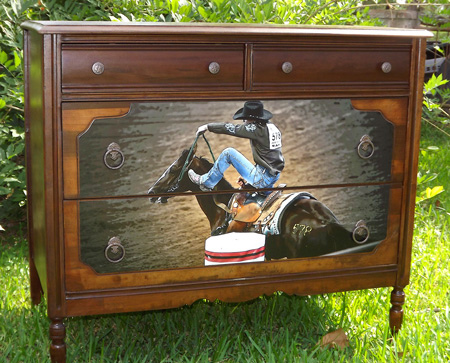 (2013-10-04-002.jpg-Jolene.jpg) (2013-10-04-002.jpg-Jolene.jpg)
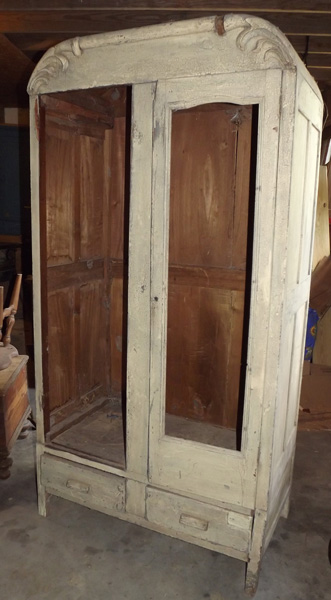 (2013-09-11-003.jpg) (2013-09-11-003.jpg)
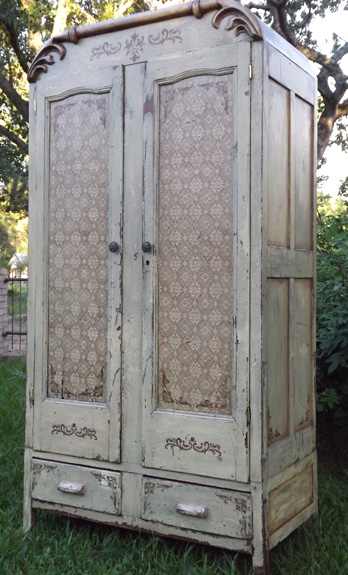 (2013-10-06-002.jpg) (2013-10-06-002.jpg)
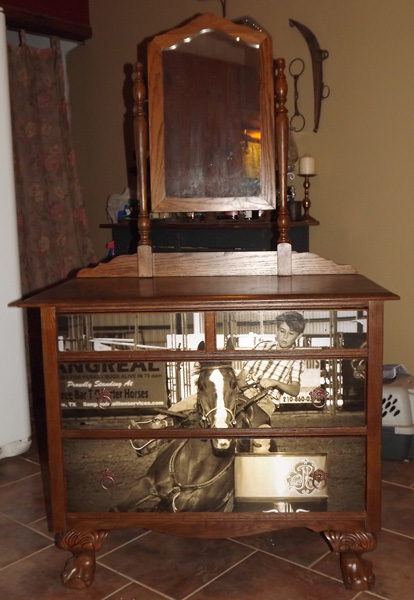 (2013-09-26-031.jpg) (2013-09-26-031.jpg)
 (2013-12-15-Clayanne.jpg-sma.jpg) (2013-12-15-Clayanne.jpg-sma.jpg)
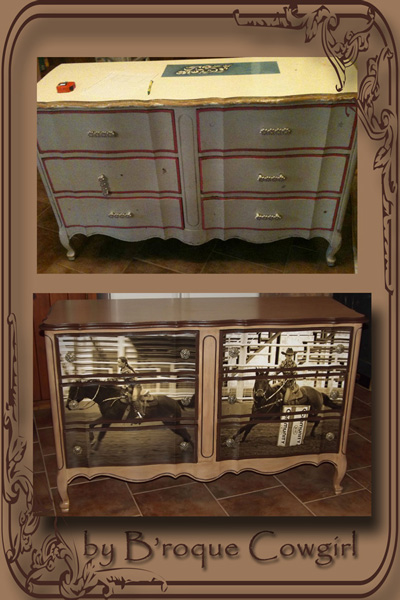 (2013-12-21-french-proventia.jpg) (2013-12-21-french-proventia.jpg)
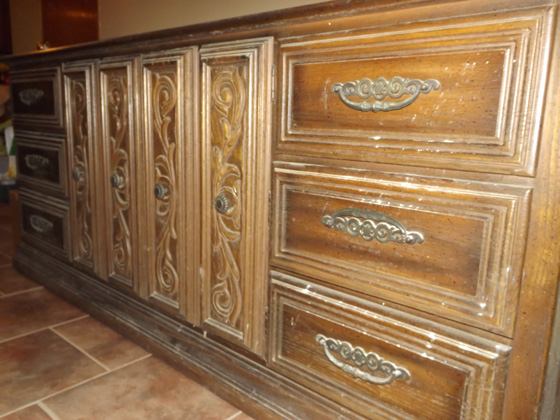 (2013-12-27-004.jpg) (2013-12-27-004.jpg)
 (2014-01-20-002.jpg-Bay.jpg) (2014-01-20-002.jpg-Bay.jpg)
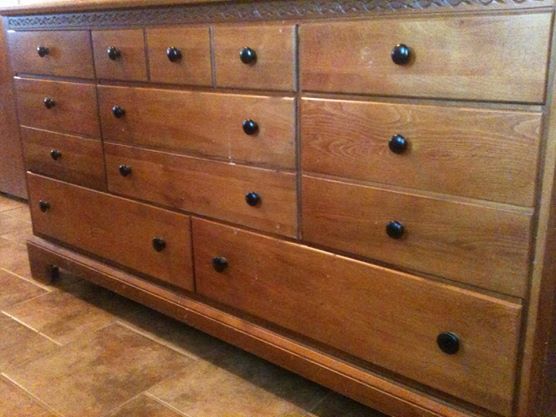 (2014-03-25 Traci Dresser before.jpg) (2014-03-25 Traci Dresser before.jpg)
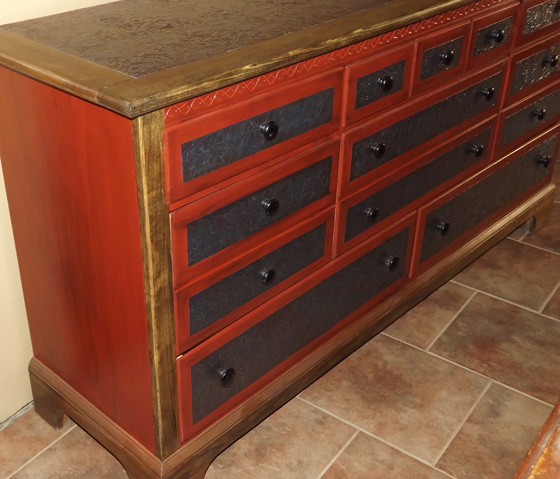 (2014-03-25-001.jpg) (2014-03-25-001.jpg)
Attachments
----------------
2013-09-17-dresser.jpg (54KB - 291 downloads)
2013-10-04-002.jpg-Jolene.jpg (98KB - 299 downloads)
2013-09-11-003.jpg (66KB - 288 downloads)
2013-10-06-002.jpg (97KB - 289 downloads)
2013-09-26-031.jpg (86KB - 287 downloads)
2013-12-15-Clayanne.jpg-sma.jpg (93KB - 293 downloads)
2013-12-21-french-proventia.jpg (96KB - 291 downloads)
2013-12-27-004.jpg (99KB - 276 downloads)
2014-01-20-002.jpg-Bay.jpg (69KB - 295 downloads)
2014-03-25 Traci Dresser before.jpg (41KB - 290 downloads)
2014-03-25-001.jpg (99KB - 298 downloads)
|
|
| |
|
 Veteran
Posts: 197
Location: Jones, OK | how much do you charge to make these pieces? |
|
| |
|
Elite Veteran
Posts: 1074
| I love all the pieces but my favorites have the pictures. I definitely want to have a dresser with pictures like this of my kids. TOTALLY AWESOME!!!!!! |
|
| |
|
Lover of Old Things
Posts: 989
Location: South East Texas | Prices all depend on if I furnish the piece of furniture....or if it belongs to the person to begin with. My agreement with BHW is only as a how to thread. I don't sell my pieces from here. :) |
|
| |
|
Lover of Old Things
Posts: 989
Location: South East Texas | And then I kinda kicked off into the sewing crafting mode for a while....mostly because of such nasty cold wet weather thru the winter.
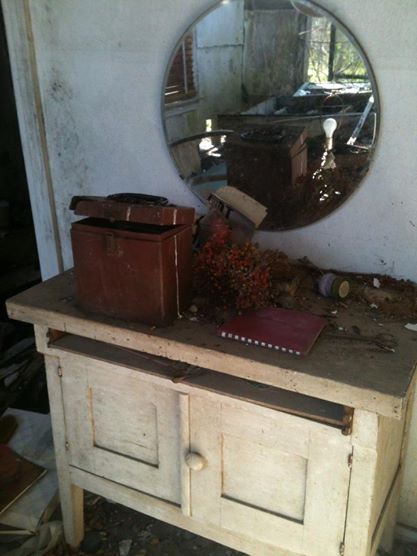 (2014-03-25 Carolyn before.jpg) (2014-03-25 Carolyn before.jpg)
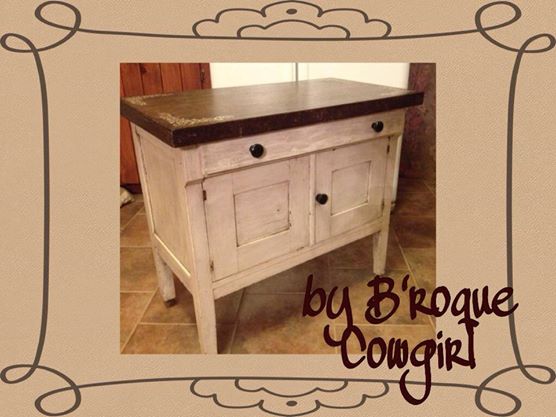 (2014-03-25 Carolyn after.jpg) (2014-03-25 Carolyn after.jpg)
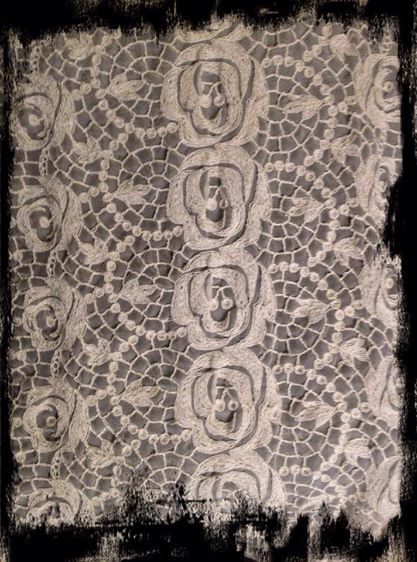 (2014-03-25 Lace.jpg) (2014-03-25 Lace.jpg)
 (2014-03-25 Gypsy bag.jpg) (2014-03-25 Gypsy bag.jpg)
 (2014-03-25 Gypsy bag velvet.jpg) (2014-03-25 Gypsy bag velvet.jpg)
 (2014-03-25 Man's shirt.jpg) (2014-03-25 Man's shirt.jpg)
 (2014-03-25 Ruffled Shirt.jpg) (2014-03-25 Ruffled Shirt.jpg)
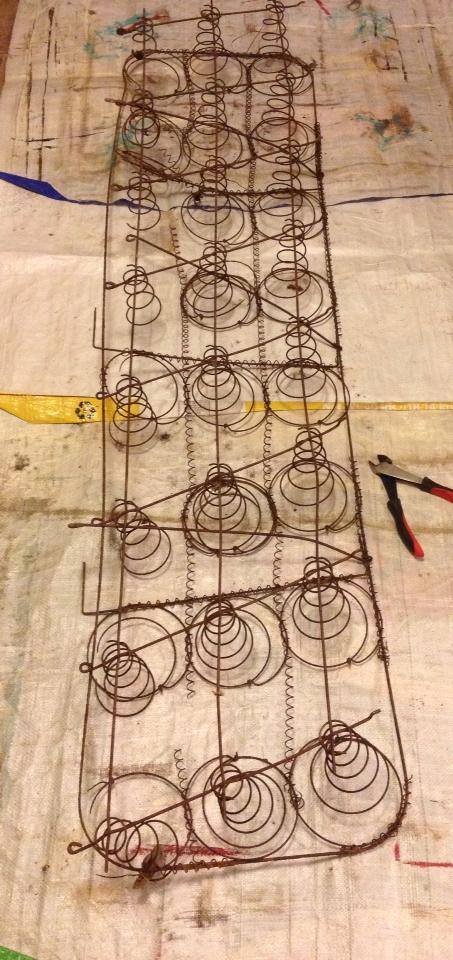 (2014-03-25 Couch springs.jpg) (2014-03-25 Couch springs.jpg)
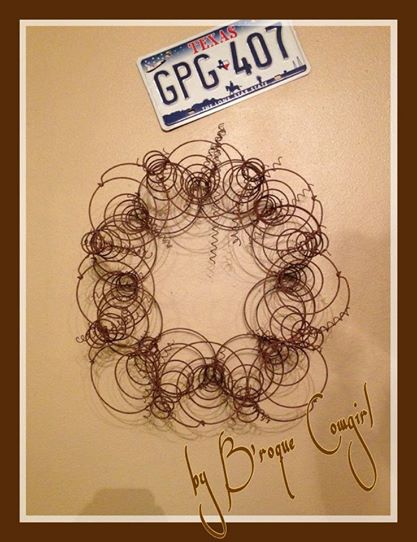 (2014-03-25Spring Wreath.jpg) (2014-03-25Spring Wreath.jpg)
Attachments
----------------
2014-03-25 Carolyn before.jpg (36KB - 286 downloads)
2014-03-25 Carolyn after.jpg (38KB - 299 downloads)
2014-03-25 Lace.jpg (66KB - 295 downloads)
2014-03-25 Gypsy bag.jpg (48KB - 306 downloads)
2014-03-25 Gypsy bag velvet.jpg (57KB - 288 downloads)
2014-03-25 Man's shirt.jpg (24KB - 284 downloads)
2014-03-25 Ruffled Shirt.jpg (68KB - 290 downloads)
2014-03-25 Couch springs.jpg (90KB - 291 downloads)
2014-03-25Spring Wreath.jpg (43KB - 289 downloads)
|
|
| |
|
Lover of Old Things
Posts: 989
Location: South East Texas | The gypsy bags are all made with vintage fabrics, and lace doilies and lace. Scrap jeans etc. The wreath is made out of springs out of an old couch. The gypsy ruffled shirt...started out as a plain man's white shirt, altered to fit a woman's shoulders then dressed up with the ruffles and lace. |
|
| |
|
Location: Keeping up with the numbers! | Love it!!!! |
|
| |
|
 Extreme Veteran
Posts: 349
| not sure if this has been mentioned on this post, but a good way to strip paint off furniture is to take it to a Monument place - they usually have a large sandblaster for the gravestones. Not sure if they all will do it but the one near me does - they will test the wood first to make sure that it's hardwood. They sand blast it and it comes out really nice - especially good for pieces with designs - I had a tea wagon and rocking chair done. |
|
| |
|
Lover of Old Things
Posts: 989
Location: South East Texas | I have used our blasting box to sand blast a few wood pieces. Mostly table legs that are ornate. And oak. But most of the dressers I do it wouldn't work on because they aren't oak. I don't mind the sanding too much. |
|
| |
|
| LOVE all of your pieces JeresyLilly!! |
|
| |
|
Lover of Old Things
Posts: 989
Location: South East Texas | Thank you :)) |
|
| |
|
 Expert
Posts: 2457
| Kgirl - 2014-03-28 2:39 PM
LOVE all of your pieces JeresyLilly!!
ME TOO!! gorgeous items! |
|
| |
|
Elite Veteran
Posts: 794
| I haven't seen any new projects lately. What have you done lets see photos. |
|
| |
|
Lover of Old Things
Posts: 989
Location: South East Texas | Since the first Ruffled shirt I've been at the sewing machine sewing like crazy making more. I've made 13 shirts and 5 pair of ruffles bloomers. Just finished up a vanity dresser today will post pics in a bit. Somehow Ianaged to not get a before pic tho :/ |
|
| |
|
Lover of Old Things
Posts: 989
Location: South East Texas | Two Vanities since my last picture post lol First one is just totally refinished. Second one...sanded down, some painted black and some areas stained. Broke the center mirror on the second one by accident and had to go have one cut to replace it. I bout cried.
All of these shirts are started from a man's dress shirt. Alot of old linens...doilies, table clothes, curtains etc are repurposed into ruffles and used as adornments on the shirts.
Edited by thejerseylilly2000 2014-04-22 9:48 PM
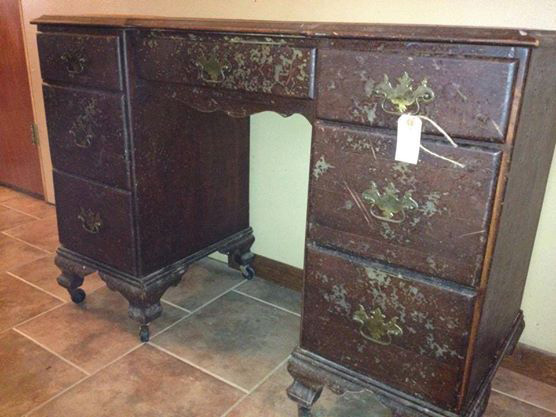 (vanity-before.jpg) (vanity-before.jpg)
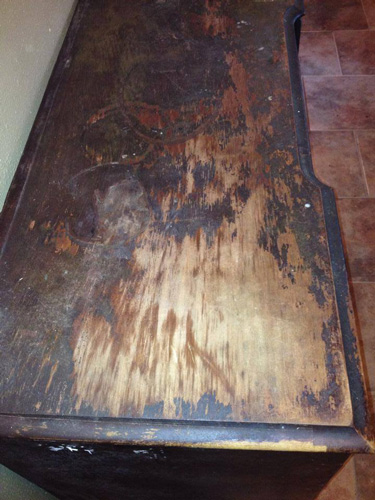 (vanity-top-before.jpg) (vanity-top-before.jpg)
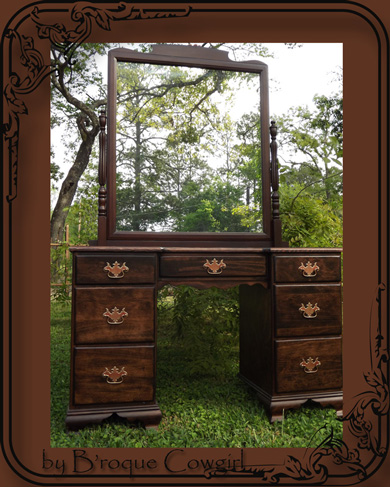 (2014-04-12small-Tracy-Kloec.jpg) (2014-04-12small-Tracy-Kloec.jpg)
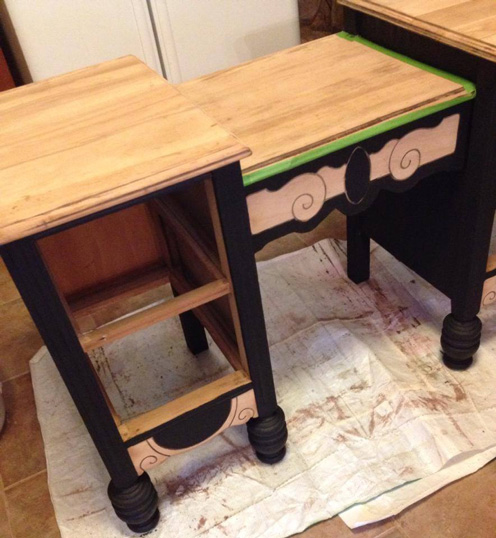 (vanity-during-paint.jpg) (vanity-during-paint.jpg)
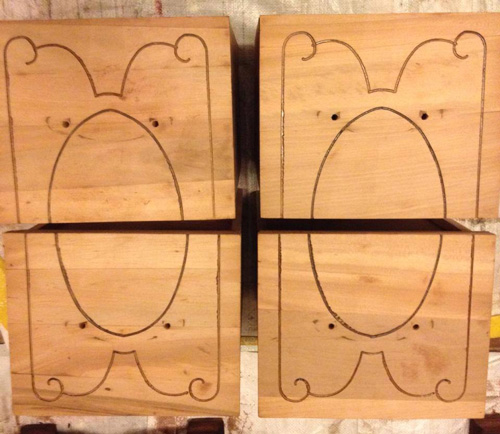 (vanity-drawers-sanded.jpg) (vanity-drawers-sanded.jpg)
 (2014-04-22small-Vanity.jpg) (2014-04-22small-Vanity.jpg)
 (2014-04-22-small-rustic-ruf.jpg) (2014-04-22-small-rustic-ruf.jpg)
Attachments
----------------
vanity-before.jpg (65KB - 305 downloads)
vanity-top-before.jpg (81KB - 319 downloads)
2014-04-12small-Tracy-Kloec.jpg (98KB - 291 downloads)
vanity-during-paint.jpg (99KB - 327 downloads)
vanity-drawers-sanded.jpg (80KB - 295 downloads)
2014-04-22small-Vanity.jpg (99KB - 311 downloads)
2014-04-22-small-rustic-ruf.jpg (99KB - 335 downloads)
|
|
| |
|
 Elite Veteran
Posts: 806
Location: Arkansas | I have my husband's back numbers from all over (Calgary, Cheyenne, Houston, San Antonio, Sundre, etcs.) that I have kept to do something with. I also have pictures to match. Any suggestions?
Also, I have an old screen door from my Great Grandmother's house that we are going to have to tear down soon unfortunately. I wondered about collaborating the two items somehow? |
|
| |
|
Elite Veteran
Posts: 794
| Gorgeous work |
|
| |
|
Lover of Old Things
Posts: 989
Location: South East Texas | Esther - 2014-04-23 8:13 AM
I have my husband's back numbers from all over (Calgary, Cheyenne, Houston, San Antonio, Sundre, etcs.) that I have kept to do something with. I also have pictures to match. Any suggestions?
Also, I have an old screen door from my Great Grandmother's house that we are going to have to tear down soon unfortunately. I wondered about collaborating the two items somehow?
If you are going to tear down the house, I would be more tempted to get a couple of the old doors...hinge them together and put them in a corner of den living room. And tack the back numbers to them. Maybe using upholstery tacks. Mixed in with photos. |
|
| |
|
boon
Posts: 2
Location: Portland, OR | Every year end I work on some of my home furniture and try to give them their touch and shine better by self varnishing them, painting them so that they look again new and add different look to my home. Also i replace the older ones which are beyond repair from office furniture 4 sale store at reasonable price.
Edited by FrancesAlford 2014-04-26 12:47 AM
|
|
| |
|
| I have some white wicker furniture that my mom gave me... But my house is white so it blends right in... How can i make it look like old barn wood instead? I'm creating some planters with barn wood and galvanized tin so i'd love to have it all to match! Thanks!! |
|
| |
|
 Transplant Okie
Posts: 1206
Location: Always on call..... | Just wanted to share some nightstands I finally got done. After initially buying them and starting last summer! LOL. Now that they are done I wish I would have went with the barnwood stain, but hubby talked me out of it because it said it was too gray looking. So I did a wheat stain and antiquing glaze. Then put the cowhide in the drawers. I was going to add nail heads around the cowhide but I can't hammer them in straight to save my life!
Edited by Dr. J 2014-05-13 10:21 PM
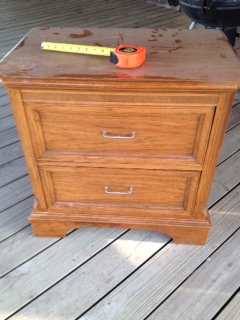 (photo1.JPG) (photo1.JPG)
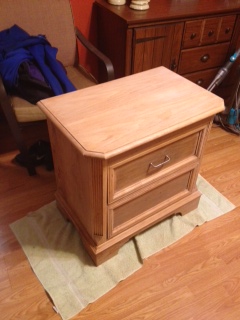 (photo 3.JPG) (photo 3.JPG)
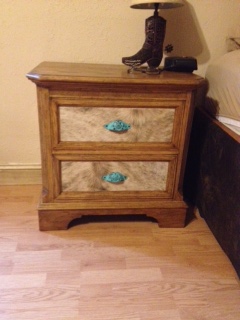 (photo4.JPG) (photo4.JPG)
Attachments
----------------
photo1.JPG (41KB - 293 downloads)
photo 3.JPG (49KB - 324 downloads)
photo4.JPG (46KB - 300 downloads)
|
|
| |
|
| too cute! how did u attach the cowhide? |
|
| |
|
Transplant Okie
Posts: 1206
Location: Always on call..... | Kgirl - 2014-05-14 7:11 AM too cute! how did u attach the cowhide?
With the craft glue E6000. That stuff is pretty strong. It's what I use the glue down my beadwork on dog collars, tack and bracelets. The hard part was getting the hides cut to just the right size. |
|
| |
|
| Jersey Lilly....
what do you do if your dresser is missing its metal claw feet? I've recently spotted a gem at the flea market but it is missing its feet.. any replacements or how do you address that?
|
|
| |
|
Elite Veteran
Posts: 794
| Just wondering have you ever used modpodge on glass. I have a glass door that is in my classroom and I would like to do something with it. I was thinking of taking one of my old text books and gluing to the door. Any ideas that might be better. |
|
| |
|
boon
Posts: 2
Location: 389 N 3855 E, Rigby, ID 83442 | thejerseylilly2000 - 2014-04-22 9:19 PM
Two Vanities since my last picture post lol First one is just totally refinished. Second one...sanded down, some painted black and some areas stained. Broke the center mirror on the second one by accident and had to go have one cut to replace it. I bout cried.
All of these shirts are started from a man's dress shirt. Alot of old linens...doilies, table clothes, curtains etc are repurposed into ruffles and used as adornments on the shirts.
The instruction suggested over furniture makeover are good but I would like to add some more tips on behalf of my termite treatment folsom team in order to make furniture makeover Instruction best. At the time of wooden furniture makeover, one must also go with termite inspection as there is always a possible of termite attack on wooden furniture. Termite inspection and termite treatment will help to keep wooden furniture safe from termites, strong and new for years.
Edited by simonedwin 2014-05-28 2:03 AM
|
|
| |
|
Lover of Old Things
Posts: 989
Location: South East Texas | Kgirl - 2014-05-21 2:42 PM
Jersey Lilly....
what do you do if your dresser is missing its metal claw feet? I've recently spotted a gem at the flea market but it is missing its feet.. any replacements or how do you address that?
I haven't ever seen a dresser with metal claw feet. All I've ever seen is bathtubs and piano a tools. ??? |
|
| |
|
Lover of Old Things
Posts: 989
Location: South East Texas | cavlier - 2014-05-24 8:56 AM
Just wondering have you ever used modpodge on glass. I have a glass door that is in my classroom and I would like to do something with it. I was thinking of taking one of my old text books and gluing to the door. Any ideas that might be better.
I haven't, but that doesn't mean you can't. I think pages from a book would work well on the back side of the glass. |
|
| |
|
Lover of Old Things
Posts: 989
Location: South East Texas | simonedwin - 2014-05-28 2:02 AM
thejerseylilly2000 - 2014-04-22 9:19 PM
Two Vanities since my last picture post lol First one is just totally refinished. Second one...sanded down, some painted black and some areas stained. Broke the center mirror on the second one by accident and had to go have one cut to replace it. I bout cried.
All of these shirts are started from a man's dress shirt. Alot of old linens...doilies, table clothes, curtains etc are repurposed into ruffles and used as adornments on the shirts.
The instruction suggested over furniture makeover are good but I would like to add some more tips on behalf of my termite treatment folsom team in order to make furniture makeover Instruction best. At the time of wooden furniture makeover, one must also go with termite inspection as there is always a possible of termite attack on wooden furniture. Termite inspection and termite treatment will help to keep wooden furniture safe from termites, strong and new for years.
I haven't came across anything that is termite damaged. If I did...I would probably pass on it unless it was on legs that could be sawn off and make the piece shorter. I look things over well before purchasing. |
|
| |
|
Lover of Old Things
Posts: 989
Location: South East Texas | Dr. J - 2014-05-13 10:15 PM
Just wanted to share some nightstands I finally got done. After initially buying them and starting last summer! LOL. Now that they are done I wish I would have went with the barnwood stain, but hubby talked me out of it because it said it was too gray looking. So I did a wheat stain and antiquing glaze. Then put the cowhide in the drawers. I was going to add nail heads around the cowhide but I can't hammer them in straight to save my life!
Those turned out super nice!!! |
|
| |
|
Lover of Old Things
Posts: 989
Location: South East Texas | Kgirl - 2014-05-13 8:13 AM
I have some white wicker furniture that my mom gave me... But my house is white so it blends right in... How can i make it look like old barn wood instead? I'm creating some planters with barn wood and galvanized tin so i'd love to have it all to match! Thanks!!
You can spray paint wicker a barnwood grayish brown then do a light light brushing with a lighter gray or white to make it look aged |
|
| |
|
Elite Veteran
Posts: 794
| thejerseylilly2000 - 2014-06-05 1:48 AM
cavlier - 2014-05-24 8:56 AM
Just wondering have you ever used modpodge on glass. I have a glass door that is in my classroom and I would like to do something with it. I was thinking of taking one of my old text books and gluing to the door. Any ideas that might be better.
I haven't, but that doesn't mean you can't. I think pages from a book would work well on the back side of the glass.
Thanks I am going to try it. I am going to put a glaze over it so that may help it to adhere to the window better. |
|
| |
|
Member
Posts: 5
| I really like the design of night stands. |
|
| |
|
| I thought i'd share my latest project.. though its not furniture.. i made a super large clock! I got a wagon wheel that someone had kept in the garden and just cleaned it up nice. bought a clock kit from klockit.com carved a hole in the back to hold the mechanism and ta da!!! large wall clock!
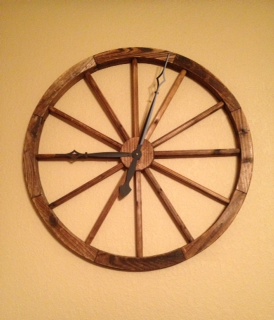 (wagon wheel.jpg) (wagon wheel.jpg)
Attachments
----------------
wagon wheel.jpg (38KB - 299 downloads)
|
|
| |
|
Lover of Old Things
Posts: 989
Location: South East Texas | Ohhh love the clock!!! |
|
| |
|
I keep my change in my pockets
Posts: 2985
Location: MN | On the Traci dresser red front with lots of drawers, what is the center of each drawer? Looks like blue with texture or a pattern? I like it and I have dresser I would like to do like that. |
|
| |
|
Expert
Posts: 1477
Location: In the land of peanuts and cotton | Starting my first piece now. When I get it painted what do I put over it, if anything, to help seal the paint? |
|
| |
|
 Elite Veteran
Posts: 984
Location: Southwest Minnesota | thejerseylilly2000 - 2014-03-25 1:04 PM Ok....here's a few of the projects I've done since my last posting. I've been so busy....it's amazing. I'm incredibly blessed. And having so much fun. :))
Can you tell me what the best thing to use to put the pics on the front of the dressers? Do you use Modge Podge or is there a better product? My daughter is doing a dresser for her 4-H project this year. |
|
| |
|
Lover of Old Things
Posts: 989
Location: South East Texas | dawnb - 2014-06-24 9:18 PM
On the Traci dresser red front with lots of drawers, what is the center of each drawer? Looks like blue with texture or a pattern? I like it and I have dresser I would like to do like that.
It is liquid leading. Which is designed for making fake lead lines on painted glass to look like stained glass. Then I painted copper and turquoise lightly over it after it dried overnight.
I use a putty knife to put it on with...then just go at it making the swirls with the putty knife.
Edited by thejerseylilly2000 2014-07-14 12:39 AM
|
|
| |
|
Lover of Old Things
Posts: 989
Location: South East Texas | chuckie31 - 2014-07-07 10:36 PM
thejerseylilly2000 - 2014-03-25 1:04 PM Ok....here's a few of the projects I've done since my last posting. I've been so busy....it's amazing. I'm incredibly blessed. And having so much fun. :))
Can you tell me what the best thing to use to put the pics on the front of the dressers? Do you use Modge Podge or is there a better product? My daughter is doing a dresser for her 4-H project this year.
Answered your pm regarding this :)) |
|
| |
|
I keep my change in my pockets
Posts: 2985
Location: MN | Where do you find liquid leading at? |
|
| |
|
Lover of Old Things
Posts: 989
Location: South East Texas | Hobby lobby is where I get it...it may be available at Michaels too. |
|
| |
|
 Extreme Veteran
Posts: 421
Location: Texas!! | Syoung, Quikchik found it!! |
|
| |
|
Elite Veteran
Posts: 850
Location: Bluffdale UT | Thanks! I book marked this! |
|
| |
|
A Somebody to Everybody
Posts: 41354
Location: Under The Big Sky Of Texas | Going to bump this thread.... |
|
| |
|
Queen Bean of Ponyland
Posts: 24954
Location: WYOMING | Southtxponygirl - 2021-01-13 2:29 PM
Going to bump this thread....
HEY BIG KISSES!! THANKS I will read thru this. |
|
| |
|
A Somebody to Everybody
Posts: 41354
Location: Under The Big Sky Of Texas | geronabean - 2021-01-13 1:30 PM
Southtxponygirl - 2021-01-13 2:29 PM
Going to bump this thread....
HEY BIG KISSES!! THANKS I will read thru this.
I sure do miss her posts, she is just so awesome... |
|
| |
|
 Sweetpea
Posts: 5816
Location: Central Texas | thejerseylilly2000 - 2013-04-27 10:50 PM I haven't ever reupholstered anything like that. There are YouTube videos showing how to...I've just not tried it. Now they have paint you can paint the fabric with but I haven't tried that either...it's a spray. Think it's dr by Tulip. I was told that Dixie Belle furniture paint can be used on upholstery. Let me see if I can find pictures of the chair my friend did. edited to add that I did not even realize that thread was started in 2013! LOL!
Edited by flossie 2021-01-14 12:43 PM
|
|
| |
|
A Somebody to Everybody
Posts: 41354
Location: Under The Big Sky Of Texas | flossie - 2021-01-14 12:37 PM thejerseylilly2000 - 2013-04-27 10:50 PM I haven't ever reupholstered anything like that. There are YouTube videos showing how to...I've just not tried it. Now they have paint you can paint the fabric with but I haven't tried that either...it's a spray. Think it's dr by Tulip. I was told that Dixie Belle furniture paint can be used on upholstery. Let me see if I can find pictures of the chair my friend did. edited to add that I did not even realize that thread was started in 2013! LOL! Yep, this is a old thread, I bumped it up for a BB to check out.. But its still fun to read up on it and check out some of the makeovers. Please show us the pictures of your chair, would love to see it..
Edited by Southtxponygirl 2021-01-14 3:26 PM
|
|
| |
|
Sweetpea
Posts: 5816
Location: Central Texas | Southtxponygirl - 2021-01-14 3:25 PM
flossie - 2021-01-14 12:37 PM
thejerseylilly2000 - 2013-04-27 10:50 PM I haven't ever reupholstered anything like that. There are YouTube videos showing how to...I've just not tried it. Now they have paint you can paint the fabric with but I haven't tried that either...it's a spray. Think it's dr by Tulip.
I was told that Dixie Belle furniture paint can be used on upholstery. Let me see if I can find pictures of the chair my friend did.
edited to add that I did not even realize that thread was started in 2013! LOL!
Yep, this is a old thread, I bumped it up for a BB to check out.. But its still fun to read up on it and check out some of the makeovers.
Please show us the pictures of your chair, would love to see it..

I really want to give this a try! |
|
| |
|
A Somebody to Everybody
Posts: 41354
Location: Under The Big Sky Of Texas | flossie - 2021-01-15 9:27 AM
Southtxponygirl - 2021-01-14 3:25 PM
flossie - 2021-01-14 12:37 PM
thejerseylilly2000 - 2013-04-27 10:50 PM I haven't ever reupholstered anything like that. There are YouTube videos showing how to...I've just not tried it. Now they have paint you can paint the fabric with but I haven't tried that either...it's a spray. Think it's dr by Tulip.
I was told that Dixie Belle furniture paint can be used on upholstery. Let me see if I can find pictures of the chair my friend did.
edited to add that I did not even realize that thread was started in 2013! LOL!
Yep, this is a old thread, I bumped it up for a BB to check out.. But its still fun to read up on it and check out some of the makeovers.
Please show us the pictures of your chair, would love to see it..
I really want to give this a try!
How cool is that!!! The paint really did a great job of covering up the gold, I just may have to look into this paint.. Did the paint make the fabric feel weird, like stiff/hard? |
|
| |
|
Roan Wonder
Location: SW MO | Thanks for bumping this up |
|
| |
|
A Somebody to Everybody
Posts: 41354
Location: Under The Big Sky Of Texas | crossspur - 2021-01-15 9:39 AM Thanks for bumping this up I think this is a great thread and love seeing what our BB's can do..Theres alot of talented ladys on here..
Edited by Southtxponygirl 2021-01-15 9:46 AM
|
|
| |
|
Sweetpea
Posts: 5816
Location: Central Texas | Southtxponygirl - 2021-01-15 9:33 AM
flossie - 2021-01-15 9:27 AM
Southtxponygirl - 2021-01-14 3:25 PM
flossie - 2021-01-14 12:37 PM
thejerseylilly2000 - 2013-04-27 10:50 PM I haven't ever reupholstered anything like that. There are YouTube videos showing how to...I've just not tried it. Now they have paint you can paint the fabric with but I haven't tried that either...it's a spray. Think it's dr by Tulip.
I was told that Dixie Belle furniture paint can be used on upholstery. Let me see if I can find pictures of the chair my friend did.
edited to add that I did not even realize that thread was started in 2013! LOL!
Yep, this is a old thread, I bumped it up for a BB to check out.. But its still fun to read up on it and check out some of the makeovers.
Please show us the pictures of your chair, would love to see it..
I really want to give this a try!
How cool is that!!! The paint really did a great job of covering up the gold, I just may have to look into this paint.. Did the paint make the fabric feel weird, like stiff/hard?
I have not been able to see the chair in person, but she said it did not change anything about the fabric. Well excpet the color. LOL!
|
|
| |