|
|
 Lover of Old Things
Posts: 989
  
Location: South East Texas | It's the same treatment as on the sides of the last dresser ... I didn't take during pictures of this one but will post pictures later today of the sides. I'm in the hay field now trying to help hubby get equipment ready to bale hay. Lol |
|
| |
|
Lover of Old Things
Posts: 989
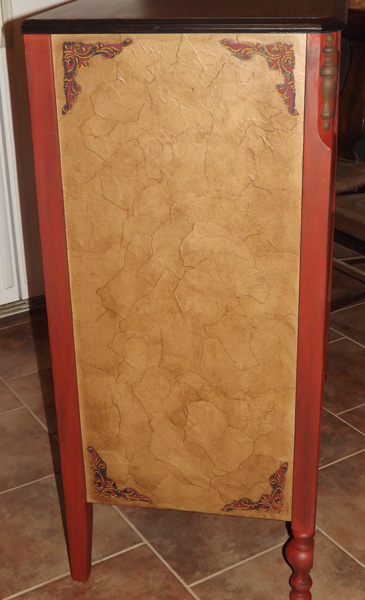
Location: South East Texas | The sides...covered with paper to look like leather. Then corner stencils. :))
 (2013-06-11-002.jpg) (2013-06-11-002.jpg)
Attachments
----------------
 2013-06-11-002.jpg (74KB - 303 downloads) 2013-06-11-002.jpg (74KB - 303 downloads)
|
|
| |
|
  Expert
Posts: 1584

Location: Central Texas | Fascinating thread, thanks! Amazing work. |
|
| |
|
Lover of Old Things
Posts: 989
Location: South East Texas | Thanks Marfan :)) |
|
| |
|
Lover of Old Things
Posts: 989
Location: South East Texas | In case any of you are wondering why this piece seems to be taking longer...it's because we've been cutting and baling hay. (Interrupting my painting lol) but a must do none the less. Gotta make hay while the sun shines. Also have been doing some minor drawer repairs getting them ready to finish. |
|
| |
|
I keep my change in my pockets
Posts: 2985

Location: MN | Be thankful you can bale hay. We can't go for more then 2 days without rain. We have 4 beautiful acres of grass hay that needs to be cut but we are to wet. Around use the farms are already thinking that they will not be able to finish planting their crops. Our pastures are so wet that the farrier says the horse hoofs are just wet sponges. Hope thrush doesn't hit us next.
Your work is beautiful and can't wait to see it done. |
|
| |
|
Lover of Old Things
Posts: 989
Location: South East Texas | Oh I'm extremely thankful that we have hay to cut. The drought just nearly did us in as far as cattle go. We had to cut our herd so hard that we have only 30 cows left. For too many yers to count it was almost pointless to cut it because there was hardly anything there. Two years ago our pastures were dirt...blowing sand. We have had wonderful rain to bring the pastures back to lush grass and abundant hay. It did however get rained on after cutting. But one field is rolled. And got a neighbors cut for them yesterday with hopes of baling it tomorrow or Tuesday. |
|
| |
|
Lover of Old Things
Posts: 989
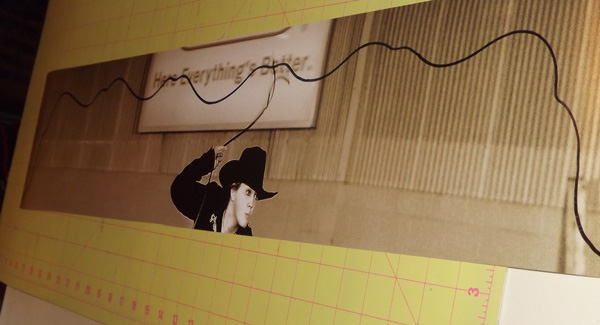
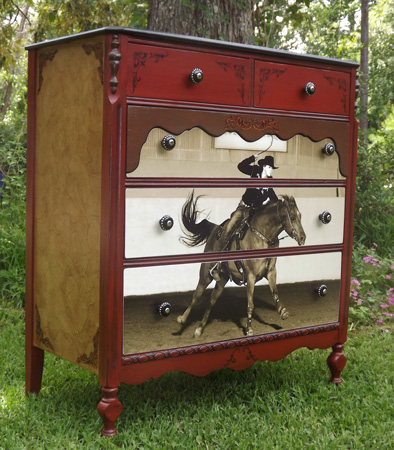
Location: South East Texas | Ok...here's the latest pictures of the dresser.
Cutting the picture to fit....
Picture layed out on the drawers final placement before glueing them on.
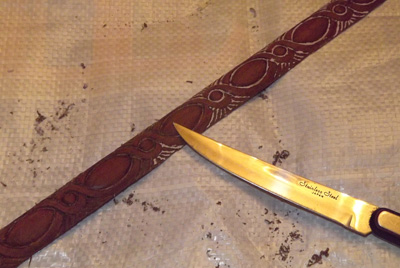
One small trim piece I almost forgot to strip the paint off of and add. Had to dig paint out of the creases wth a kitchen knife.
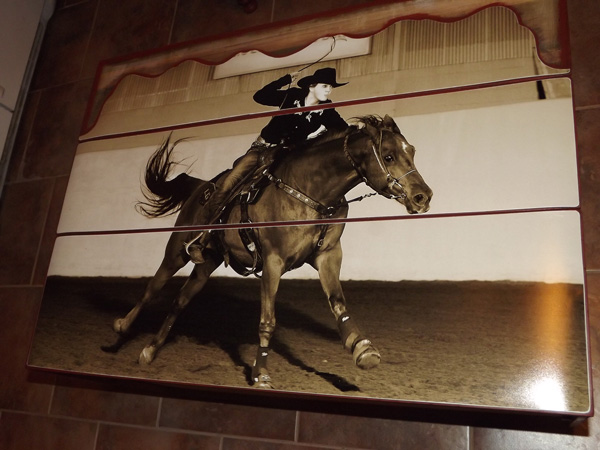
FINISHED!!!! :))
Edited by thejerseylilly2000 2013-06-17 3:24 PM
 (2013-06-15-021.jpg) (2013-06-15-021.jpg)
 (2013-06-15-022.jpg) (2013-06-15-022.jpg)
 (2013-06-17-002.jpg) (2013-06-17-002.jpg)
 (2013-06-17-006.jpg) (2013-06-17-006.jpg)
Attachments
----------------
2013-06-15-021.jpg (57KB - 313 downloads)
2013-06-15-022.jpg (86KB - 292 downloads)
2013-06-17-002.jpg (46KB - 306 downloads)
2013-06-17-006.jpg (95KB - 300 downloads)
|
|
| |
|
Elite Veteran
Posts: 794
| thejerseylilly2000 - 2013-06-11 9:20 PM
The sides...covered with paper to look like leather. Then corner stencils. :))
I know you said you use paper sacks for the sides but how do you get it to stick o you use mogpodg or wall paper glue and once it is on do you go back and stain it with any thing or do you just poly. One more question do you like to use poly or do you prefer varnish. I have started to use varnish and I love the finish I get with it. But only use it on outside stuff. Thanks for all your information you will give me. |
|
| |
|
Elite Veteran
Posts: 794
| thejerseylilly2000 - 2013-06-17 3:20 PM
Ok...here's the latest pictures of the dresser.
Cutting the picture to fit....
Picture layed out on the drawers final placement before glueing them on.
One small trim piece I almost forgot to strip the paint off of and add. Had to dig paint out of the creases wth a kitchen knife.
FINISHED!!!! :))
This piece is soooooo pretty I can't stop looking at it. You are the most talented person. I wish I could send you pix of my stuff and you could tell me what to do with them. |
|
| |
|
Lover of Old Things
Posts: 989
Location: South East Texas | cavlier - 2013-06-17 3:26 PM
thejerseylilly2000 - 2013-06-11 9:20 PM
The sides...covered with paper to look like leather. Then corner stencils. :))
I know you said you use paper sacks for the sides but how do you get it to stick o you use mogpodg or wall paper glue and once it is on do you go back and stain it with any thing or do you just poly. One more question do you like to use poly or do you prefer varnish. I have started to use varnish and I love the finish I get with it. But only use it on outside stuff. Thanks for all your information you will give me.
Yes I use modpodge. And I use polycrylic because I like the finish I get...plus it's soap and water clean up and dries much faster than varnish. It's really just a matter of preference. I do usually do a antiquing stain over the paper. It just gives it more depth. |
|
| |
|
Lover of Old Things
Posts: 989
Location: South East Texas | cavlier - 2013-06-17 3:28 PM
thejerseylilly2000 - 2013-06-17 3:20 PM
Ok...here's the latest pictures of the dresser.
Cutting the picture to fit....
Picture layed out on the drawers final placement before glueing them on.
One small trim piece I almost forgot to strip the paint off of and add. Had to dig paint out of the creases wth a kitchen knife.
FINISHED!!!! :))
This piece is soooooo pretty I can't stop looking at it. You are the most talented person. I wish I could send you pix of my stuff and you could tell me what to do with them.
That's what this whole thread was intended for...to get more people interested and doing pieces of their own. Post pictures of what you have and what you want to do with it and I will help any way I can. |
|
| |
|
 Elite Veteran
Posts: 685
Location: Arkansas | So I've been wanting to redo my dresser and night stands that have been passed down 3 generations to me... they are an old, creamy color with gold trim and very ornate! I would like to do a distressed/crackle red look with hints of black on top... any suggestions as to how I can accomplish this?? I don't have time to start it too soon, but would like to start planning... I am also almost afraid to do anything to them out of fear of making them look worse  |
|
| |
|
Elite Veteran
Posts: 794
| thejerseylilly2000 - 2013-06-17 3:45 PM
cavlier - 2013-06-17 3:28 PM
thejerseylilly2000 - 2013-06-17 3:20 PM
Ok...here's the latest pictures of the dresser.
Cutting the picture to fit....
Picture layed out on the drawers final placement before glueing them on.
One small trim piece I almost forgot to strip the paint off of and add. Had to dig paint out of the creases wth a kitchen knife.
FINISHED!!!! :))
This piece is soooooo pretty I can't stop looking at it. You are the most talented person. I wish I could send you pix of my stuff and you could tell me what to do with them.
That's what this whole thread was intended for...to get more people interested and doing pieces of their own. Post pictures of what you have and what you want to do with it and I will help any way I can.
Thanks so much I will get pix and we will go from there. Thanks |
|
| |
|
Lover of Old Things
Posts: 989
Location: South East Texas | Brrlracengirl - 2013-06-17 9:23 PM
So I've been wanting to redo my dresser and night stands that have been passed down 3 generations to me... they are an old, creamy color with gold trim and very ornate! I would like to do a distressed/crackle red look with hints of black on top... any suggestions as to how I can accomplish this?? I don't have time to start it too soon, but would like to start planning... I am also almost afraid to do anything to them out of fear of making them look worse
My suggestion is go buy a small bottle of the crackle medium and small bottles of whatever paint color you want and play with it on something that doesn't matter. I have tried crackle and wasn't happy at all with the results. But...play with it anyway...seems like everyone has a different hand when it comes to that and it may work great for you. |
|
| |
|
Elite Veteran
Posts: 685
Location: Arkansas | thejerseylilly2000 - 2013-06-17 11:53 PM
Brrlracengirl - 2013-06-17 9:23 PM
So I've been wanting to redo my dresser and night stands that have been passed down 3 generations to me... they are an old, creamy color with gold trim and very ornate! I would like to do a distressed/crackle red look with hints of black on top... any suggestions as to how I can accomplish this?? I don't have time to start it too soon, but would like to start planning... I am also almost afraid to do anything to them out of fear of making them look worse
My suggestion is go buy a small bottle of the crackle medium and small bottles of whatever paint color you want and play with it on something that doesn't matter. I have tried crackle and wasn't happy at all with the results. But...play with it anyway...seems like everyone has a different hand when it comes to that and it may work great for you.
sounds like a good idea! would it also work to paint the item black, then put a coat or two of deep red on top and just lightly sand to allow the black to show through?? |
|
| |
|
 Extreme Veteran
Posts: 480
Location: Oklahoma | I recently began working on an old dresser. I originally planned to stain the drawers and paint the sides and top, but when I got the old paint off, I found there was too much filler on the drawers for them to stain nicely, so I decided to do the paper bag finish. The two larger drawers turned out great, but the small ones have some places where it looks as though the stain I used bled through the Modpodge. What would cause that to happen? Maybe put on more coats of Modpodge? I think I will scrape it all off and try again. Any tips for better luck? |
|
| |
|
Lover of Old Things
Posts: 989
Location: South East Texas | Brrlracengirl - 2013-06-18 8:24 PM
thejerseylilly2000 - 2013-06-17 11:53 PM
Brrlracengirl - 2013-06-17 9:23 PM
So I've been wanting to redo my dresser and night stands that have been passed down 3 generations to me... they are an old, creamy color with gold trim and very ornate! I would like to do a distressed/crackle red look with hints of black on top... any suggestions as to how I can accomplish this?? I don't have time to start it too soon, but would like to start planning... I am also almost afraid to do anything to them out of fear of making them look worse
My suggestion is go buy a small bottle of the crackle medium and small bottles of whatever paint color you want and play with it on something that doesn't matter. I have tried crackle and wasn't happy at all with the results. But...play with it anyway...seems like everyone has a different hand when it comes to that and it may work great for you.
sounds like a good idea! would it also work to paint the item black, then put a coat or two of deep red on top and just lightly sand to allow the black to show through??
Yes you can sure do that. |
|
| |
|
Lover of Old Things
Posts: 989
Location: South East Texas | ibracin - 2013-06-19 10:20 AM
I recently began working on an old dresser. I originally planned to stain the drawers and paint the sides and top, but when I got the old paint off, I found there was too much filler on the drawers for them to stain nicely, so I decided to do the paper bag finish. The two larger drawers turned out great, but the small ones have some places where it looks as though the stain I used bled through the Modpodge. What would cause that to happen? Maybe put on more coats of Modpodge? I think I will scrape it all off and try again. Any tips for better luck?
I've had that happen a couple times too. And have started putting a really good layer of mod podge on after the first initial "gluing it on" is dry. Seems to help keep that from happening. |
|
| |
|
 A Somebody to Everybody
Posts: 41354

Location: Under The Big Sky Of Texas | thejerseylilly2000 - 2013-06-17 3:20 PM Ok...here's the latest pictures of the dresser. Cutting the picture to fit.... Picture layed out on the drawers final placement before glueing them on. One small trim piece I almost forgot to strip the paint off of and add. Had to dig paint out of the creases wth a kitchen knife. FINISHED!!!! :))
That is AWWWSOME, I love it  |
|
| |