|
|
 Lover of Old Things
Posts: 989
  
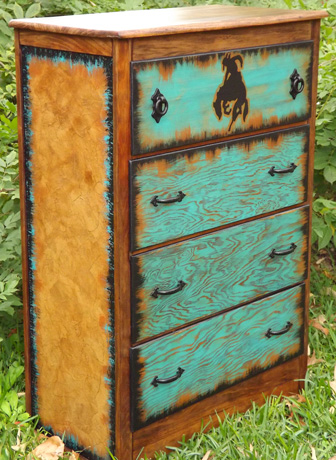
Location: South East Texas | This is my latest piece. I'm loving it....almost want to keep it instead of letting it go. LOL The drawers weren't all the same wood. Why I have no idea. So....even tho they weren't, I couldn't help playing with that wood grain. And I love how it turned out. Probably won't ever be able to repeat this affect. I started out calling this piece "The Ugly Duckling"......now that it's finished it's named, "Let 'er Buck"
 (2013-11-16-before.jpg) (2013-11-16-before.jpg)
 (2013-11-16-002.jpg) (2013-11-16-002.jpg)
Attachments
----------------
 2013-11-16-before.jpg (98KB - 313 downloads) 2013-11-16-before.jpg (98KB - 313 downloads)
2013-11-16-002.jpg (98KB - 305 downloads)
|
|
| |
|
  Angel in a Sorrel Coat
Posts: 16030
 
Location: In a happy place | Aaaawwwwwww! I love it! |
|
| |
|
Veteran
Posts: 116
| I love it!!! What did you do on the drawers? Awesome!!!! |
|
| |
|
Lover of Old Things
Posts: 989
Location: South East Texas | I painted them then went over them lightly with the sander. The wood grain that you see is a tad higher than where the paint stayed. Very slight difference but enough so that sanding took it off on the rippled grain. The top drawer was totally different wood.
Edited by thejerseylilly2000 2013-11-18 10:05 PM
|
|
| |
|
 The Rose of Rodeo...
Posts: 2560

Location: Where we still run to look when the siren goes by. | What or how do you fill in the holes made by the previous drawer pulls?
|
|
| |
|
 Looking for Lady Jockey
Posts: 3747
Location: Rodeos or Baseball games | Love it!!!!  |
|
| |
|
 Bye-Bye Jiggle
Posts: 1691
Location: Where ever there's sunshine! | I'm starting on my first project this weekend. It's nothing fancy, but fter seeing all of your work I'm extremely excited! Thanks for sharing you talent and knowledge. |
|
| |
|
Lover of Old Things
Posts: 989
Location: South East Texas | Rodeo Rose...sometimes I'm able to use existing holes...sometimes not. If I fill the holes I use Elmer's wood filler then sand smooth. |
|
| |
|
Lover of Old Things
Posts: 989
Location: South East Texas | BleuIdGrl please share before and after pictures here on this thread, would love to see more of other people's projects. |
|
| |
|
Bye-Bye Jiggle
Posts: 1691
Location: Where ever there's sunshine! | thejerseylilly2000 - 2013-11-16 10:48 AM
This is my latest piece. I'm loving it....almost want to keep it instead of letting it go. LOL The drawers weren't all the same wood. Why I have no idea. So....even tho they weren't, I couldn't help playing with that wood grain. And I love how it turned out. Probably won't ever be able to repeat this affect. I started out calling this piece "The Ugly Duckling"......now that it's finished it's named, "Let 'er Buck"
How did you sand this piece and not lose the depth in the grooves? I would have thought sanding it wouls have made it a smooth surface? |
|
| |
|
Lover of Old Things
Posts: 989
Location: South East Texas | Just very different grain than you normally come across. I sanded the piece down before I painted...then a light sanding afterward. Weird deal...that's why I said I won't ever be able to repeat this technique. |
|
| |
|
Bye-Bye Jiggle
Posts: 1691
Location: Where ever there's sunshine! | thejerseylilly2000 - 2013-11-23 11:16 PM
Just very different grain than you normally come across. I sanded the piece down before I painted...then a light sanding afterward. Weird deal...that's why I said I won't ever be able to repeat this technique.
Just wanted to check. It looks amazing! I love your work! |
|
| |
|
Bye-Bye Jiggle
Posts: 1691
Location: Where ever there's sunshine! | ok, I want to be able to see the wood, but I want to put a red colored finish(?) on it and do some stenciling. How would I go about this? Do i finish it first, add the stencil and then go over with a polyurethane? |
|
| |
|
The Rose of Rodeo...
Posts: 2560
Location: Where we still run to look when the siren goes by. | thejerseylilly2000 - 2013-11-23 3:41 PM Rodeo Rose...sometimes I'm able to use existing holes...sometimes not. If I fill the holes I use Elmer's wood filler then sand smooth.
Thank you I will try that! |
|
| |
|
Lover of Old Things
Posts: 989
Location: South East Texas | BleuIdGrl - 2013-11-24 1:08 PM
ok, I want to be able to see the wood, but I want to put a red colored finish(?) on it and do some stenciling. How would I go about this? Do i finish it first, add the stencil and then go over with a polyurethane?
Do your stenciling first...then stain then finish. If you try to put stenciling on over the finish it most likely will smear around with the brush strokes when you try to put finish over it. (Speaking from experience ;) |
|
| |
|
Expert
Posts: 1409
Location: Oklahoma | Where do u get your stencils from i cant seem to find any. Thanks |
|
| |
|
Lover of Old Things
Posts: 989
Location: South East Texas | I get new ones at Hobby Lobby, Michaels, JoAnn's, the a big majority I've picked up at thrift stores and yard sales. |
|
| |
|
Lover of Old Things
Posts: 989
Location: South East Texas | I have been super super busy with some pieces for Christmas....I will get pictures up as soon as the holiday is over. Don't want to ruin any surprises ;) |
|
| |
|
Elite Veteran
Posts: 602
Location: out in Oklahoma | I have ran in to a spot on my furniture remake where I need some advice. I have a few small cut out images that I have placed on the surface of my table thing but they do not take up the entire surface, they are just accent images. I have used mod podge to put the images on and seal them but where I run in to my confusion is; Do I need to use a layer of modpodge over the entire surface of the table or just over the images? There are small shiny spots left around the edges of the images and im curious if the poly sealer will even that out when I put it on or if I just need to do a layer of modpodge over the surface to make it look even? |
|
| |
|
I Eat Like a Normal Person
Posts: 3400
Location: Kansas | I have a wooden sled that I used as a litle girl. It's 50+ years old, and is still in good shape, however it's been out in the barn for years. What is the best thing to clean the wood with that won't ruin what finish and decals are left? I'm sure the mice have been around it, but it's not stained, chewed, or damaged....just dusty/dirty. Thanks! |
|
| |